Learn how to easily output requirements and assets in either HTML, PDF, or as Microsoft Word documents.
Continue readingModern Requirements Admin Panel
Learn how to effectively use the Modern Requirements admin panel to take full control of your project.
Continue readingReusing Requirements
Requirements Reuse: An Effective Way to Facilitate Requirements Elicitation
Learn how to Reuse Requirements in Azure DevOps

Azure DevOps is an incredible platform that provides a single-source of truth.
For many teams that statement alone is enough to consider using the world’s leading ALM platform for their requirements management. Being able to tie development tasks to requirements, and those to Test Cases is hard to pass up.
But what if you don’t need all of the features of a full ALM platform?
What if you only need a solution for your Requirements Management needs?
You can use all of the rich features of Modern Requirements4DevOps to turn your Azure DevOps project into a full-featured Requirements Management solution. One of these features is the ability to reuse requirements across different projects, collections, and servers using the Modern Requirements4DevOps Reuse tool.
Looking to reuse requirements?
You’re in the right place.
What you’ll learn in this short article:
- Benefits of reusing requirements
- The two types of reusing requirements
- How reusing requirements can be used effectively
The Benefits of Reusing Requirements
When we talk about the benefits of requirements reuse there is one thing that needs to be addressed first.
The most common question I get from hardware teams is “How could this possibly benefit teams who aren’t software-related?”
So before we begin, requirements reuse is not just for software teams.
Requirements reuse is a topic that often catches people’s attention.
This is because in the world economy we are seeing companies focusing on given domain or areas within given industries. This leads to companies building products within a specific domain, or around a given solution, and really narrowing in on the few things they can be really successful at.
This means that as you build projects, solutions, or systems, often a team can reuse elements of a previous project. This is where requirements reuse fits into the picture.
By enabling a team to reuse those requirements in the next project they are able to reduce the amount of overhead required in getting started in a new project.
For some people this might already be obvious.
What might not be obvious, however, is that reuse can also be a great way of handling requirements that are scoped above the project level. This would include non-functional requirements, or risks that need to be considered as a company-wide mandate. This would even go so far as to allow your team to reuse requirements whose purpose is strictly regulatory or compliance-centric. This functionality can be extended to software and hardware teams alike and can even help teams product teams devoted to a physical component or deliverable.
The Two Types of Reusing Requirements
Reusing Requirements by Reference
Reusing requirements by reference is a quick way to introduce existing requirements to your project by simply building links with them. By doing this, you could have direct access to those work items and review all the associated content, links, and attachments without actually copying them within or across projects.
Reusing Requirements by Reference
Reusing Requirements by Copy
In Azure DevOps there is very limited functionality for copying requirements, or other work items, from one project to another. But when you add Modern Requirements4DevOps into your Azure DevOps environment, requirements reuse meets its full potential.
When discussing the Reusing Requirements by Copy, there are three major approaches to consider.
Reusing Requirements by Copy
How to Reuse Requirements Effectively
After watching the above videos it is obvious that the Modern Requirements4DevOps Reuse tool is effective for reusing requirements.
It offers full control over the requirements you are choosing to reuse, allows you to apply customization to those requirements, and allows you to link the requirements to the source work item.
This means no matter where you want to send requirements, you can do so using the Modern Requirements4DevOps Reuse tool. But there are some ways that you can use the Reuse tool more effectively.
The first notable mention is by pairing the reuse tool with the Modern Requirements4DevOps Baseline tool.
What is a Baseline?
Many teams use Baselines of requirements and don’t even realize they do.
A Baseline is a snapshot of Work Items at a given point in time.
For many teams they simply use Microsoft Word document versions as a baseline.
When talking about capturing requirements at a given time, there are many reasons why the Modern Requirements4DevOps feature is better than the traditional Microsoft Word approach. With Modern Requirements4DevOps Baselines, you are able to capture a set of, work items as they were on any date of your choosing.
This means if you want to capture your requirements as they are two weeks ago, you can easily create a Baseline for those requirements on that date. This lends itself directly to the benefits of the Reuse tool added by Modern Requirements4DevOps.
By combining the Reuse tool with our Baseline, you can not only choose the set of requirements you want to reuse but also the version of those requirements as well. This allows you to take the best and most applicable version of your requirements forward to your next project.
The next notable mention is to use the prefix / postfix / and other operations effectively when reusing requirements.
When reusing requirements, the Modern Requirements4DevOps Reuse tool allows you to customize how the requirements being reused will appear in their destination project.
The screen which allows you to do this can be seen below:
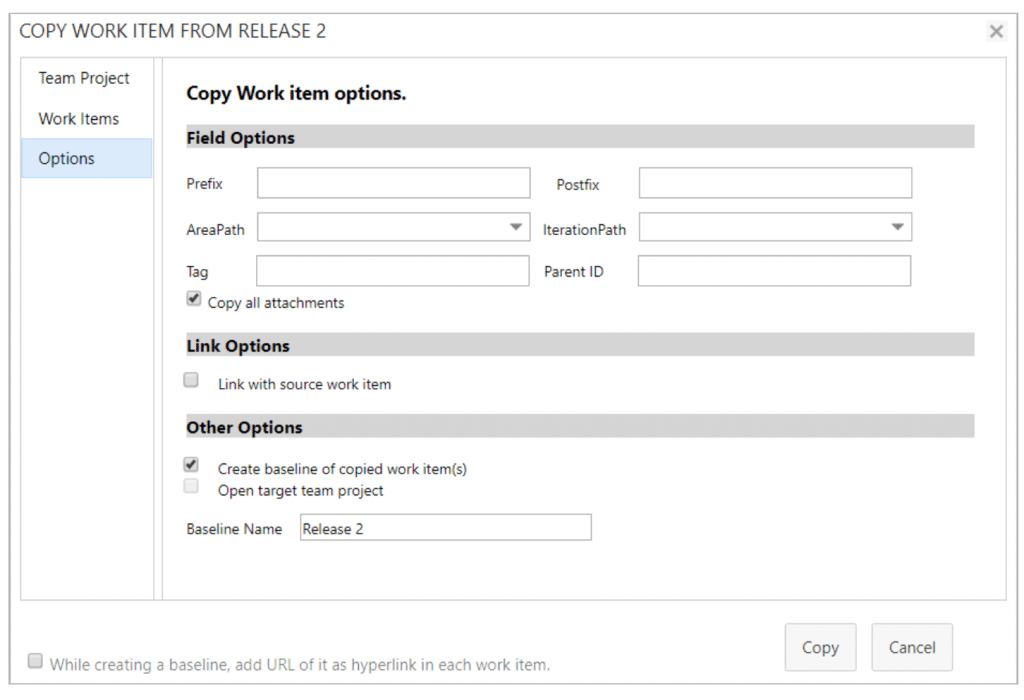
Using the above feature will allow you to easily add a prefix or postfix to the requirements once they reach your chosen destination project. As seen above, you can also choose to send these requirements to a specific area path (like hardware or software for instance), or even into a given iteration so you can decide when these requirements get handled.
The most commonly used feature in the field options, however, is the ability to add a tag.
Often when you are sending requirements from one project to another you want to be able to easily identify and trace those requirements in your destination project. Adding a Tag will allow you to do this.
What is the link with Source Work Item Option?
This option allows you to establish a link between the work item you are reusing and the work item you create in your destination project.
What link does it create?
It links your new destination work item to your original work item via the “Related” link or any link type that you have configured in the admin area.
In the below image you can see a Test Case I have copied from project to project, using both the prefix “CL- ” and the “Link to source work item” options set.
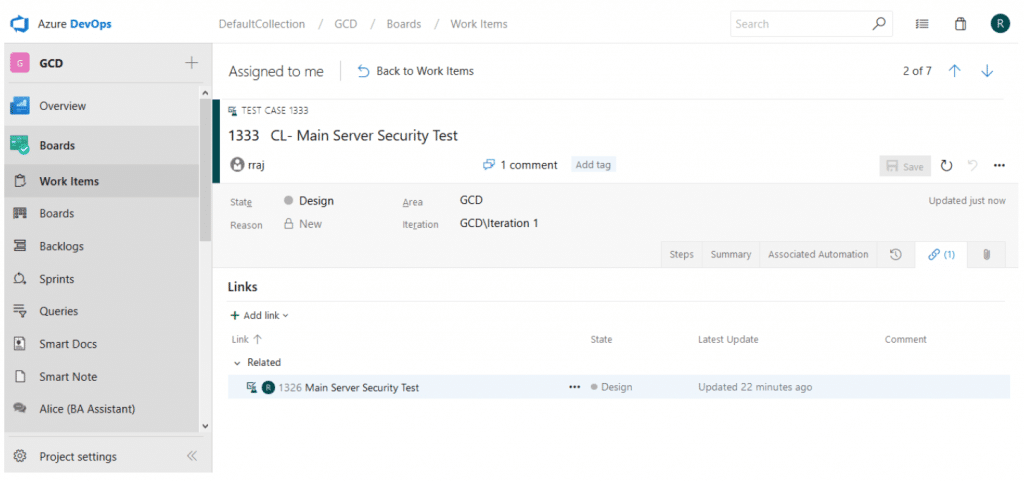
Using the “Link to source work item” feature allows you to easily trace requirements back to where they were pulled from. While there are many use cases for this feature when moving requirements directly from project to project, this more advanced use cases are for when you are moving requirements from a library or repository into a project instead.
How to merge copied baselines?
Baseline is a very useful tool no matter you want to reuse a single work item or a long list of work items from your source project/library. In Modern Requirements, you could create links between your source and copied works items so that you could locate the origins of these copied work items.
Although there are links in between, the copied work items are still considered to be independent of the source work items, which means any changes you make to either the copied or source work items will not impact their counterpart.
You might want to ask: how to synchronize the changes when necessary? Assume you have a library where all your design specification work items are saved, and you have reused them in 5 different projects. If now you have to modify some designs in the library, and you want all copied design specifications to be synchronized, you can simply use the Merge functionality, which is located under Source Copied Baseline(s) or Target Copied Baseline(s) in the Details tab of the Baseline module.
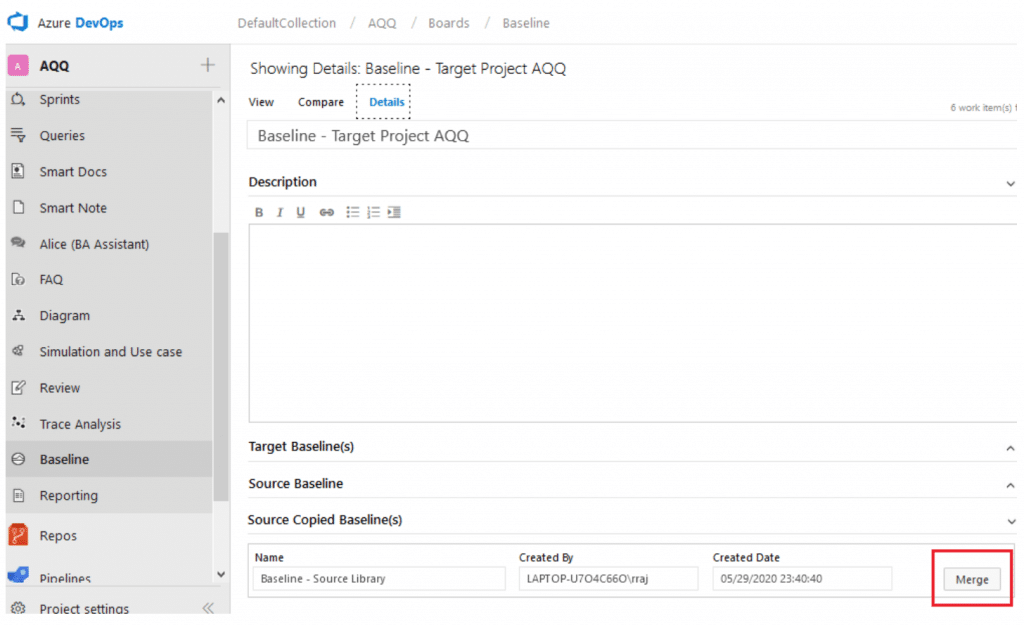
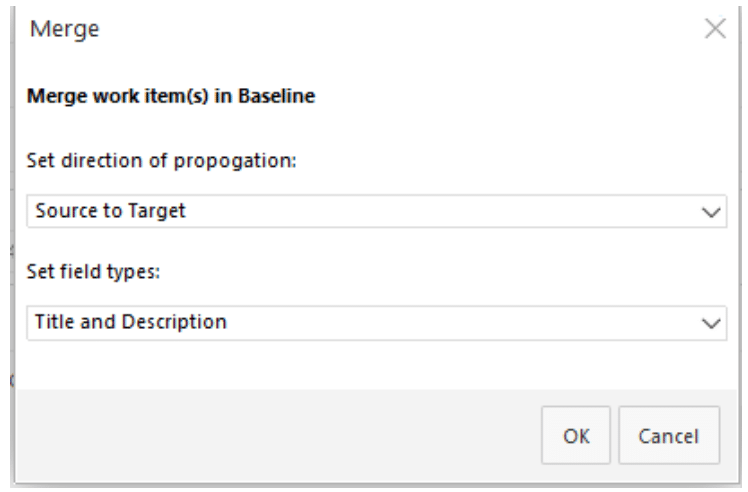
Still remember the definition of a baseline? A snapshot of selected work items at a point in time. So no matter what changes we have made to the baselined work items, the saved snapshot won’t change. So even if we have merged the baselines, the changes are done against the latest versions of the work items, not to the baselines themselves. Sounds like a little bit hard to understand?
Please watch the 5-minute Merge Copied Baselines video.
Merge Copied Baselines
Want to experience reuse's full potential?
Try Modern Requirements4DevOps for free today.
We offer you the ability to try our Requirements Management solution in your own Azure DevOps environment, or in an environment we supply that includes sample data.
Importing Requirements to Azure DevOps
Importing Requirements into Azure DevOps
Learn how to easily import requirements (and some assets) into your ADO project

When moving to Azure DevOps, or when working offline away from your existing Azure DevOps project, you need a way to bring your newly created requirements into Azure DevOps.
Many teams face the issue of getting the requirements they have created in Excel, Word, and elsewhere into Azure DevOps. Luckily there are a few simple ways to do this without having to worry about adding a lengthy copy/paste session to your process!
In this article, we’ll cover a few different ways to import requirements.
One of these options is free, and some are features provided by adding Modern Requirements4DevOps to your Azure DevOps project.
The topics in this article are as follows:
- Importing Requirements from Microsoft Excel
- Importing Requirements from Microsoft Word
- Importing Diagrams and Mockups into Azure DevOps
Importing Requirements from Microsoft Excel
Whether you have all or some of your existing requirements in Excel, or you are looking to export requirements from an in-house tool to a .csv file, there is a free way to import your requirements to your Azure DevOps project.
This is a free solution – provided you already have Azure DevOps and Excel.
The first step is to make sure you have the Microsoft Excel add-in called “Team tab.”
You can download this add-in directly from the link below:
https://go.microsoft.com/fwlink/?LinkId=691127
If you clicked the link above, you will have the ability to turn on your Excel team tab.
When enabled, this extension allows you to connect an Excel sheet directly to a given project in your Azure DevOps Organization.
When you enable it you will have two primary functions available to you:
1) You will be able to publish requirements to your project from Excel
2) You will be able to pull requirements from your project to Excel
This means you can work on your requirements from either interface and connect the changes to your project. i.e. if you pull requirements into Excel and make changes, you can publish those changes backup to your requirements in your project.
After you have run the installer you downloaded you are ready to enable the extension.
Enabling the Team tab in Excel:
- Open Excel
- Create a Blank Sheet
- Click File
- Click Options
- Click Add-ins
- Choose COM Add-ins from the drop down near the bottom of the window
- Select “Team Foundation Add-In and select Okay.
Using the Excel Team tab
In this video, we cover how your team can use the Import capabilities provided by the Excel Team tab Add-in.
Importing Requirements from Microsoft Word
The second way to import requirements into your project is through Microsoft Word.
This feature is a “Preview Feature” available with any Enterprise Plus Modern Requirements4DevOps license. This means any user in your organization with an Enterprise Plus license will be be able to access and use the Word Import Feature.
If you aren’t currently using Modern Requirements4DevOps, you can try this Word Import Feature by trying Modern Requirements4DevOps today!
So how does Word Import work?
Warning: As a Preview Feature, you should expect that this might not be prettiest solution, and will typically require some coding knowledge. But not much – and if you can borrow a developer familiar with xml (or any other scripting language) for 20 minutes, you should be just fine.
Word Import works by having a well-formatted Word document which uses different Headings to represent the different Work Items / Requirements and their properties in your document.
For example, let’s take an example of a BRD you might already have in Word format.
You likely have your Introduction, Overview, Scope, and other context elements using the style of Heading 1.
You might then have your Epics, Features and User Stories in this document as well. Your document might look like this:
Heading 1 – Introduction
-> Paragraph – All of the text for the Introduction goes here…
Heading 1 – Overview
-> Paragraph – All of the text for the Overview goes here…
Heading 1 – Scope
-> Paragraph – All of the text for the Scope goes here…
Heading 1 – Requirements
-> Heading 2 – Name of Epic
–> Heading 3 – Name of Feature
—> Heading 4 – Name of User Story
—-> Paragraph – Description of the User Story above
Now, your document might be a little different but that’s okay. The principles you are about to learn are the same.
Word import requires a document (shown above) and a ruleset (explained below).
Typically an admin will create a ruleset that your team will use for importing documents, and it will only have to be done once. So if you have a document already created and your admin has created a ruleset you’re good to go.
If your admin needs to create a ruleset, read on.
Creating a ruleset is incredibly simple and is done by editing an XML file.
The XML file you create will determine how the Word Import tool parses your document for:
1) Which pieces of the document are work items?
2) Which pieces of the document are properties of a given work item?
If you are working through this in real-time, it might help to download this ruleset file as a starting point and watch the following video:
Using the Sample Ruleset to Start
In this video, we cover how to use the sample ruleset file to import a simple requirements document. Please remember creating a ruleset is typically a one-time process.
Importing Diagrams and Mockups into Azure DevOps
Diagrams, Mockups, and Use Case models can be incredible tools for authoring and eliciting requirements.
This is why with Modern Requirements4DevOps, your team can easily build all of these visualizations directly from within your project. This allows you to benefit from a single-source of truth model where everything is built into your project.
But maybe you already have Diagrams and Mockups that you would like to add to your Azure DevOps project and connect to requirements. Is it possible to import these assets?
The answer is yes.
Both our Mockup tool and our Diagram tool will allow you to easily bring existing Mockups or Diagrams into your Azure DevOps project.
To do this, simply save your asset as a .png or .jpeg file from your chosen Mockup/Diagram tool.
You can then upload your created asset to either the Modern Requirements4DevOp Simulation tool (mockups) or Diagram tool (diagrams).
You might be thinking, but if we upload it as .png or .jpeg then how can we edit our Diagrams and Mockups? Well, you can’t. But there’s a reason you should do this even still.
If you want to connect a single Diagram to 25 requirements without using Modern Requirements, you will have to open all 25 requirements and connect them to each individual requirement.
When you update your Diagram in the future, you will have to reopen all 25 requirements and change the attachment.
With Modern Requirements4DevOps however, you are able to create a Diagram work item that you can link all of your necessary requirements directly to using the right panel. This means you will be able to have your Diagram in one place, and when that Diagram needs updating, you can easily add in your updated image, and connect your attachment to that single work item.
Conclusion
In this article we covered three distinct ways that you can import both requirements and their assets to your Azure DevOps project.
You can import requirements through Excel or Word, or import your existing Diagrams and Mockups.
If you are interested in using Modern Requirements4DevOps to support your requirements management process, consider giving our product a try here!
The FAQ Module
The FAQ Module
The solution for upfront requirements gathering

In this article we cover the features and benefits of the FAQ module.
This module was designed to help teams who gather requirements at the start of their requirements management process. By creating question lists teams can easily capture and reuse their knowledge of the elicitation process to ask the right questions that yield the best requirements.
What is the FAQ module?
The FAQ module is a repository of question lists that your team can construct, edit, change, template, and use to elicit requirements. By using the FAQ module to build up a knowledge base for your team, you can be confident that any team member can engage with stakeholders in an effective manner.
By building the best set of questions on that domain, your team can ensure that they are always eliciting the best possible set of requirements.
The main benefit of this module is that it allows your team the opportunity to build up a knowledge base that can be used by both experienced BA’s, as well as by those who might need to elicit requirements in an unfamiliar domain. The FAQ module comes already stocked with over 3000 questions that cover many different topics.
These topics include multiple ISO Compliance templates, as well as templates on Non-Functional Requirement topics such Scalability, Reusability, or Operability that can be used for elicitation.
For many teams this module will replace their Excel-based question lists they may have used in the past.
To stay in line with the other modules in the Modern Requirements toolset, the FAQ module takes what used to be a disconnected process and connects it directly with your project. This means your teams can easily add requirements into your project simply by supplying answers to the questions in your FAQ question list.
What Value does the FAQ module offer?
The value of our FAQ module can be described in two simple points.
- The FAQ module helps create better requirements by guiding the elicitation process, leading to a greater likelihood of project success.
- The FAQ module reduces the time spent on elicitation throughout your project, allowing your team to get started building sooner.
By using the valuable knowledge of experienced BA’s, you can create domain-specific question templates that help structure the elicitation process. This means you can send any BA of any experience level into a room with a stakeholder and feel confident they will create complete and actionable requirements.
By no longer needing to construct question templates and then copy elicited requirements to your RM tool, your team can move through the elicitation process faster. This means more time spent iterating on more accurate requirements and less time spent copy and pasting user stories that are likely to need more work.
What are the Use Cases for the FAQ module?
When we talk to our community about their use of the FAQ module, they often describe the ways in which this module has streamlined their process and made the elicitation phase of projects easier to navigate.
Even with teams who traditionally don’t use question lists, after joining our community they will tell us how much added value they see from being able to consolidate the knowledge of everyone on their team into one cohesive list.
Here are the Use Cases we have seen for the FAQ module.
USE CASE 1
My team currently gathers requirements up front and moves iteratively through our project thereafter. We currently use Excel during the requirements gathering phase, but it means that we are copying requirements to our tool of choice afterwards.
By being a team who gathers requirements up front, this provides a perfect opportunity to use a question list designed for that domain. But using Excel as a means of facilitating this question list is a recipe for a long copy-paste process later down the road.
Copy/paste processes are generally error-prone and lengthy. It is often during these already long copy/paste processes that a team member will recognize they have missed a property of a work item that they need stakeholder input on.
In this case, using the FAQ module means you will have the question list in your Azure DevOps project already. When you ask your Stakeholder your question you will be able to answer that question in your FAQ question list and it will automatically create a requirement for you.
You can then open that requirement directly and pursue any follow up questions that you might have while you are still with your Stakeholder. This saves time and makes the elicitation process more thorough, while preventing your team from missing opportunities to get the right information at the right moment.
USE CASE 2
My team works in a compliant/regulated space and we need to ensure we are building the full set of requirements to remain compliant and auditable.
One of the best features of the FAQ module is that you can use many of our pre-built compliance-related templates to elicit requirements. Our pre-built templates have been created in partnership with many of our existing customers, as well as through partnerships with thought-leaders in these spaces.
In this case, teams with access to the FAQ module can speak to domain experts and consultants and build the question list that will help them create all the requirements necessary for compliance and regulation. Once created, these question lists can be reused in several projects and can be deployed again and again.
How do I use the FAQ module effectively?
The FAQ module provides incredible benefits for teams inside the elicitation phase of their project. Here are some of the ways you can use the module to facilitate project success.
Use the Pre-built Question List Templates
When users need a template on either Non-Functional Requirements, or on ISO topics, they can get started quickly by using one of our built-in templates. These templates already contain many of the most important questions about these topics. Users can start with a pre-built template and remove questions that are not relevant and/or add in new questions that necessary.
Build your own Question List Templates
If one of our pre-built templates does not satisfy your need, teams can easily build question lists from scratch. By starting with a blank template, your team can easily build up a comprehensive set of questions that make eliciting requirements a simple and more efficient process.
Once a question list is built it can be reused across projects to help with your elicitation phase down the road.
Build Question Lists that less experienced members of your team
By building question lists you are effectively providing guidance for any member who might be less familiar with a domain, solution, or system. These lists are then a great tool for guiding newer BA’s, or experienced BA’s from a different domain, during the elicitation phase. Teams understand that the quality of the questions we ask at the start of a project directly reflect in the quality of the requirements we elicit.
By building question lists with our FAQ module, you can ensure that you are getting the best possible requirements the first time.
MR Services – Email Monitor, Custom ID, Dirty Flag
In this article we cover some of the extra features that are available in the Enterprise Plus edition of Modern Requirements4DevOps. These features are called MR Services.
Continue readingUsing Alice: BA Assistant
This module is an AI-inspired module built to help your team elicit requirements quickly.
Continue readingThe Complete Guide to Non-Functional Requirements (NFR)
How to Make an NFR (Non-Functional Requirement)
Your organization’s NFRs can impact time overruns, user satisfaction, compliance, and many other issues. But knowing how to make an NFR is difficult.
It is hard because building non-functional requirements can be a major point of contention for different teams with different backgrounds and methodologies.
Even then, <customers> can struggle to manage the demands or multiple teams, third-party software limitations, organisational quirks, and other business priorities that can get in the way.
For that reason, this article covers what NFRs are and how to build them, with examples and templates to guide you along.
What is an NFR?
If you open the texting app on your phone, you will notice a few functions. They include texting, emojis, editing contacts, and others. They define what the app does. But these functions work because of several requirements that define how they will work. For example, texting only works if your phone is compatible with all major carriers.
These aspects that define how a system will work by laying out its requirements and limitations are called Non-functional Requirements (NFRs).
They are contrasted with functional requirements, which set the primary function of a system. If the functional requirement of your car is to seat four people in comfort, a non-functional requirement is the size of each headrest.
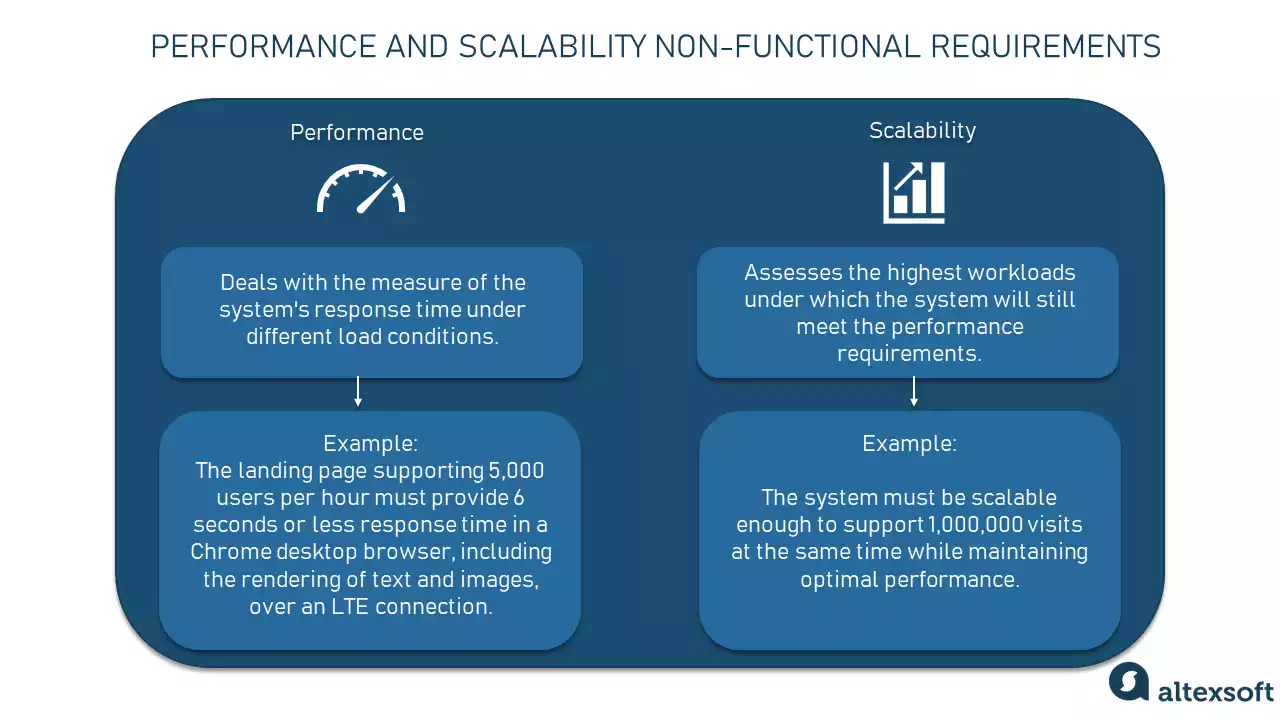
Why Should You Change or Add To Your List of NFR’s?
As time goes on, teams, companies, and stakeholders will notice that their list of non-functional requirements will grow and change. This is expected as the needs of an organization adapt and change.
You may need to add, remove, and change NFRs in response to organizational changes, implementation changes, or even changes in business needs.
Regardless of how small or extensive these changes may be, a team can easily identify how implementing a change might affect their success measures by re-evaluating their NFRs. Teams may notice that a small implementation change could lead to a completely new NFR that will help them identify a project’s success.
As teams continue to expand their list of non-functional requirements, you might be wondering how do they keep this expanding NFR list organized?
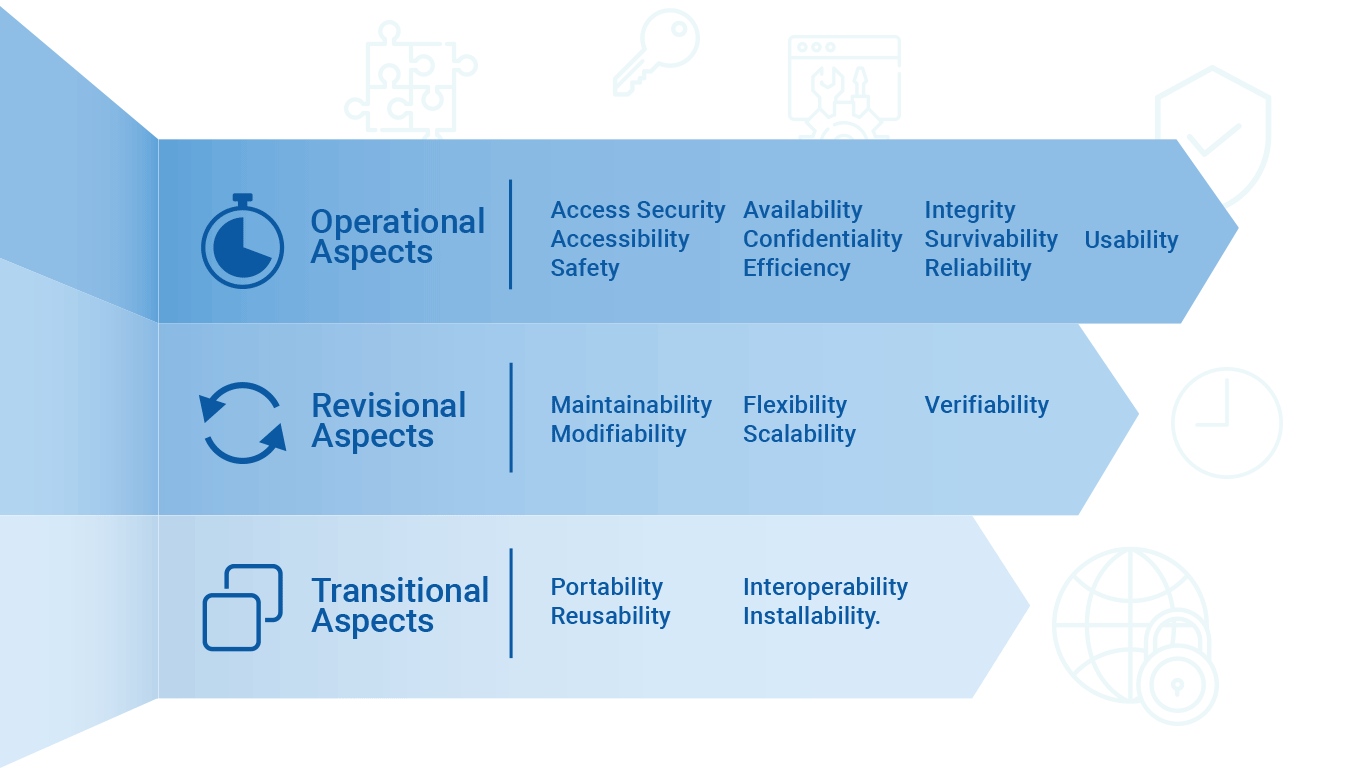
Teams keep their NFR’s organized by using categories with which they can evaluate overall success. A typical grouping of non-functional requirements would be:
Operational NFRs, like security, accessibility, and usability
Revisional NFRs, like flexibility and scalability
Transitional: NFRs, like portability, reusability, and interoperability
Step 1: How Do You Define Project Attributes Using Non-Functional Requirements?
When setting up a project’s requirements, you must set the following conditions:
Aim
A best practice when setting NFRs is establishing measurement benchmarks. But what do your measurement benchmarks (e.g., headrest size) work towards? Ultimately, any requirement has to work towards fulfilling larger business objectives.
These objectives can be very specific, like hitting quarterly revenue targets. Sometimes they can also be less empirical, like building a brand. In both cases, your NFRs should work towards fulfilling your company’s business needs.
Scope
Unlike their functional counterparts, non-functional requirements cover an incredibly broad scope. In defining the overall qualities, a project, system, or process should exhibit, the list of non-functional requirements can grow very large
While these non-functional requirements might not “do anything specifically,” they do specify the attributes a system, process, or project must have on completion. You can then use these non-functional requirements to measure the overall success of a given project, process, or system, and provide measurable insights into how close to completion our project might be.
Step 2 - For Which Project Attribute Are You Building an NFR?
When building non-functional requirements, the first thing a team must consider is whether they are tackling the NFR’s that are relevant to the project. This makes the first step of the process simple.
Identify the project attribute for which you want to build success indicators. Here’s a more exhaustive
breakdown some of the Operational, Revisional, and Transitional aspects of a project.
Operational attributes:
- Security
- Accessibility
- Efficiency
- Reliability
- Survivability
- Usability
- Availability
- Confidentiality
- Integrity
- Safety
Revisional attributes:
- Flexibility
- Maintainability
- Modifiability
- Scalability
- Verifiability
Transitional attributes:
- Installability
- Interoperability
- Portability
- Reusability
Typically, business analysts, developers, and project stakeholders develop and refine NFRs.You can tune NFRs to be product oriented, addressing specific attributes such as performance (like processor speed on a phone) or the project’s costs.
Some NFRs are created to address criteria like product longevity and growth, which are based on attributes like the modifiability of a product. Other non-functional requirements could be process facing attributes that define aspects of a product such as its reusability.
Each of these non-functional requirements will fall into either the Operational, Revisional, or Transitional categories respectively.
The next step after deciding the actionable attribute is learning how to make an NFR.
Step 3 - How to Make an NFR
- What are you measuring? Is it an application, a system, a project, or a process?
- What attribute are you measuring? Is it scalability, maintainability, security, or something else?
- What is your goal?
- What metrics are you using to determine success?
- “The system should be scalable to 10,000 users within the next 2 years.”
- “The application should be scalable to handle 10,000 concurrent logins per minute”
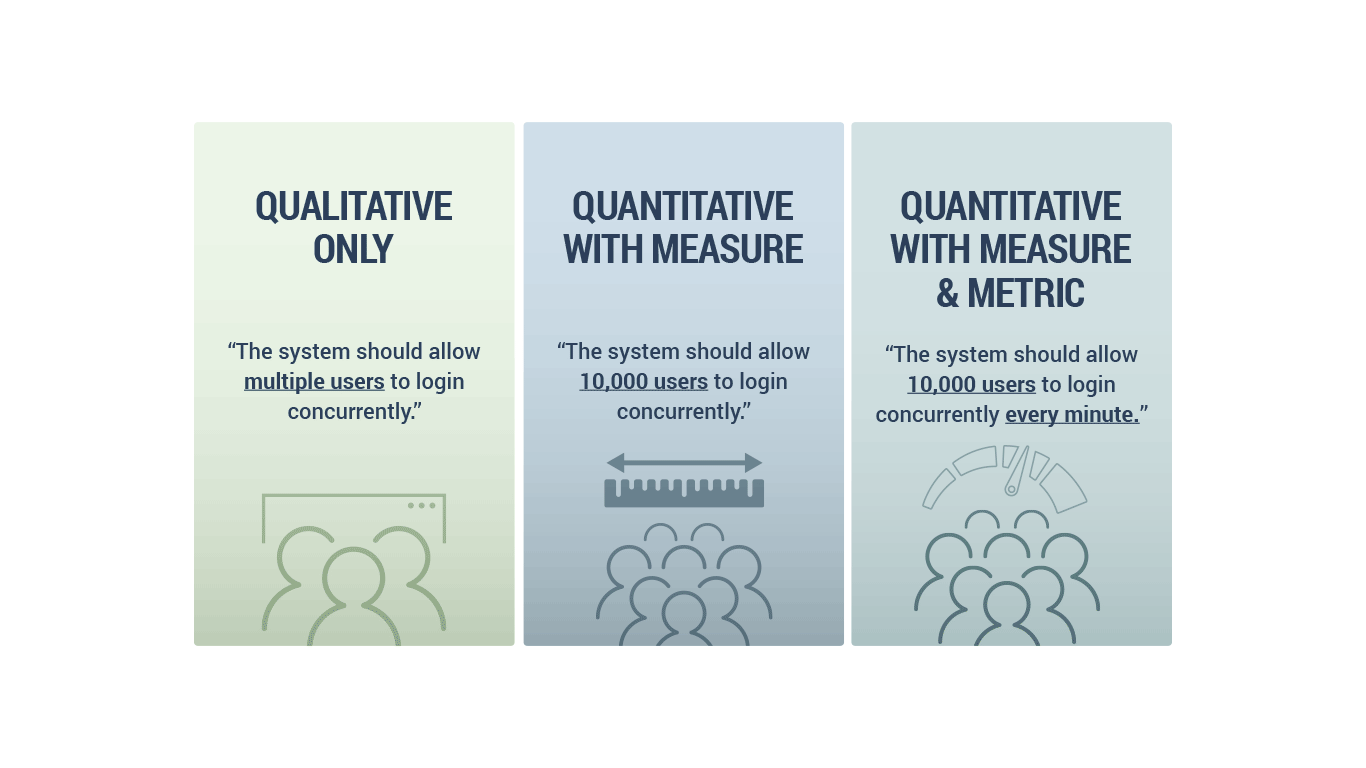
You can also build a non-functional requirement using an operational attribute like reliability.
As always, operational attributes of a project are concerned directly with the operational functions of the project from both the system and the user’s perspective. Reliability here refers to a system’s ability to consistently perform to its specification within its intended environment.
As we are trying to establish an NFR for our system, understanding that this is an operational attribute helps us understand how we can make our NFR measurable to make it achievable.
This requires the application of both a measure and a metric where possible. Some common examples of a metric that would apply to reliability is mean time to failure, probability of failure, or a level of uptime per degree of time.
If we wanted to create a reliability non-functional requirement using our NFR template, we can ask the following questions with their respective answers
- Whatare you measuring?
“We are measuring a system.” - What attribute(s) are you measuring?
“We are measuring reliability.” - What is the goal?
“We want 100% uptime in the first year.” - What are the measures and metrics you are using to determine the goals success?
“Our measure is 100% uptime, our metric is uptime/first year.”
You can condense these answers into one statement:
“The system should be operational so that we see a 100% uptime for the first year of operation in order to meet our 1-year performance guarantee.”
Adding some more information about why this NFR has these criteria as above is option. But it can be helpful to link an NFR to an initiative in order give it more context.
Despite the template, it’s always possible to forget to add non-functional requirements. You should take appropriate caution in that case.
How Non-Functional Requirements Help with Standardization
There are many instances where regulatory and compliance issues require the creation of NFRs.
For instance, in the highly regulated medical devices industry, confidentiality (an operational attribute) is paramount .
Specific requirements have been well defined by The International Organization for Standardization (ISO). These well-defined non-functional requirements must be strictly adhered to during the development of any medical device.
Let’s take a look at how these ISO-mandated requirements are categorized, and discuss some tools used to build compliant NFR’s quickly and easily.
ISO 13485 – Medical Devices –Quality Management Systems – are comprised of NFRs based on:
- Management Controls
- Product Planning
- Quality Process Evaluation
- Resource Control
- Feedback Control
ISO 14971: 2007 – Medical Devices – Application of Risk Management to Medical Devices – are requirements related to:
- Management Responsibilities
- Risk Analysis Process
- Risk Control
- Risk Management Process
- Risk Management Report
Tools for Building Effective NFR’s
Due to the broad and complex nature of NFRs, even creating examples of non-functional requirements is a difficult task. This can be especially true for novice business analysts (BAs) and even for veteran BAs who are gathering non-functional requirements in an unfamiliar space.
The elicitation of the correct NFRs is integral to asking the right questions. To do so, BAs must use social science derived data-gathering techniques like interviews, focus groups, surveys, brainstorming, and more

The next step isn’t much easier. Coming up with an example is an issue that many novice business analysts (BAs) face. Even veteran BAs are gathering non-functional requirements in an unfamiliar space can struggle.
But by using cutting-edge tools like Modern Requirements4DevOps, you can assist users with elicitation, authoring, and management of non-functional requirements.
Modern Requirements4DevOps’ FAQ module enables users with the ability to review focused question lists based on specific attributes of each of the four aspects of a project. These question lists provide the user with examples of questions that can be asked to elicit strong non-functional requirements based on each attribute.
The tool is preloaded with over 2500 questions found within 29 topics. By answering questions, users are building their non-functional requirements. Stakeholders can answer questions using existing backlog work items. Or users can create new backlog items right from within the module. They also have the freedom to make new questions and build their own custom question lists.
Interested in seeing for yourself?
Try Modern Requirements4DevOps today and build non-functional requirements using pre-built question lists that address topics such as ISO compliance, and more.
Experience for yourself how our Modern Requirements toolbox can empower Microsoft’s industry leading Azure DevOps into a single application requirements management solution.
Time to Read: 15 minutes
Author: Arunabh Satpathy
Configuring MR Agent/ Services Tab
Configuring Modern Requirements4DevOps using the MR Agent/ Services Tab
In this article we cover how to configure the MR Agent / Services Tab in MR4DevOps. The Services Tab currently offers users 3 additional features to any project using Azure DevOps Service (formerly VSTS).

Time to Read: 25 Minutes
Using the Services Tab to configure
Modern Requirements4DevOps
MR Services (formerly called MR Agent) is one of the components of Modern Requirements4DevOps that is automatically installed with the main application. It’s a framework that provides extensibility to Azure DevOps using triggers.
IMPORTANT:
Please note that MR Services are only accessible with AZURE DEVOPS Services using LIVE/PUBLIC IP to communicate with VSTS (Azure DevOps services). If any machine has no public access than VSTS Azure DevOps services could not be used (as they require public access to communicate with machine). Users are advised to contact their Network Administrators to change the value to the live IP address of their machines including the relevant port.
Currently, MR Services (MR Agent) has the following three sub components:
- Custom ID
- Dirty Flag
- Email Monitor
Proper user authentication is required before any of these components are configured. The config files of any of the components won’t work unless the relevant organization (in Azure DevOps) or collection (in TFS) is registered using authentication.
MR Services User Authentication
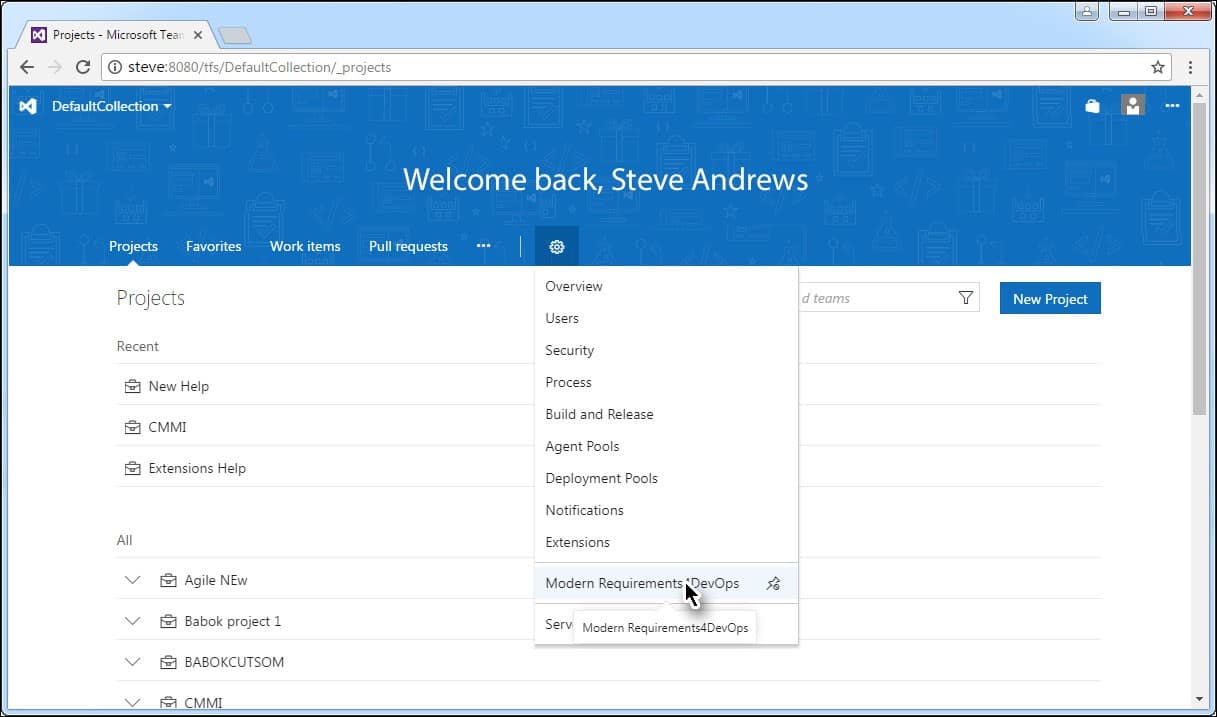
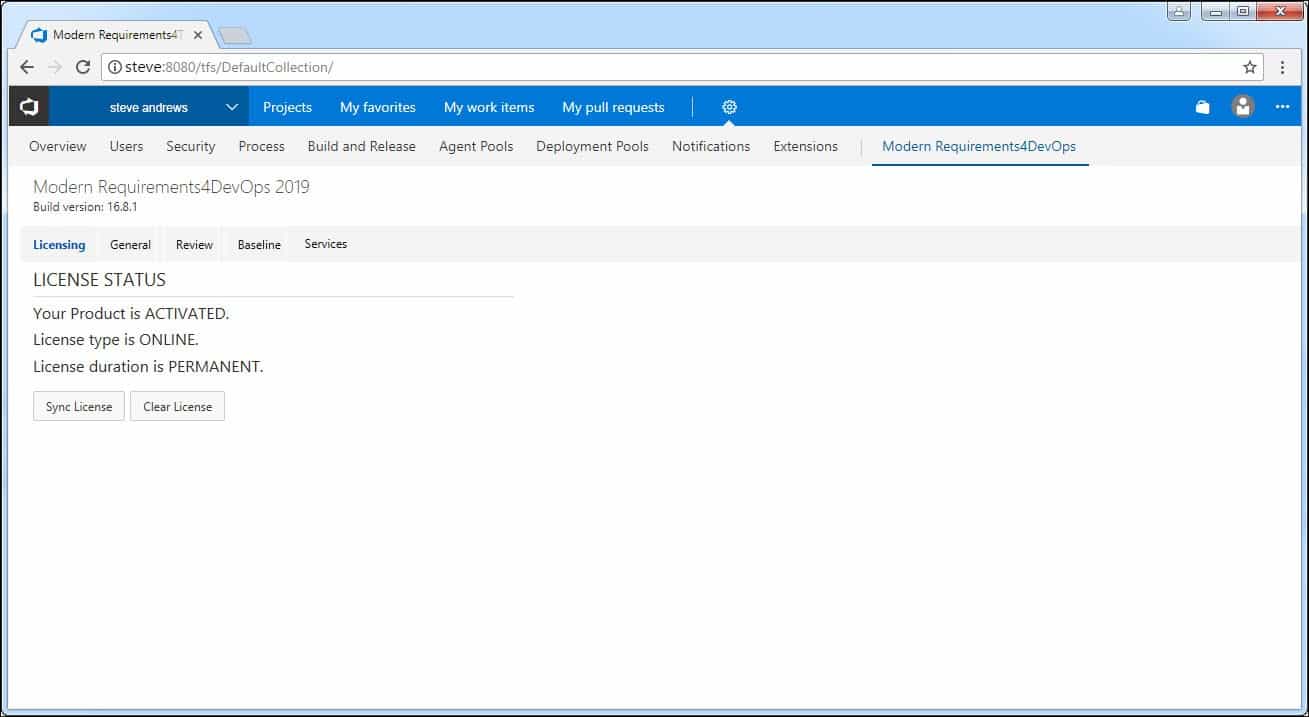
- Launch the embedded version of the application and select the Modern Requirements4DevOps option under the Settings tab.
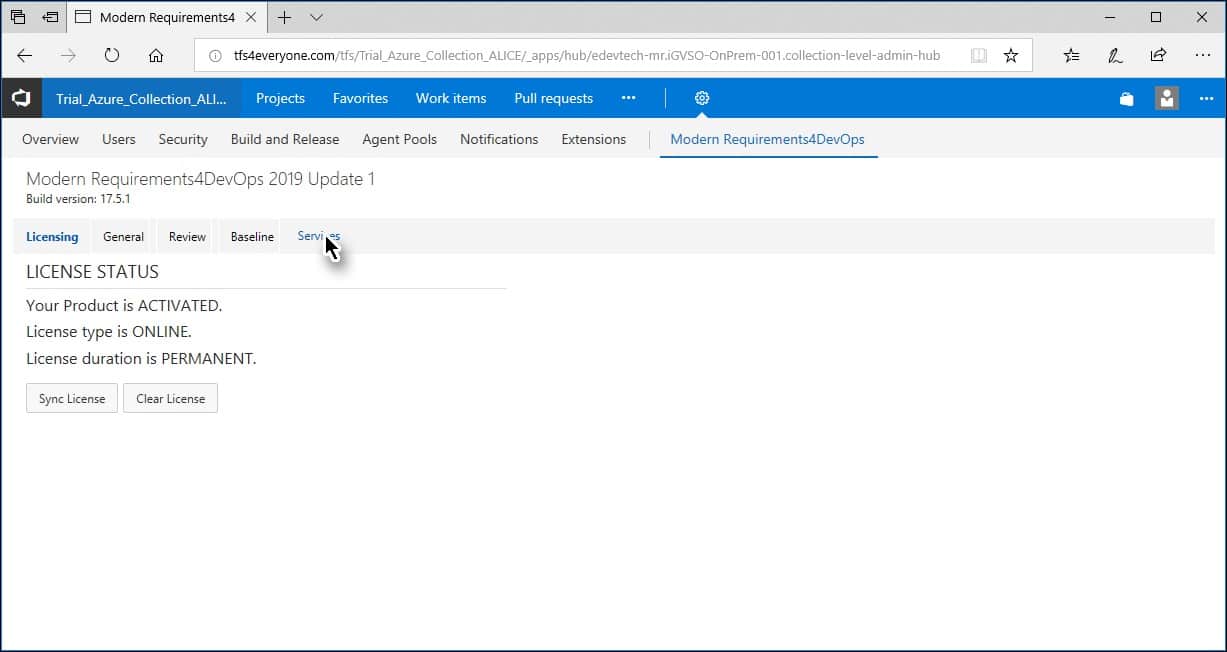
The Admin panel is displayed. - Click the Services tab.
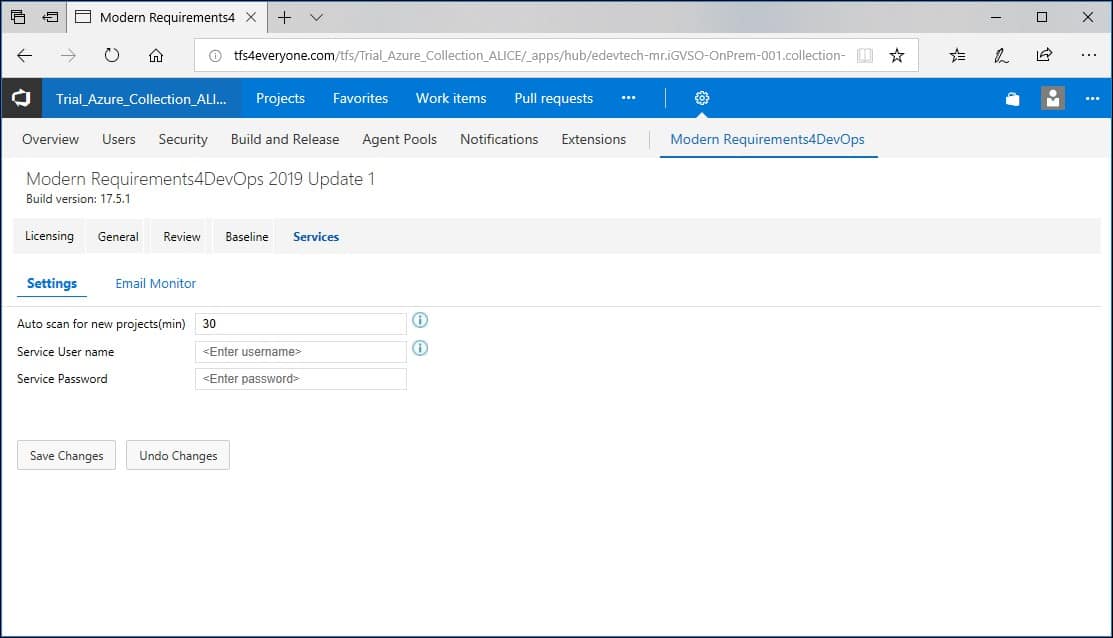
The options for Services Tab are displayed.
The Settings sub-tab deals with two options:
- Setting time interval to Scan the Azure DevOps organization (or TFS Collection) for new projects
- Registration of the current organization (Admin user credentials are required for this option)
Note: Enter values for both of these settings in one go. Users can’t choose to configure one setting while leave the other pending.
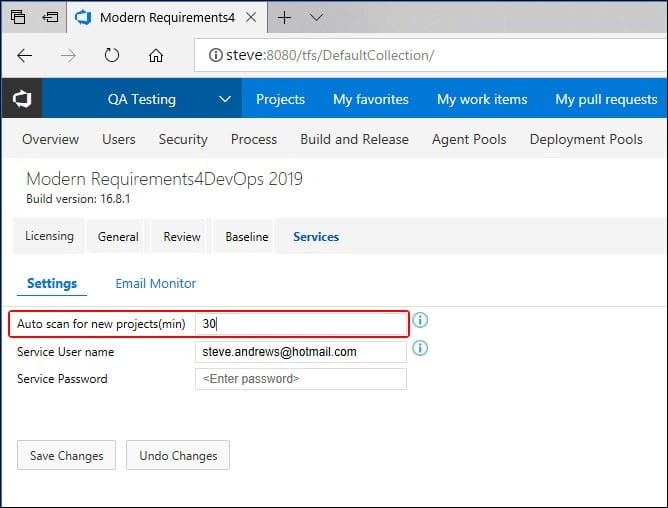
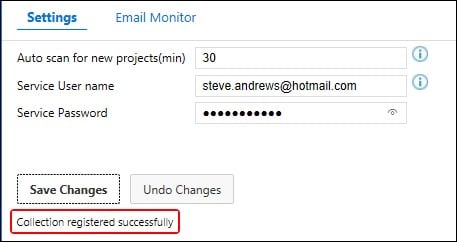
Enter time interval for Auto Scan (should be between 1 and 60).
This value determines the interval in minutes after which the registered Azure DevOps organization would be scanned for new projects.
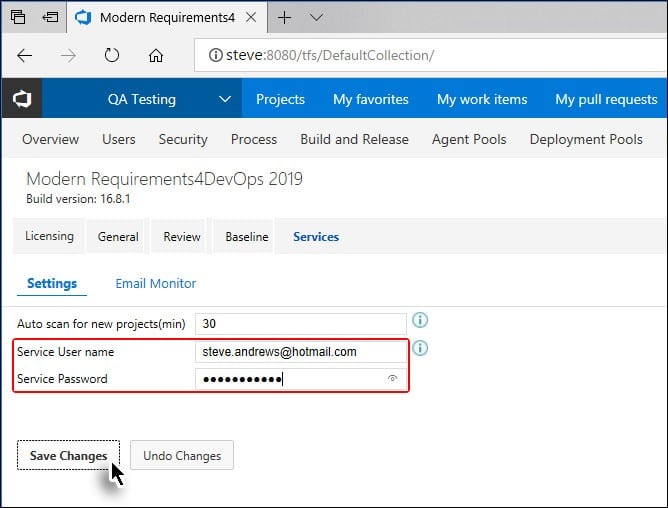
- Provide authorized login credentials. (with TFS admin rights).
On successful authentication, current organization is registered and a confirmation message is displayed.
Manually Identifying a new project in your Azure DevOps Organization
The above section elaborated the process to customize the automatic scanning time for the Azure DevOps Organization. The value shown in the above image means that the organization would be scanned every 30 minutes for the new project.
However if the user has just created a new project and wants to work on it right away then he has to manually identify it (the project) in the Azure DevOps Organization. The following steps are required to do so:
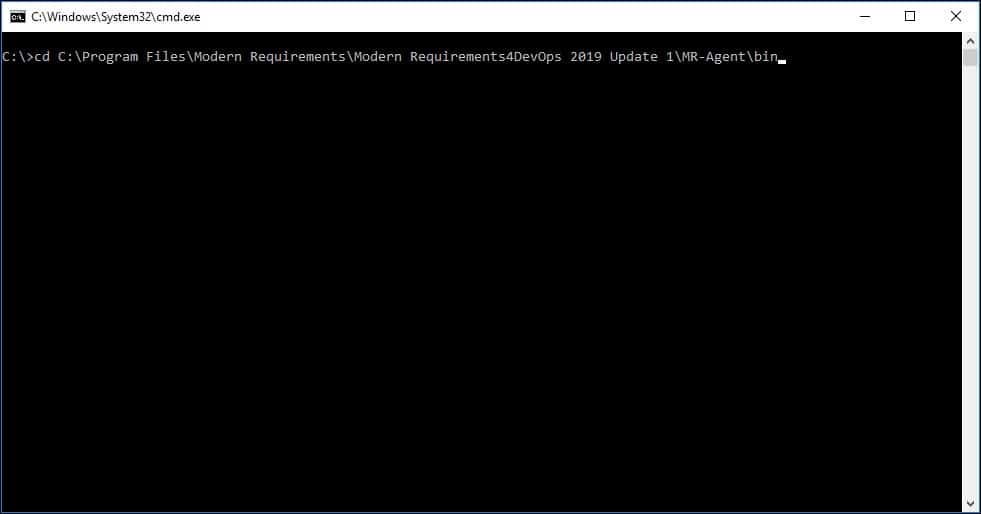
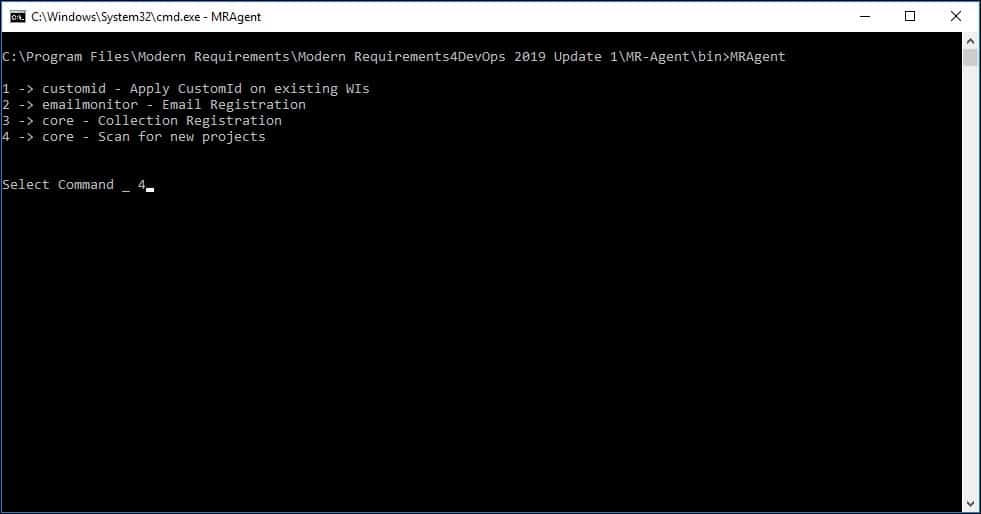
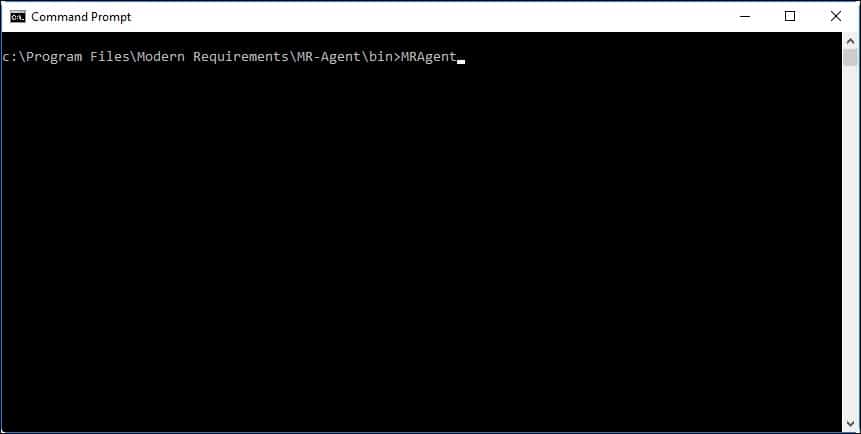
- Enter the following command on CMD: cd :\Program Files\Modern Requirements\MR-Agent\bin
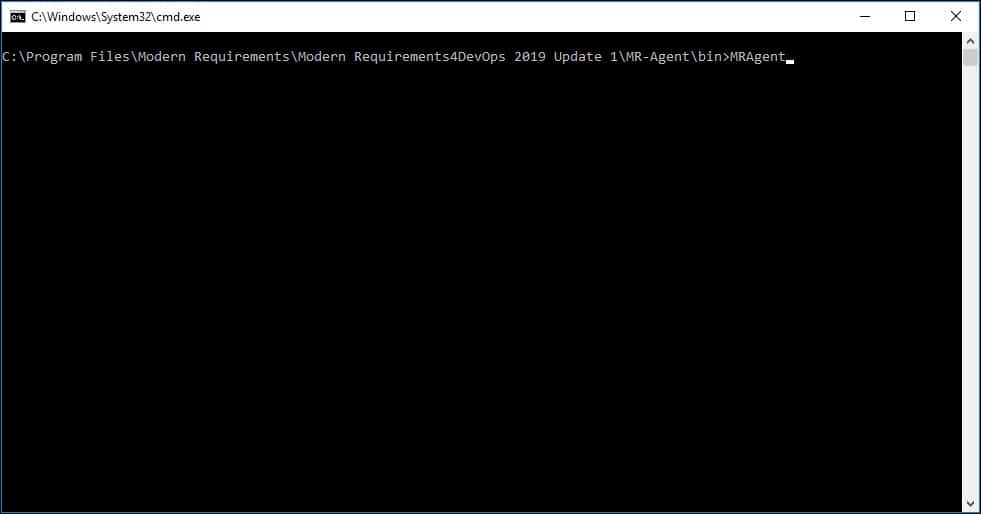
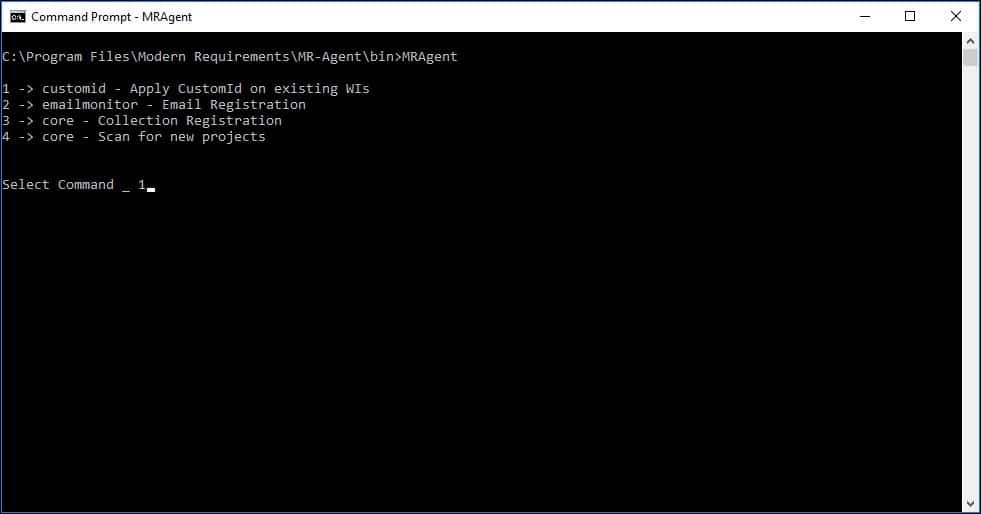
- Once in the bin directory, enter the following command: MRAgent
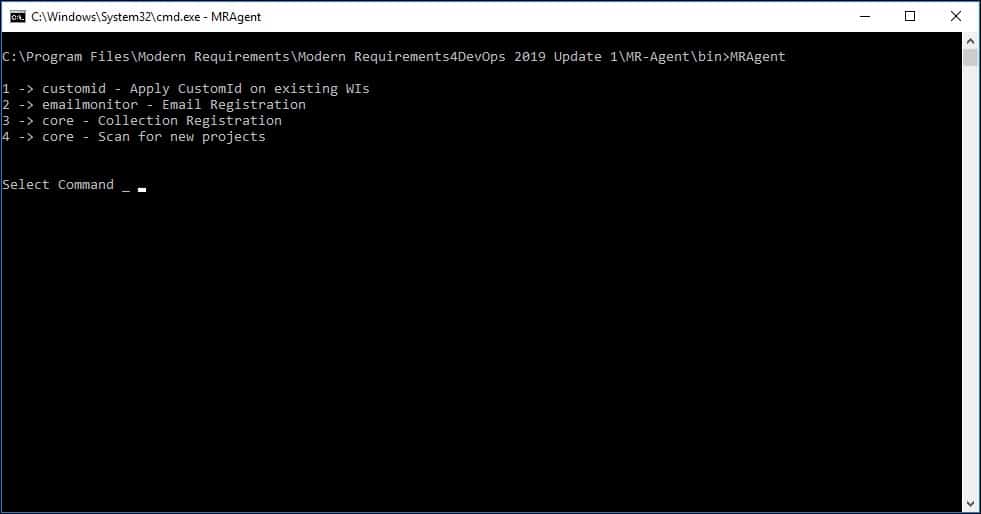
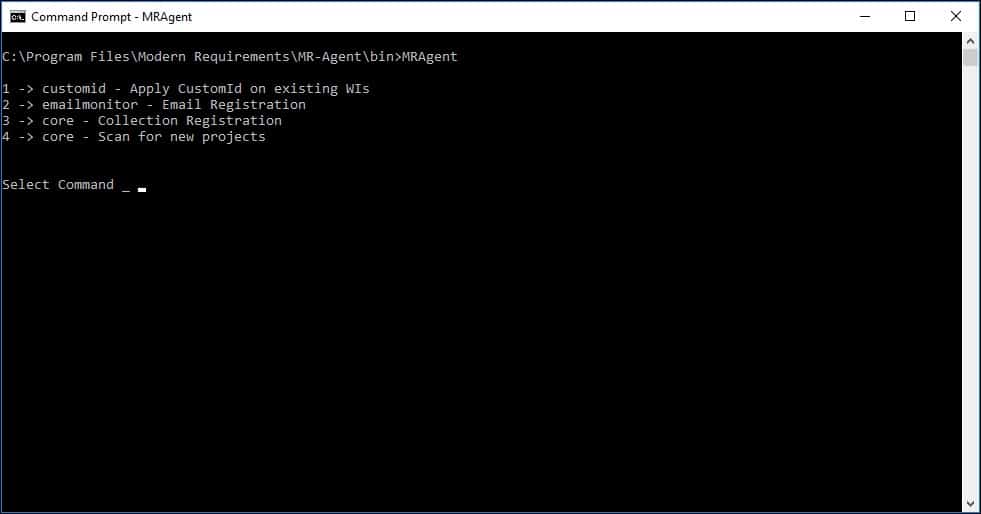
The menu of options is displayed.
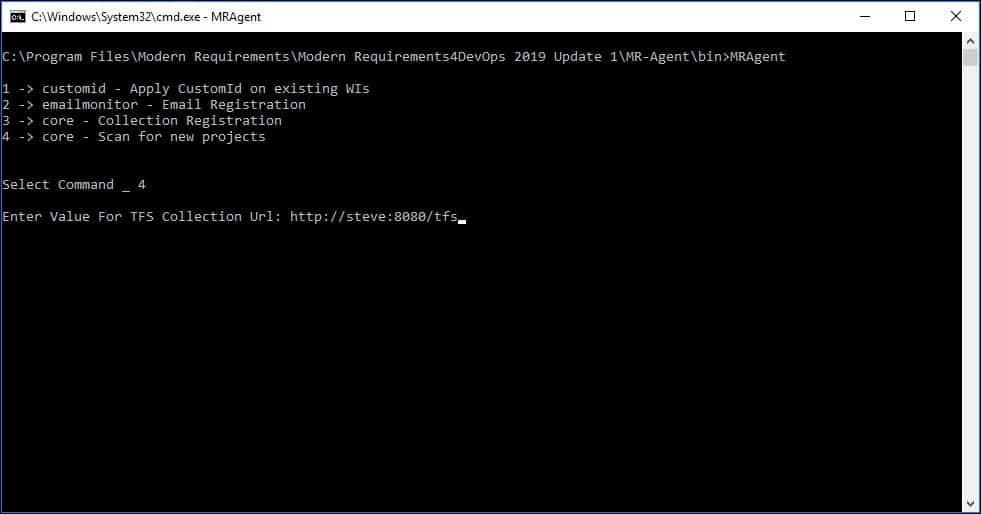
- Type 4 and click Enter.
- Enter the Azure DevOps organization value to scan for new projects.
If no error message is displayed, the process has been successfully carried out for scanning new projects created after registering an Azure DevOps organization/or applying its config.
Configure the Custom ID feature
Custom ID is a component of MR Services (MR Agent) that is used to provide Customized IDs to work items in addition to their default work item IDs. The Custom IDs do not replace the original IDs, instead they complement them. The customized IDs can be used to keep track of the work item origins (i.e. which team created a particular work item).
In order to make the Custom ID work properly, users must manually create the following two items:
- A folder that is named after the Azure DevOps (TFS) server name (on which the Custom ID is required to apply).
- Another folder that is named after Azure DevOps organization or TFS Collection (on which the Custom ID is required) under the Azure DevOps (TFS) folder name.
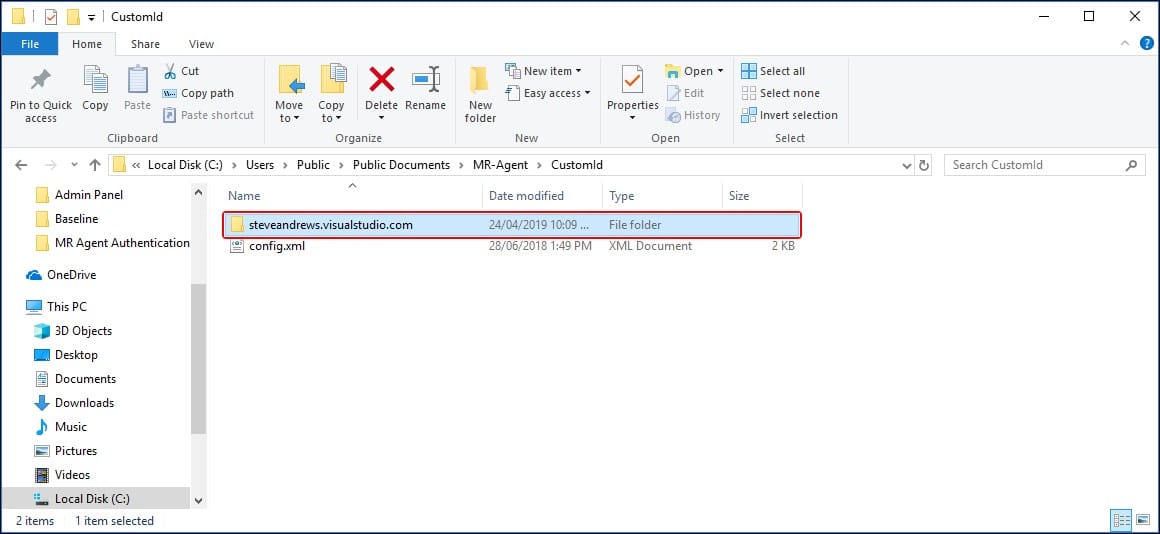
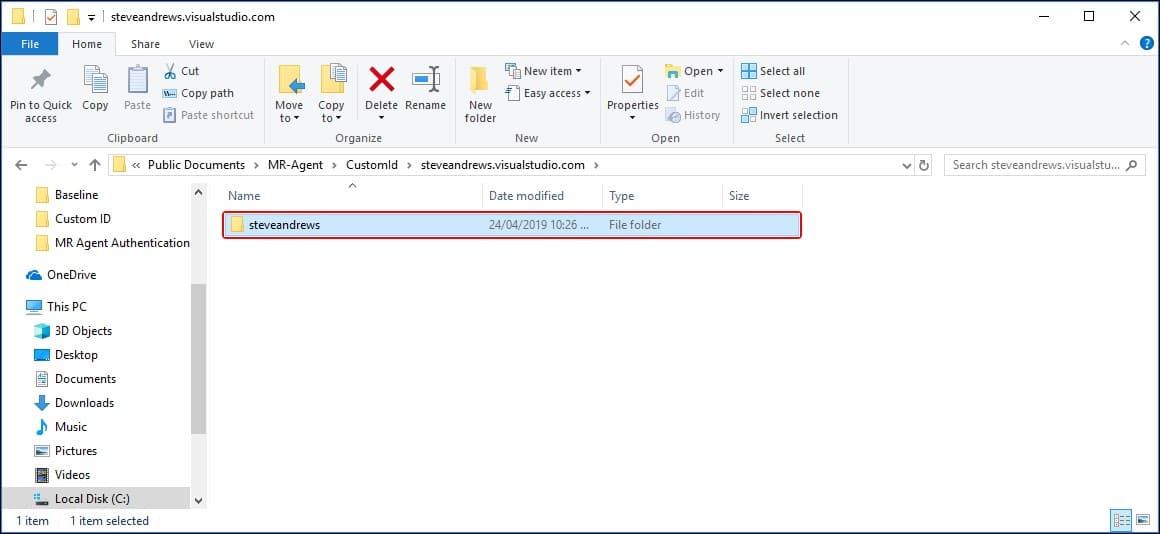
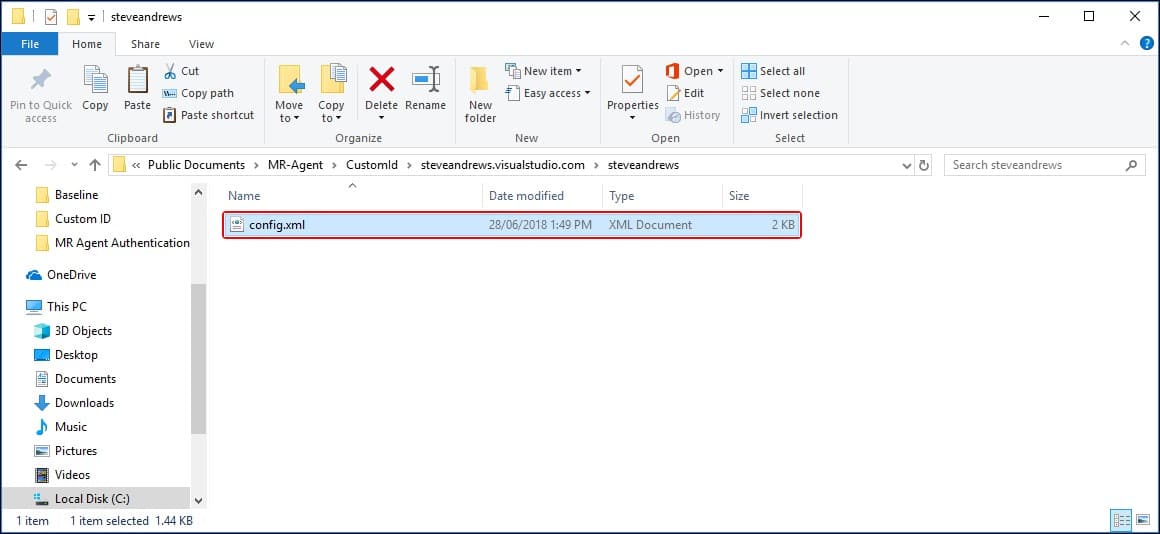
The relevant organization folder should also include the config.xml file containing all configuration. The file and folder hierarchy should appear as displayed below using the text pattern and relevant image: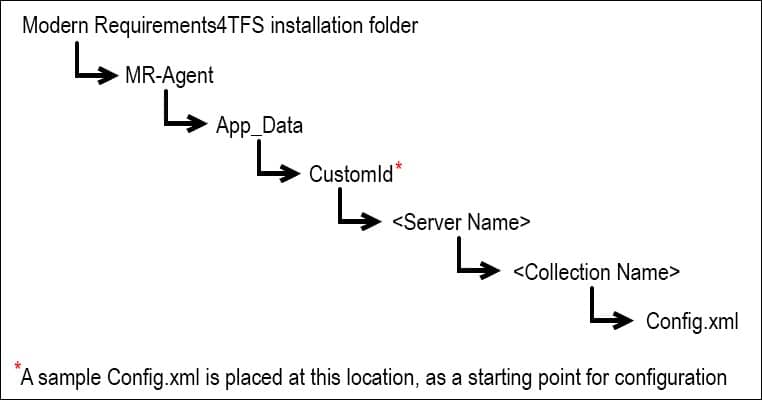
As described in the image above, a sample Config.xml file is placed in the CustomId folder.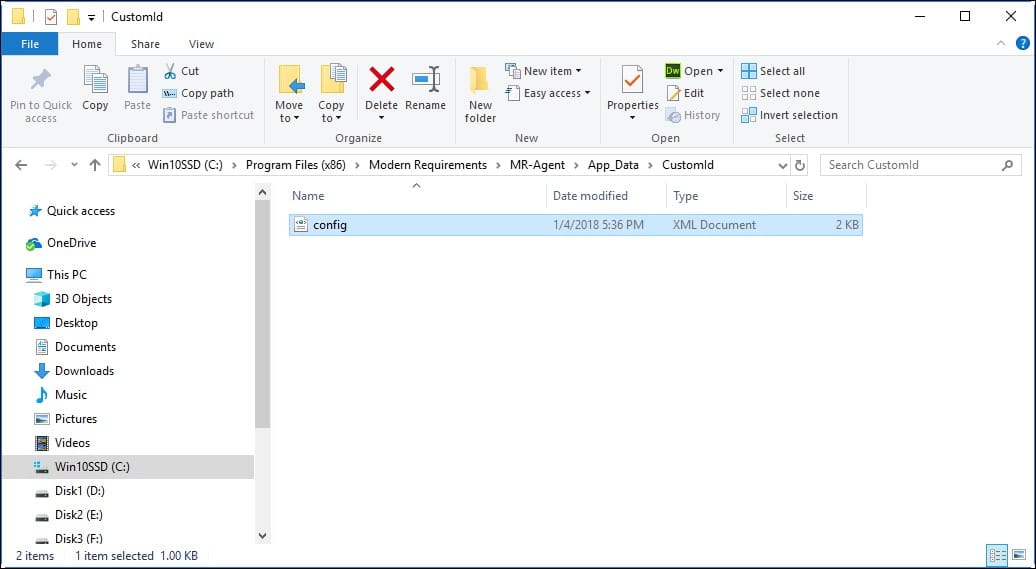
- Create a folder named after the Azure DevOps Server name (on which component is required to apply) at this location.
- Enter the newly created folder and again create another folder here with the name of Azure DevOps organization name (on which component is required to apply).
- Copy the xml file (discussed earlier) into the newly created folder i.e. Folder with Azure DevOps organization name.
This file contains the blueprint for the desired configuration.
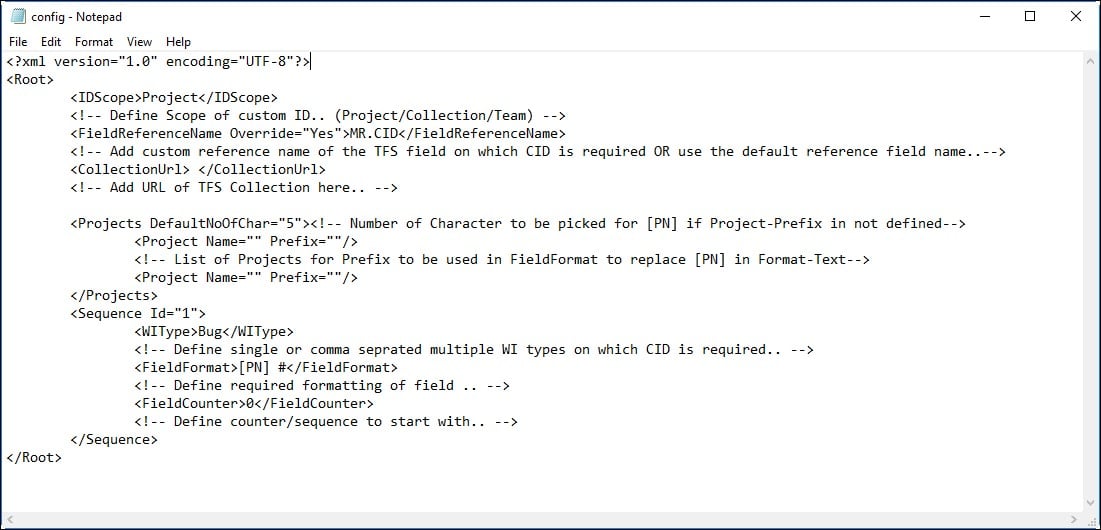
Configuring the Custom ID XML File
- Open the xml file in Notepad or any text editor.
- Define the value of the IDScope tag as per requirement, for example:
– Collection -> apply counter scope to Collection level.
– Project -> apply counter scope to Project level.
– Team ->apply counter scope to the Team level. - “FieldReferenceName” tag with “Override” value “Yes” means that the user defined field (between the tags) will be considered for the Custom ID. “Override” value “No” means that the default field “MR.CID” will be considered and applied for the Custom ID. This means that users must define this field in their TFS template with the same reference name, i.e. MR.CID.
- “CollectionUrl” tag requires the URL for the TFS collection on which the Custom ID is required to apply. (Note: Please make sure that the URL should not end on ‘\’ )
- “Projects DefaultNoOfChar” tag denotes the number of characters to pick up from the project name, if the project name is not defined in the tag<Project Name= “ ”>. By default its value is 5. Update the value if desired.
- Provide the TFS Project name (e.g. Project Name=”GITNew”) and its customized name (e.g. Prefix=”GTN”) to be used as a part of custom IDs.
- “Sequence Id=”1″” tag ID value shows the number of different Custom ID groups created in the configuration file and is used to identify and differentiate from the ID. It will always be a numeric only field and should be kept unique. The Sequence tag consists of a combination of WorkItem type, formatting required on the ID field and counter to start from.
- The “WIType” value requires the type of Work Item on which the Custom ID is required to apply. Also, if required, multiple Work Items could be defined for the same configuration to apply as a group.
- The “FieldFormat” tag is used to define ID formatting required on the Custom ID.
Example: [PN] Req #####[PN] is used as a placeholder for the above defined prefix of the project Name.
For numeric format reference please check the following link:
https://docs.microsoft.com/en-us/dotnet/standard/base-types/custom-numeric-format-strings - The “FieldCounter” tag is required to define the number or series from where the Custom ID counter is required to start from. Once the counter value is applied (configuration file is applied), it cannot be modified in any case.
- Following the successful completion of the configuration file, save and close the file.
Applying Custom ID on Existing Work Items
- Enter the following command on CMD: cd :\Program Files\Modern Requirements\MR-Agent\bin
- Once in the bin directory, enter the following command: MRAgent
The menu of options is displayed.
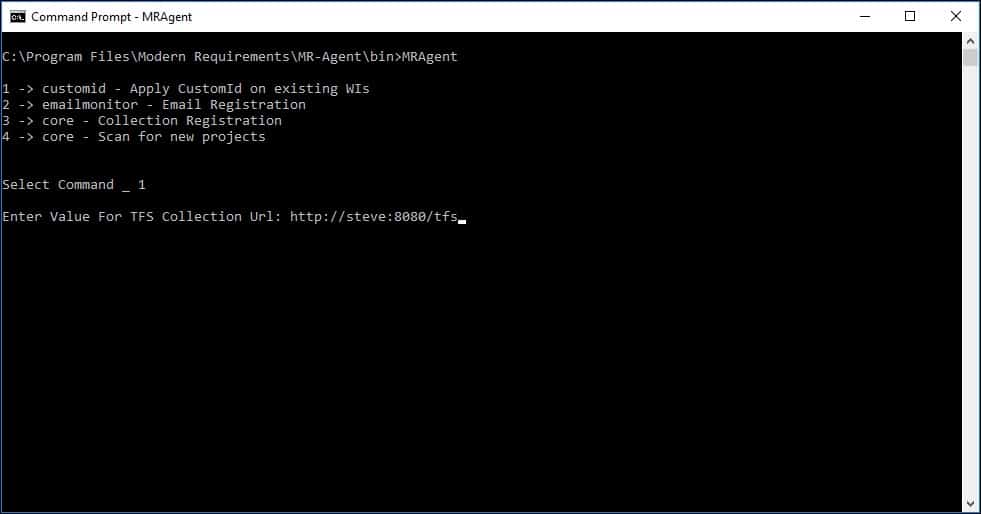
- Type 1 and click Enter.
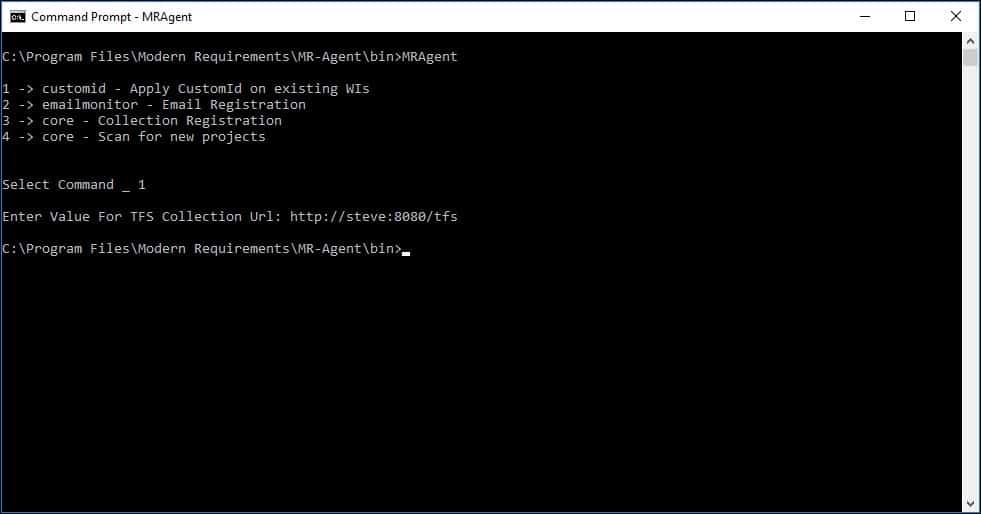
- Enter the Azure DevOps organization (or TFS Collection) URL value.
If no error message is displayed the Custom ID has been applied on existing work items of collection successfully.
Configure the Dirty Flag feature
Dirty Flag is a component of MR Services (MR Agent) that is used to mark particular work items as dirty (due to changed requirements) so that relevant stakeholders may review these work items once instead of proceeding with the outdated requirements.
In order to make the Dirty Flag work properly, users must manually create the following two items:
- A folder that is named after the Azure DevOps (TFS) server name (on which the Dirty Flag is required to apply).
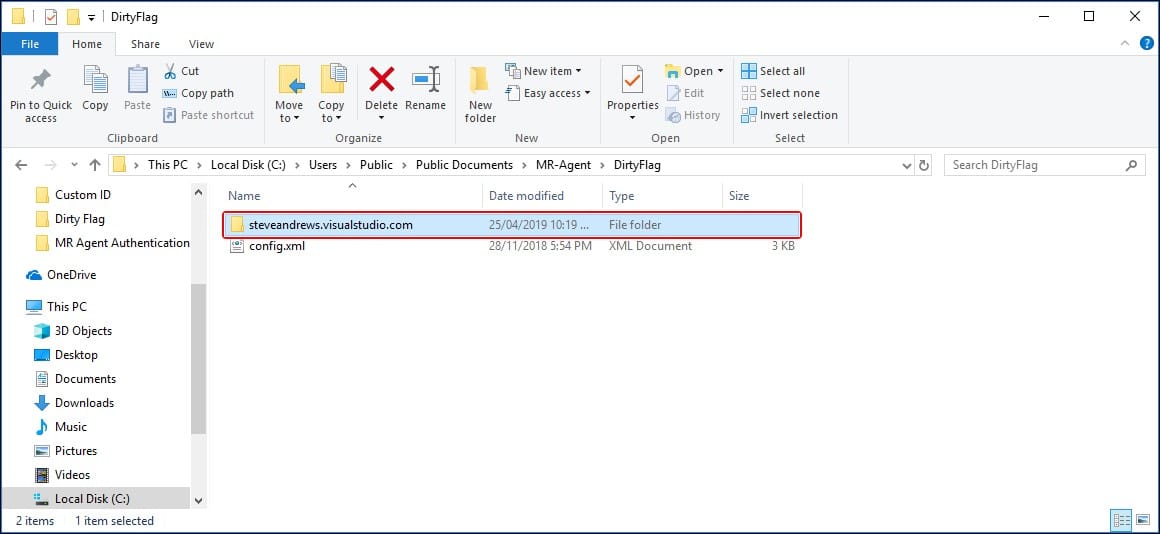
- Another folder that is named after Azure DevOps organization or TFS Collection (on which the Dirty Flag is required) under the Azure DevOps (TFS) folder name.
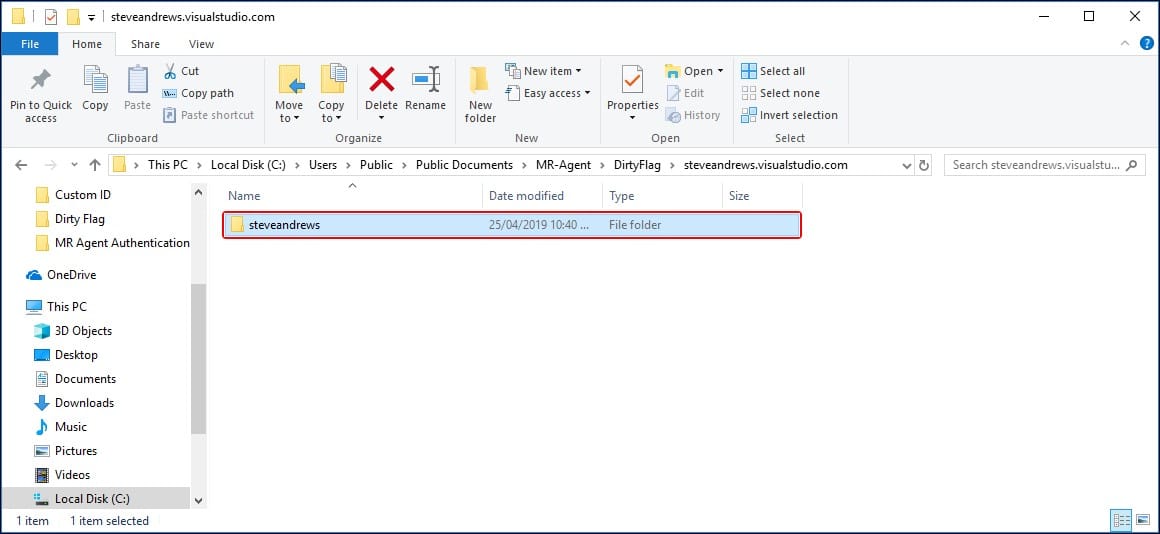
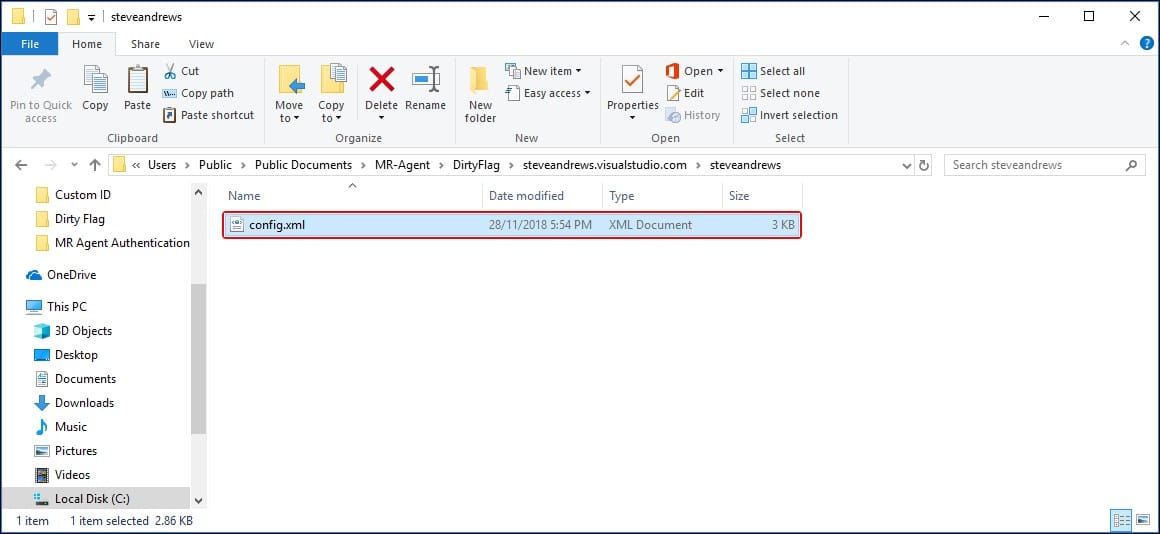
The relevant collection folder should also include the config.xml file containing all configuration. The file and folder hierarchy should appear as displayed below using the text pattern and relevant image: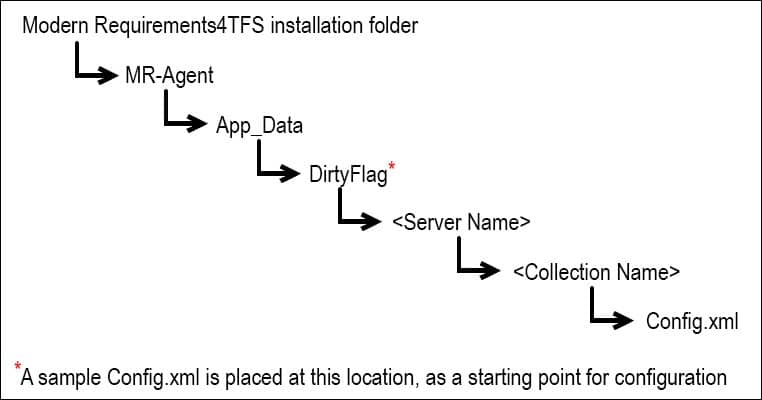
As described in the image above, a sample Config.xml file is placed in the Dirty Flag folder.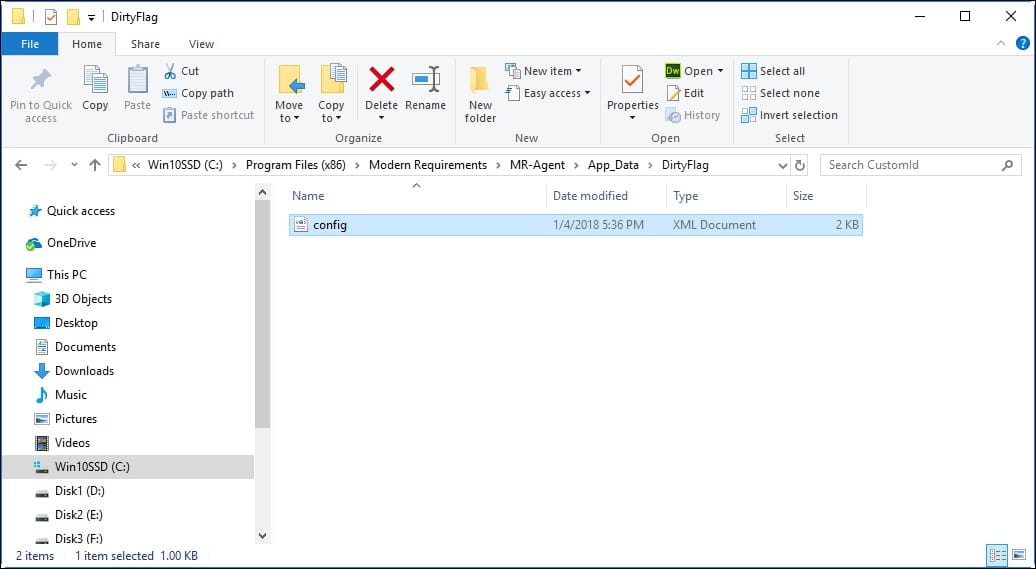
- Create a folder named after the Azure DevOps (TFS) Server name (on which component is required to apply) at this location.
- Enter the newly created folder and again create another folder here with the name of Azure DevOps organization (or TFS collection) name (on which component is required to apply).
- Copy the xml file (discussed earlier) into the newly created folder i.e. Folder with Azure DevOps organization (or TFS collection) name.
This file contains the blueprint for the desired configuration.
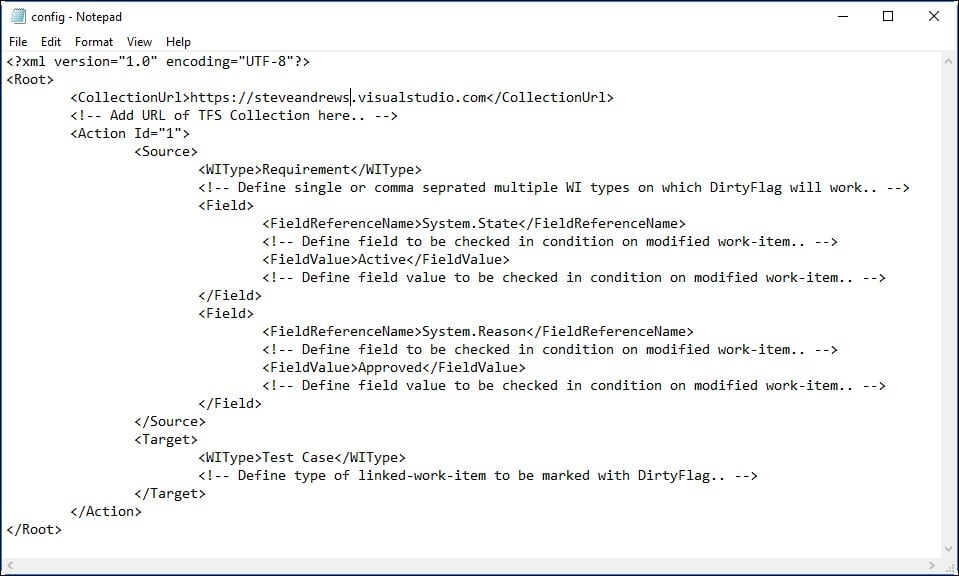
Configuring the Dirty Flag XML file
- Open the xml file in Notepad or any text editor.
- Define the Collection URL value using the CollectionURL
Each Action tag has a Source part and a Target part. The Source part tells MR Services (MR Agent) what to look for to trigger the Dirty Flag; the Target part tells MR Services (MR Agent) which type of work items will be tagged as dirty in case of a trigger.
- In the Source section the “WIType” tag denotes the type of work items with which the Dirty Flag will work. Multiple work items types could be used with comma “,” as a separator.
- The “FieldReferenceName” tag denotes which field(s) of the work item (the list is provided in the WIType tag) will be checked.
- The “FieldValue” tag denotes the exact value of the FieldReferenceName that will trigger the Dirty Flag.
If multiple fields are checked, the Dirty Flag will be triggered only when all the FieldValues are matched, i.e. using AND logic.
- The “WIType” of the target section denotes the type of work items that will be marked as dirty if the condition in the source section is satisfied.
- Save and close the configuration file following its successful completion.
Setting up the Email Monitor feature
Email Monitor is a component of MR Services (MR Agent) that is used to automatically create work items from emails. A particular email address is configured for this purpose and on successful completion of the configuration process, all emails sent to this email address result in creating/updating work items. The process involves the following steps*:
- Configuring the Email Monitor Config file (placed at a particular location)
- Entering and verifying email settings
Each of these steps is elaborated further below.
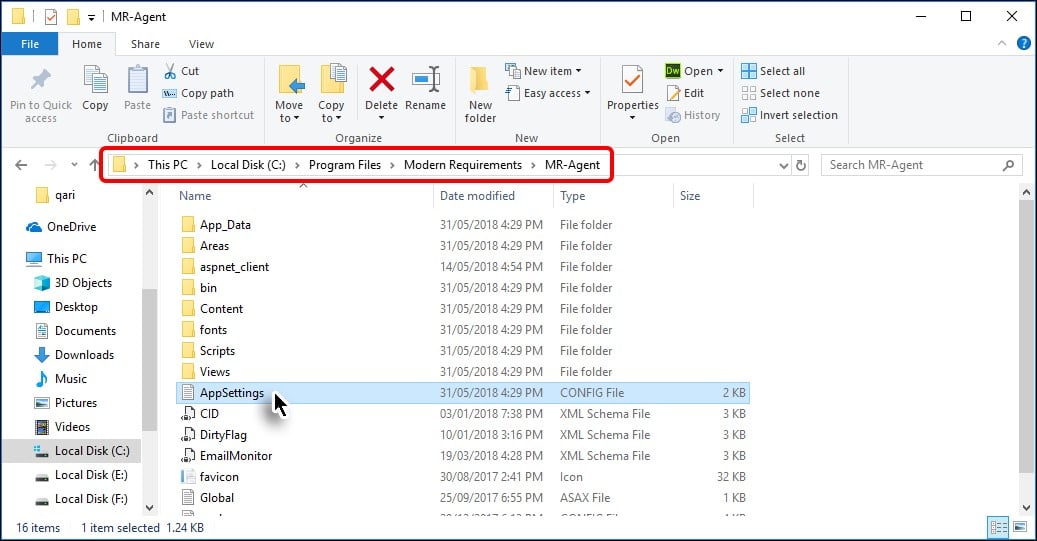
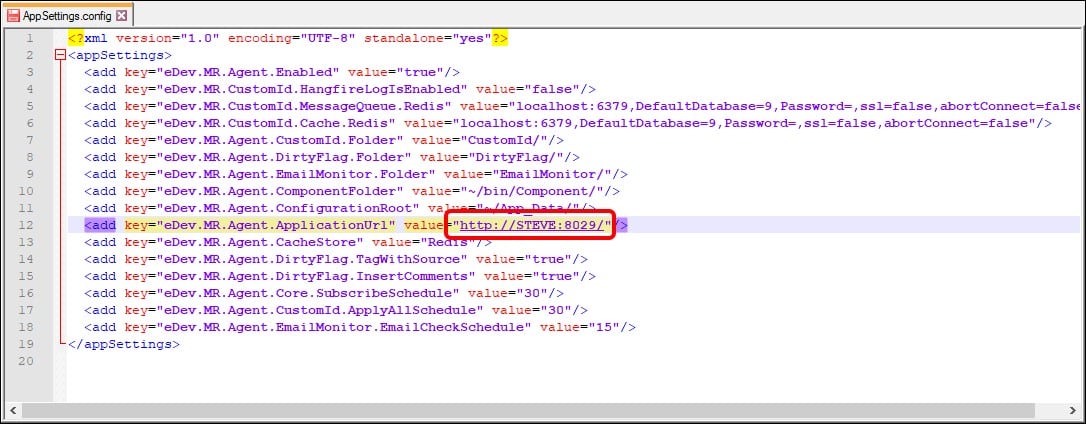
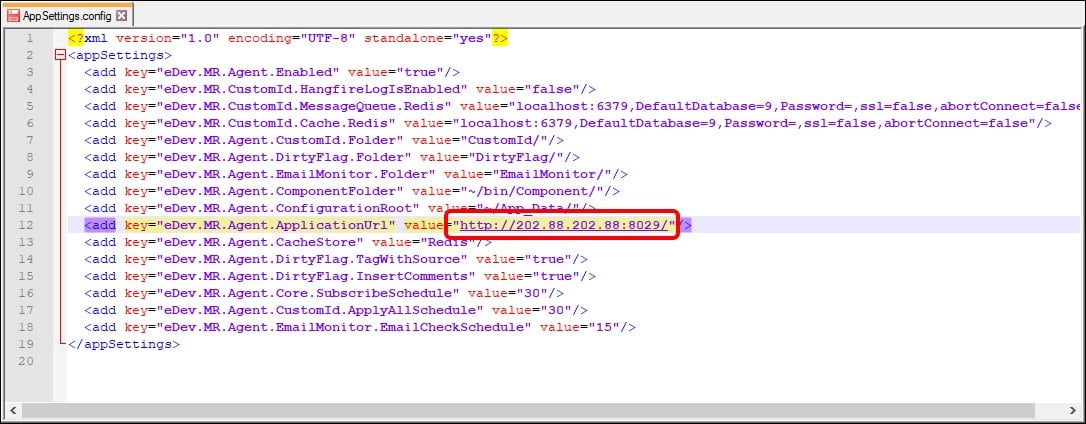
*For local Azure DevOps (TFS) servers, MR Services (MR Agent) automatically adds the relevant location in the application settings file (AppSettings.config). However if Azure DevOps Services are involved then the user’s machine should have a live IP address that the Azure DevOps Services can use to access/communicate. This IP address should be added in the AppSettings config file. The process to do it is elaborated in the following steps:
- Go to the installation folder of MR Services (MR Agent) (highlighted in the image) and open the AppSettings config file in a text editor.
The ApplicationURL is automatically set toward the local machine.
Change the value (for Azure DevOps Services only) to the live IP address of your machine including the relevant port.
*Contact your Network Administrator to get the live IP address and port information- Save and close the config file.
Timing Configurations in APPSETTING file
At the bottom of the AppSettings config file, there are three timing configurations available for users.

SubscribeSchedule
- Works for all components of MR Services
- Used to check new projects/collections
- Default value “30”* represents the number of minutes, after which MR Services (MR Agent) scans for new projects. Users can configure the value (in minutes) as per their requirements.
*This value can also be configured using Admin Panel.
ApplyAllSchedule
- Works only for Custom ID
- Used to apply Custom ID on newly created work items
- Default value “30” represents the number of minutes, after which MR Services (MR Agent) scans for new work items and apply Custom IDs on them. Users can configure the value (in minutes) as per their requirements.
EmailCheckSchedule
- Works only for Email Monitor
- Used to check if a new email has arrived from which work items could be created/updated
- Default value “15” represents the number of minutes, after which MR Services (MR Agent) scans for email. Users can configure the value (in minutes) as per their requirements.
Email Monitor Configuration
In order to make the Email Monitor work properly, users must manually create the following items:
- A folder that is named after the Azure DevOps (TFS) server name (on which the Email Monitor is required to apply).
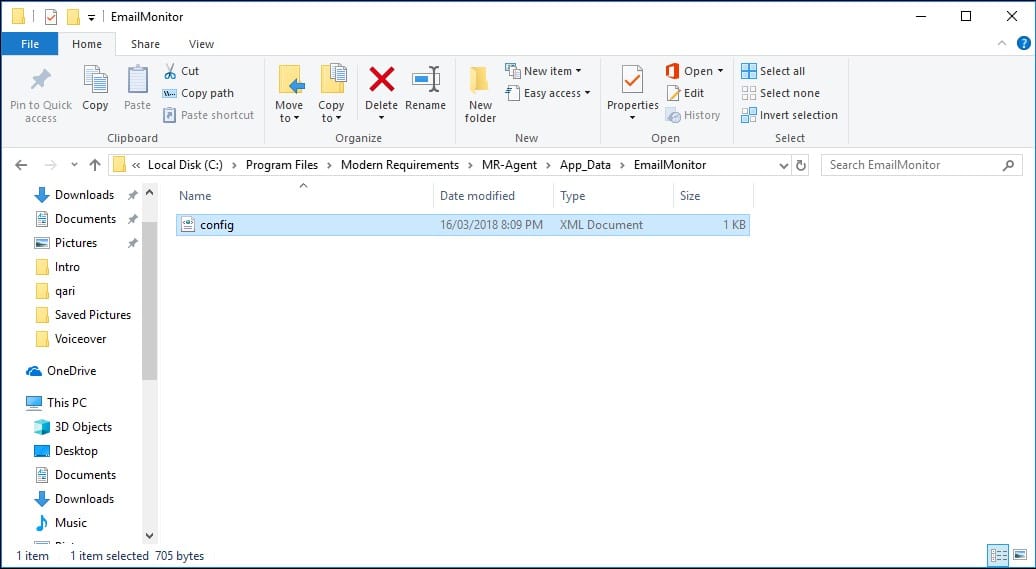
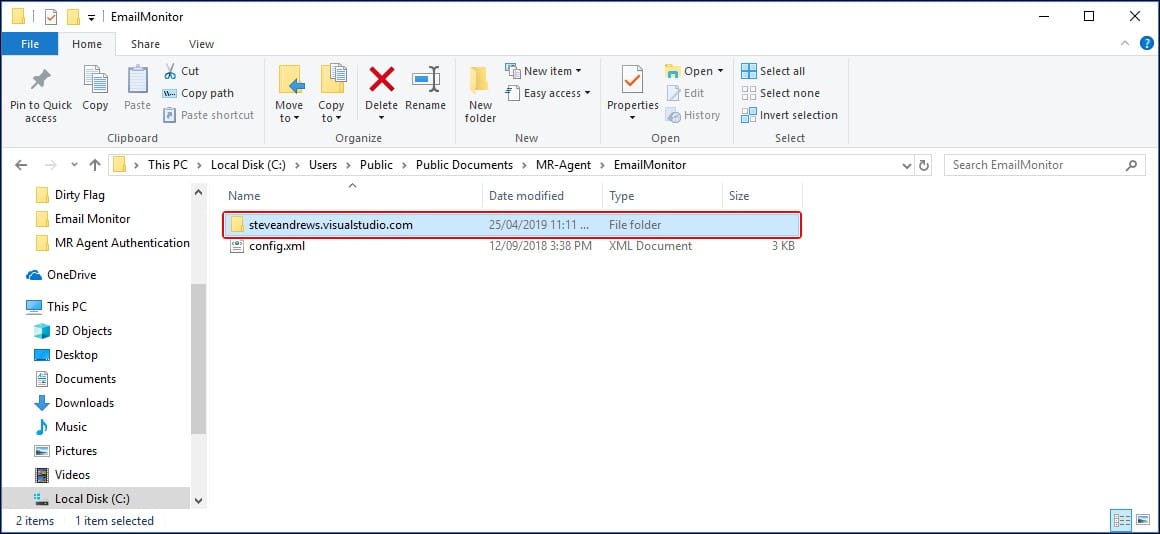
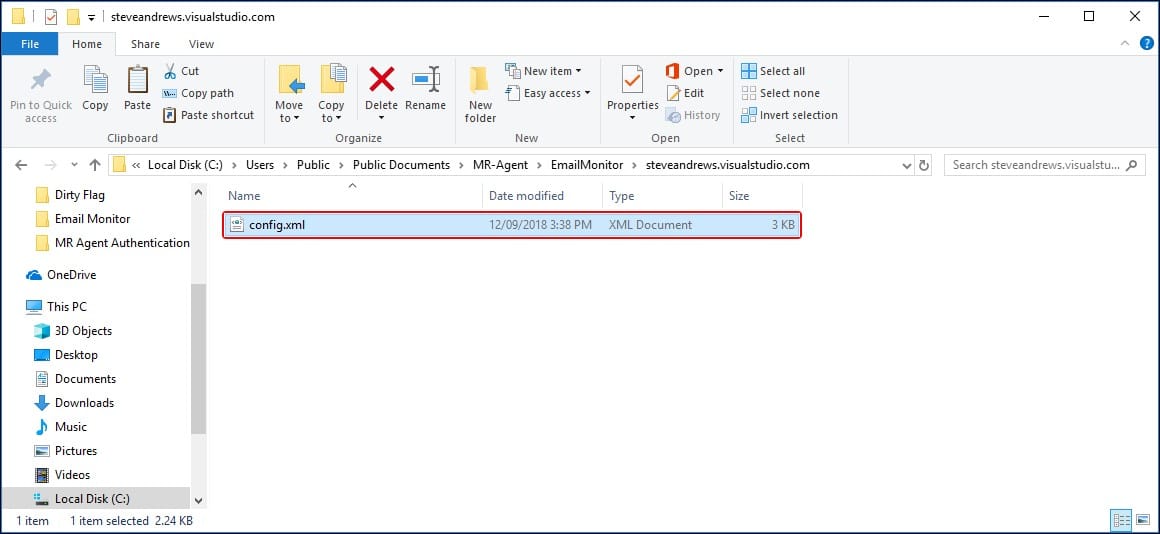
The relevant server folder should also include the config.xml file containing all configuration. The file and folder hierarchy should appear as shown below using the text pattern and relevant image:
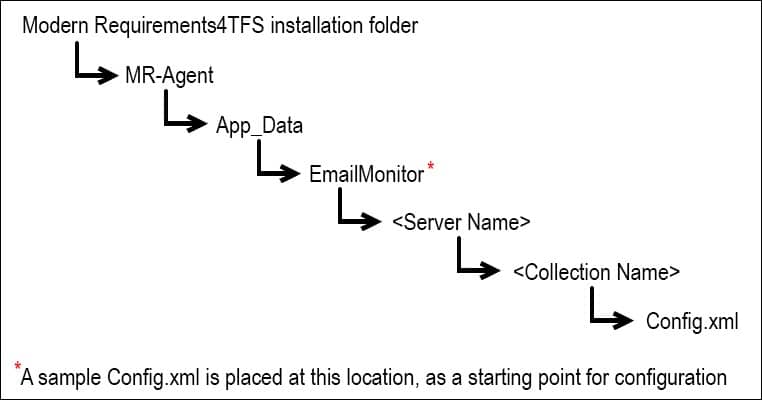
* Note: for the current versions of Email Monitor, the hierarchy stops at the server folder, and placing the file in that server folder. However for the future versions, the hierarchy would go up to the organization folder (like other components of MR Services (MR Agent)). Please consult with your administrator or contact Modern Requirements if any uncertainty persists in this matter.
As described in the image above, a sample Config.xml file is placed in the EmailMonitor folder.
- Create a folder named after the Azure DevOps (TFS) Server name (on which component is required to apply) at this location.
- Enter the newly created folder and copy the xml file (discussed earlier) into that folder i.e. Folder with Azure DevOps (TFS) Server name.
- This file contains the blueprint for the desired configuration.
Configuring the Email Monitor XML file
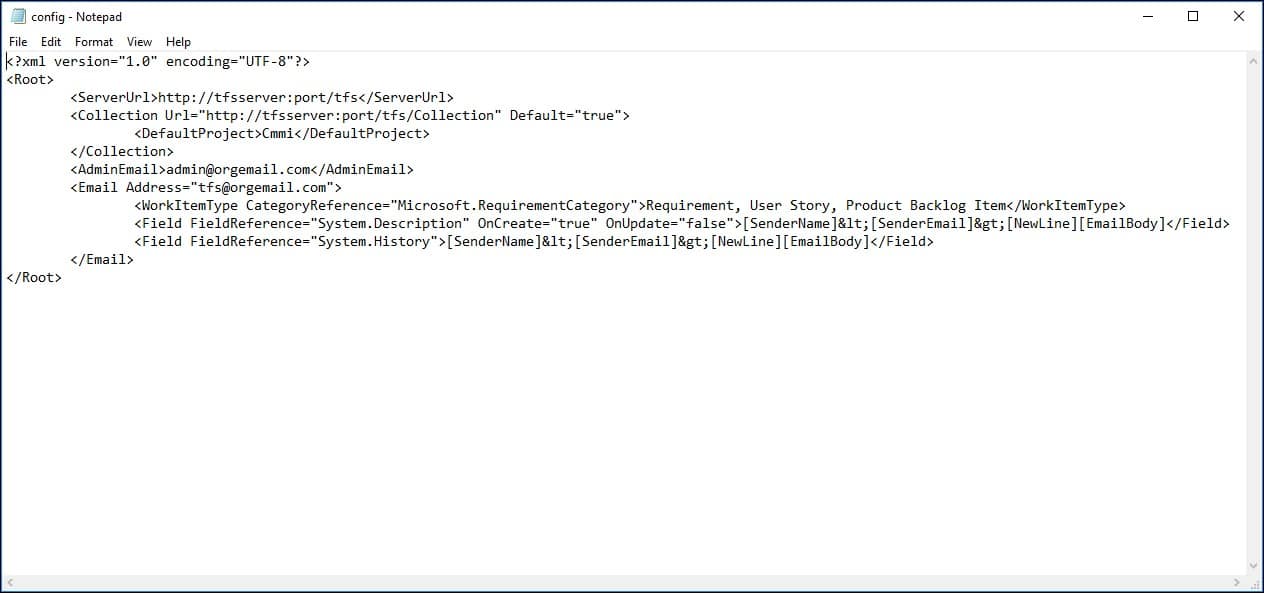
- Open the xml file in Notepad or any text editor.
- Define the value of the ServerURL tag as per requirement, for example:
- Similarly define the value for Collection Url (including the DefaultProject)
IMPORTANT
– The values for both the ServerURL and Collection Url should correspond to the folder structure described before.
– Make sure that the URL does not end with a forward slash “/”
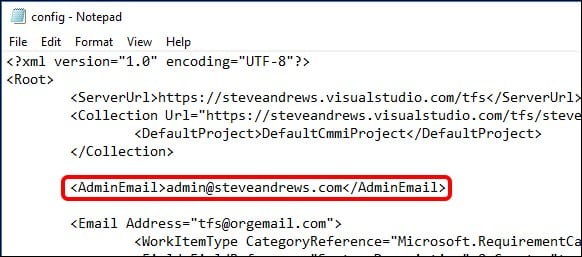
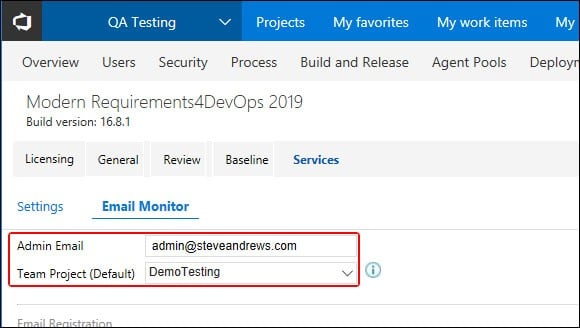
– User can define multiple Collection URLs in the config file. - Provide the value for AdminEmail. This email address is used as a mitigation, in case the desired functionality can’t be achieved using the address defined in Email tag (explained in the next step).
Note: Only a single Admin email can exist in the config file.
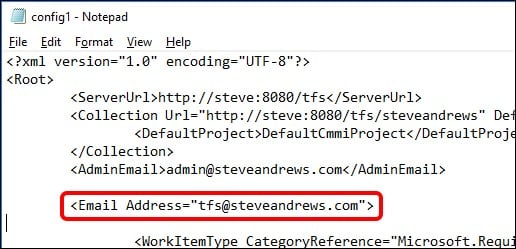
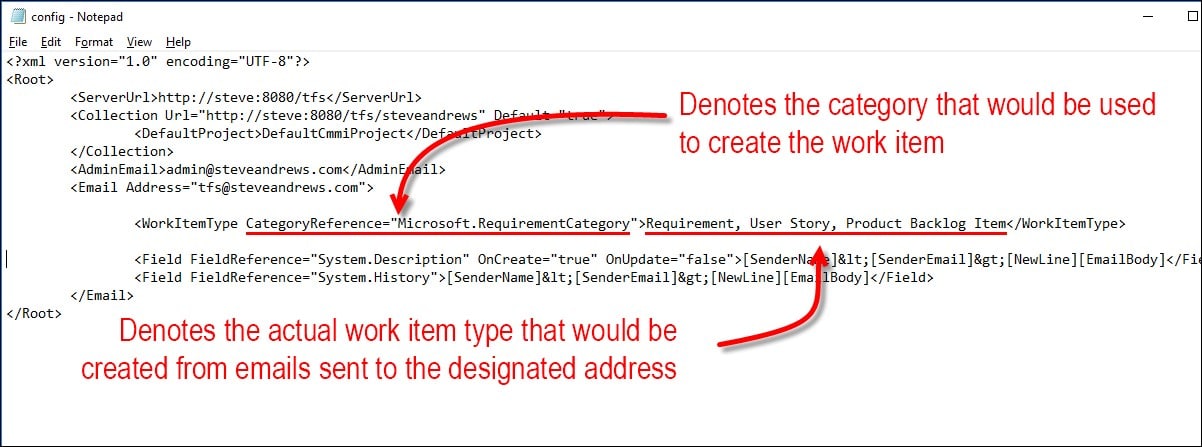
- “Email” tag is the main tag in this file that defines where the email would be sent. The emails sent to this address would be used to create desired types of work items. Configure the Email tag as required
- Email: Provide the target email address where the email should be delivered for work items creation/update. In case some criteria does not match with the desired values, the warning email would be sent at the Admin Email defined above.
Note: Multiple email addresses can be defined in the config file.
- Work Item Type: Set the desired type of work item to be created. In the following example CategoryReference represents the internal category type of work items. Multiple values in this tag means that the relevant type of work item would be created depending upon the template of team project. e.g. If the team project is using CMMI template then the email would create a Requirement work item. Similarly, for Agile based project a User Story would be created and for a Scrum based project a Project Backlog Item would be created.
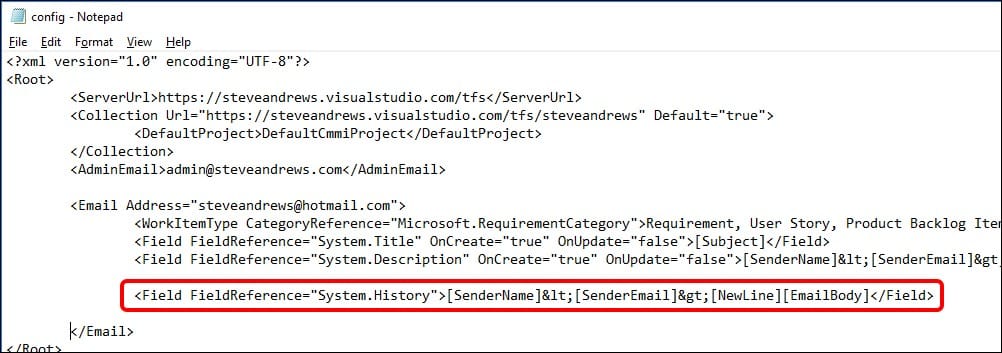
- FieldReference=”System.Title”: Tells what would be the title of the work Item to be created. The following example shows that the subject of the email would become the title of the work item.
- OnCreate= ”true” means that the title would be set from the email’s subject only for new Work Items.
- OnUpdate=”false” means that for existing Work Items, the Title field would not be updated.
- FieldReference=”System.Description”: Tell where to put the information from the incoming emails (i.e. in which property/field of the work item). The following example uses the Description field for this purpose.
- OnCreate= ”true” means that for new Work Items, the content of the email (described next) would be used to populate the Description field of the work item.
- OnUpdate=”false” means that for existing Work Items, the Description field would not be overwritten. Instead the update would go to the comments/history section of the work item.
The later part of this field tells the composition of the description field. The following information would compose the Description field:
- Sender Name shown inside <> e.g.
- Sender Email also shown inside <> e.g. <alice.ducas@steveandrews.com>
- Email body added in a new line
- The final FieldReference=”System.History” is used for discussion emails that come after a work item has been created. Instead of overwriting the Description field, the subsequent email information is stored in the Comments field (internally called History). The composition of the History field is more or less the same as of Description field discussed above. Users are advised to keep the original settings for this tag.
- Following the successful completion of the configuration file, save and close the file.
- Email: Provide the target email address where the email should be delivered for work items creation/update. In case some criteria does not match with the desired values, the warning email would be sent at the Admin Email defined above.
Deploying the Email Monitor
Email Monitor can be deployed by configuring relevant settings under the Admin Panel. These settings can be accessed using the Services Tab.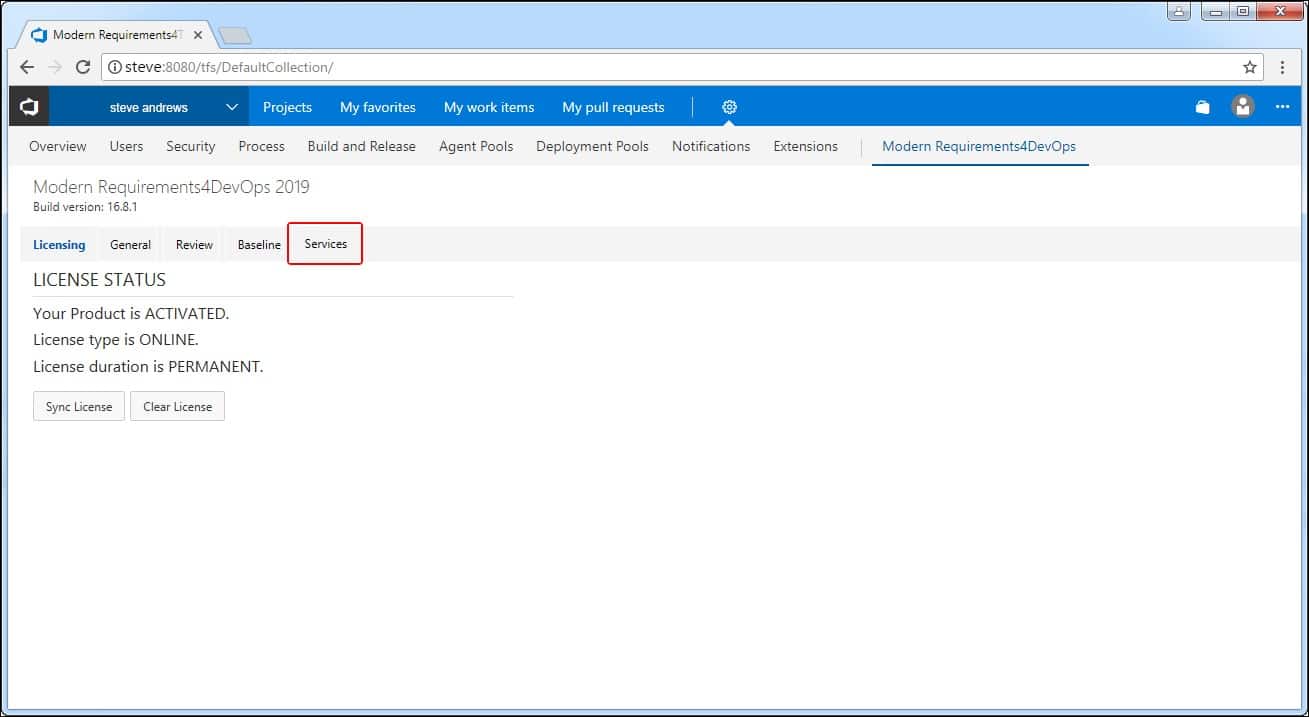
The Services section of the Admin panel currently has two Tabs: Settings & Email Monitor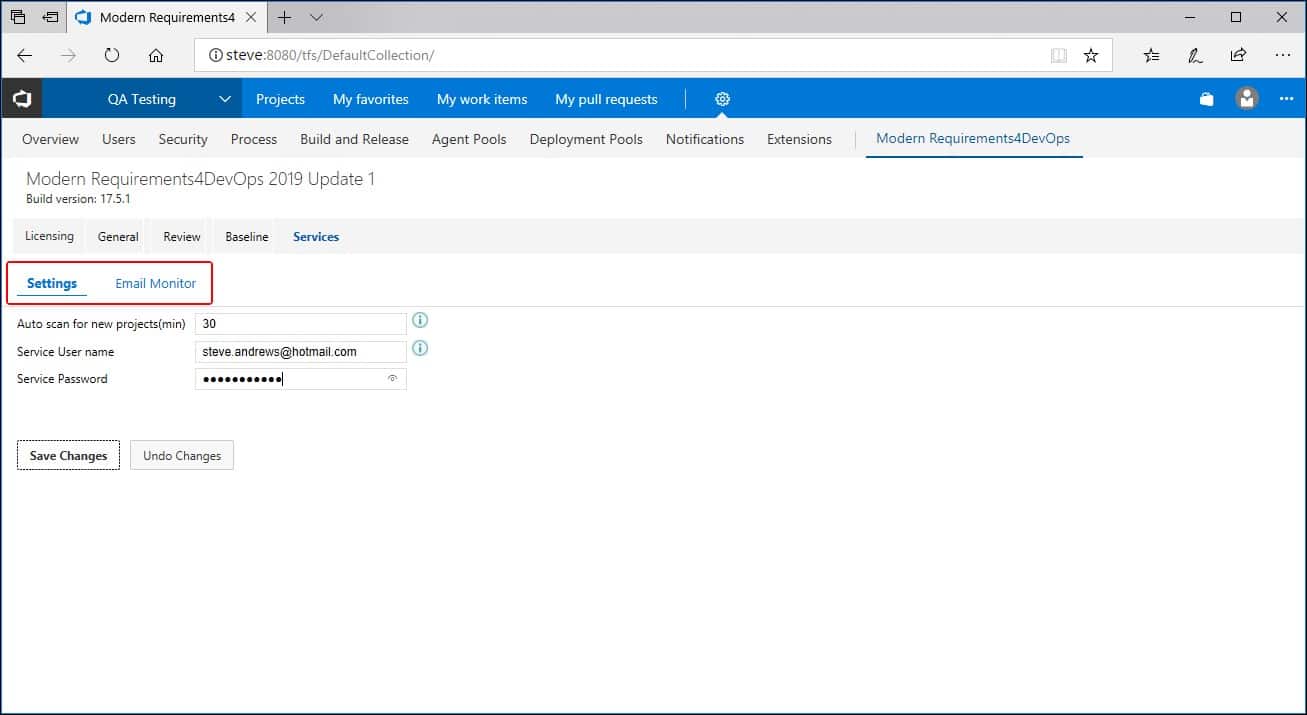
Settings Tab deals with 1) User Authentication/Organization Registration 2) Scanning for new projects.
Email Monitor deals with all the email related options discussed earlier in the command line section.
Configuring Email Monitor options
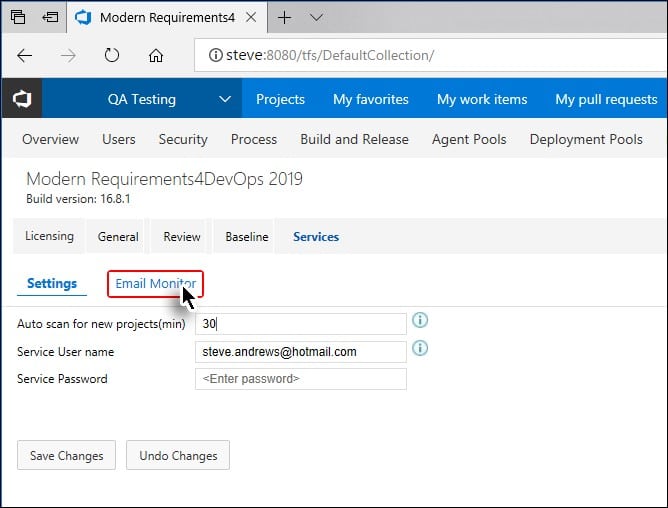
- Email Monitor tab under the Services section is used to configure email settings.
- The options can be accessed by clicking the Email Monitor tab as shown in the following image.
- If the user hasn’t registered their organization (by providing required details in the Settings sub-tab), then upon clicking the Email Monitor sub-tab, the user is sent back to the Settings sub-tab, unless the desired information is entered.
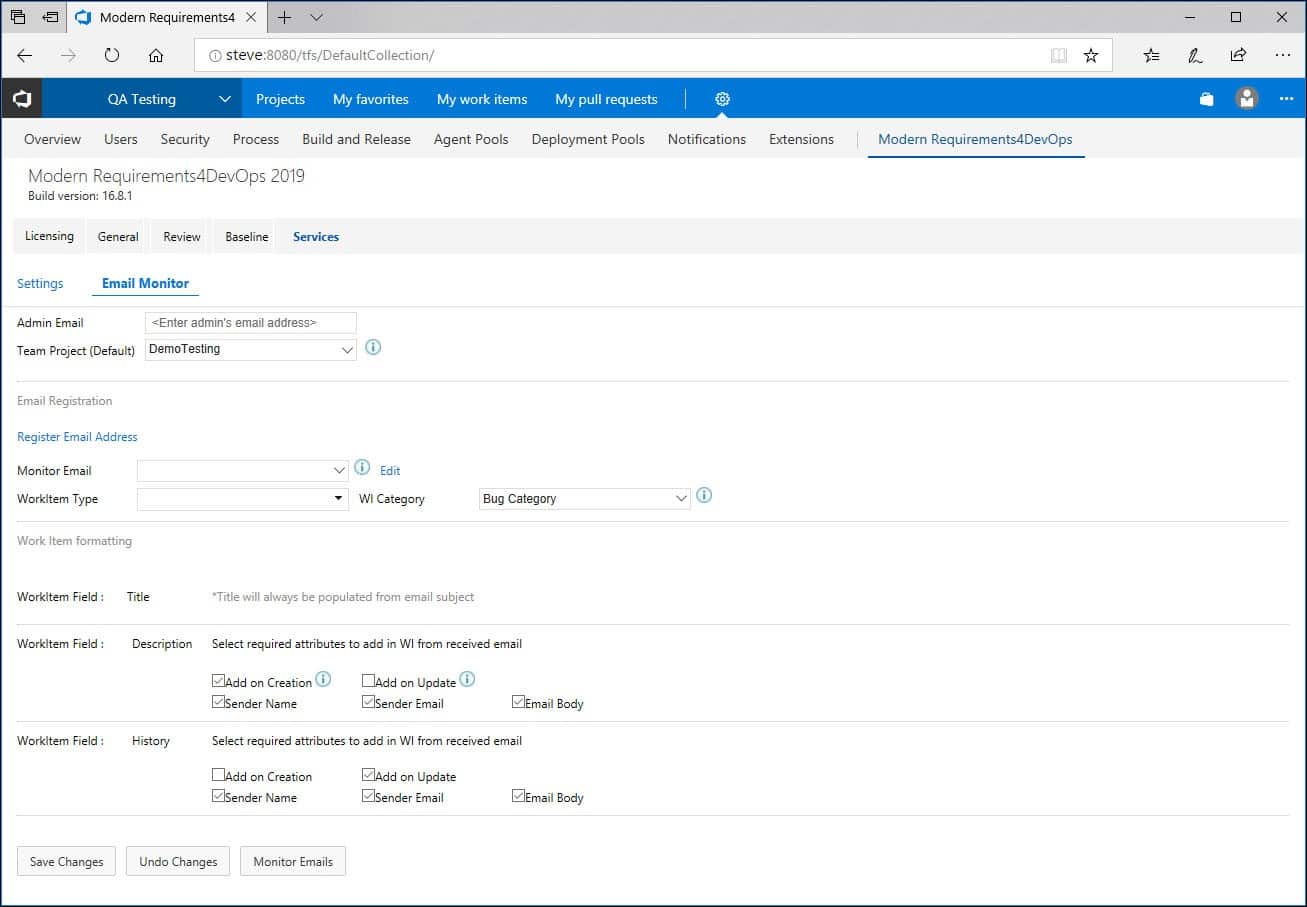
- The Email Monitor settings are divided into sections, where each section is used to configure a particular setting.
- All necessary settings are configured once. Users can not configure certain settings and leave other pending.
- The first section is used to configure the default project and the admin email address.
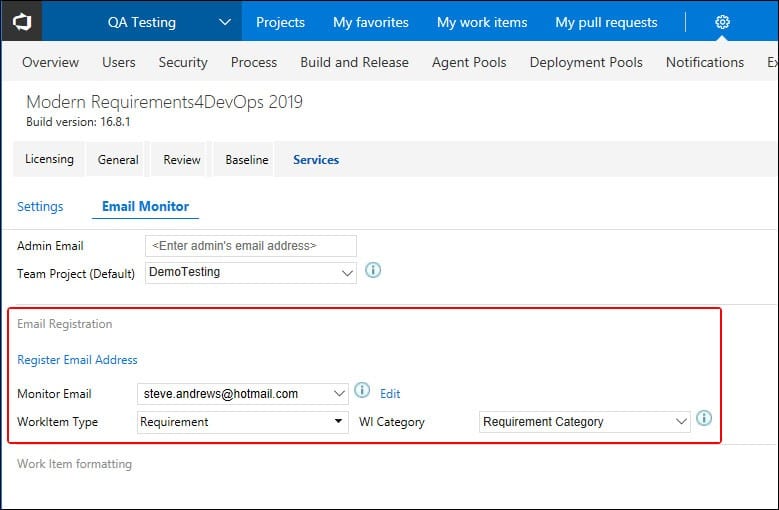
- The second section is used to configure the email address that would be used for Email Monitoring.
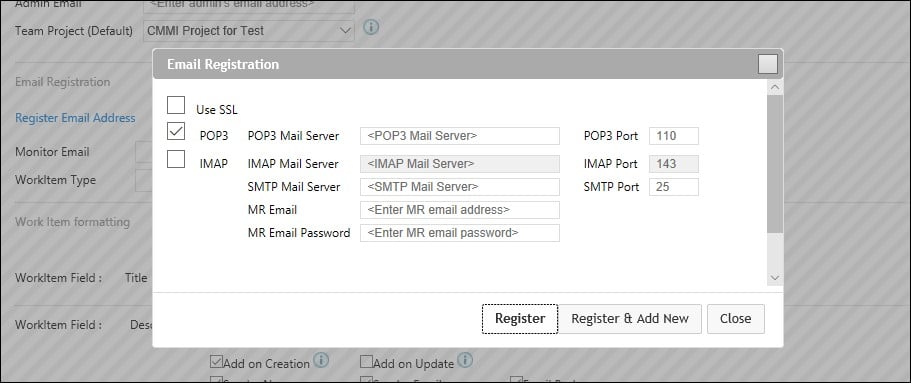
Clicking on Register Email Address would open a popup window where the network settings for the email (e.g. SSL, POP3, IMAP etc) can be configured.
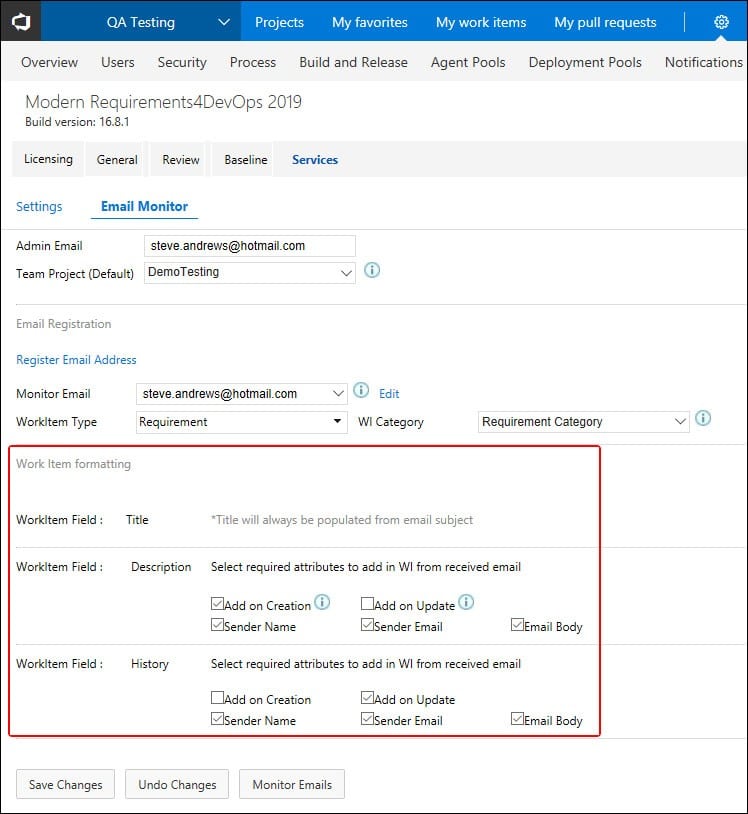
- The third section is used for settings (that will be used to) to extract Work Item content from the emails sent to the Registered Email Address.
Clicking on Save Changes button after configuring all the settings would deploy the Email Monitor.
Contact Support
Incident Support
Receive live support over phone, email, or web meeting. Each incident support request can cover one particular issue.
Incident Support
Go now!Email Support
Email our support team for our fastest response. By emailing us a ticket will be created for you automatically!
Email Support
Go now!Submit an idea
Want more out of our products? Suggestions make us better. Submit an idea and we'll add investigate adding it to our backlog!
Submit an Idea
Go now!Community Support
Find answers to common questions or submit a ticket in our community support portal.
Community Support
Go now!Report a Bug
Let us know about a bug you've found and we'll make it a priority to get it fixed. Nobody likes bugs -and we are no exception.
Report a Bug
Go now!Contact Support
Incident Support
Receive live support over phone, email, or web meeting. Each incident support request can cover one particular issue.
Incident Support
Go now!Email Support
Email our support team for our fastest response. By emailing us a ticket will be created for you automatically!
Email Support
Go now!Submit an idea
Want more out of our products? Suggestions make us better. Submit an idea and we'll add investigate adding it to our backlog!
Submit an Idea
Go now!Community Support
Find answers to common questions or submit a ticket in our community support portal.
Community Support
Go now!Report a Bug
Let us know about a bug you've found and we'll make it a priority to get it fixed. Nobody likes bugs -and we are no exception.
Report a Bug
Go now!The Admin Panel of Modern Requirements4DevOps
In this article we cover how to use the Modern Requirements4DevOps admin panel to enable and disable particular features in each MR4DevOps module.
Continue reading


