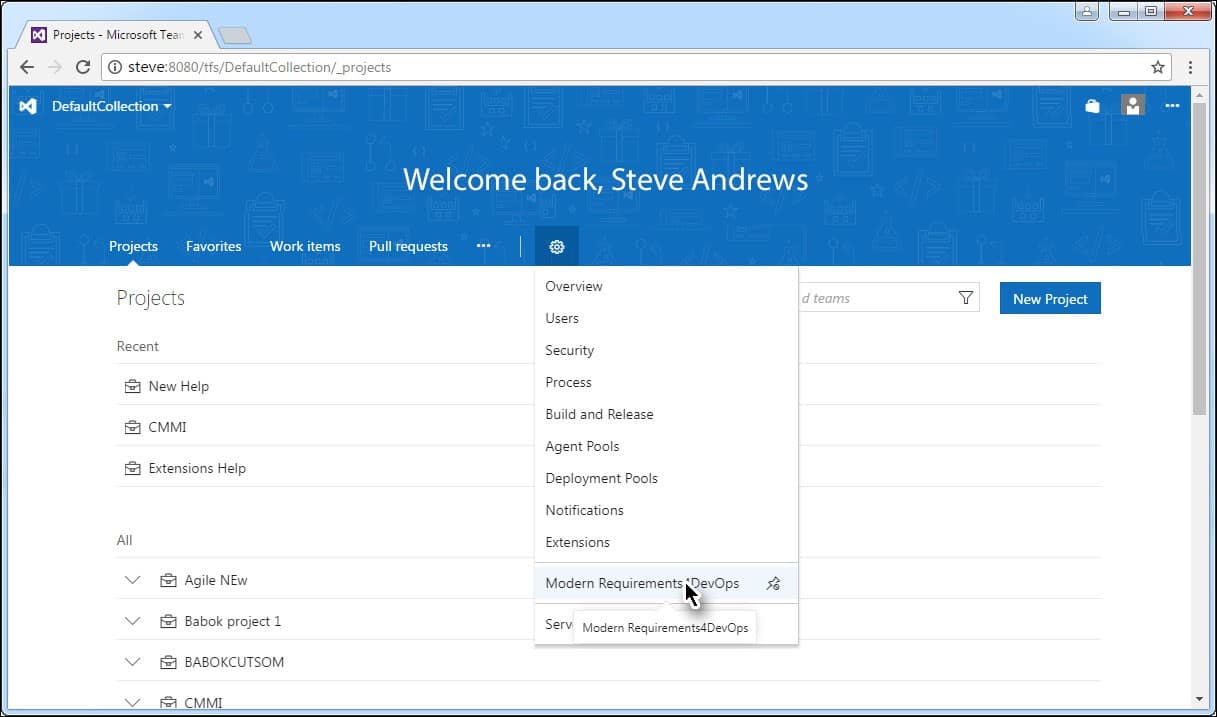
- Launch the embedded version of the application and select the Modern Requirements4DevOps option under the Settings tab.

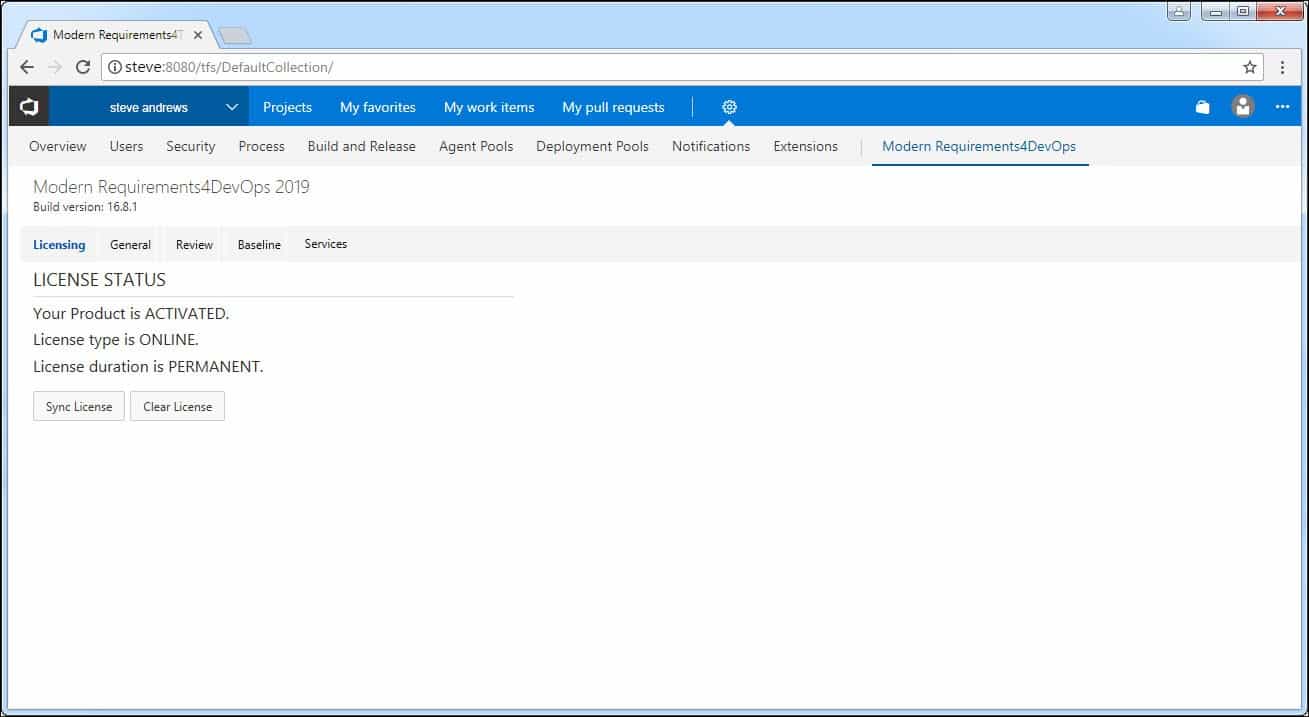
The Admin panel is displayed.
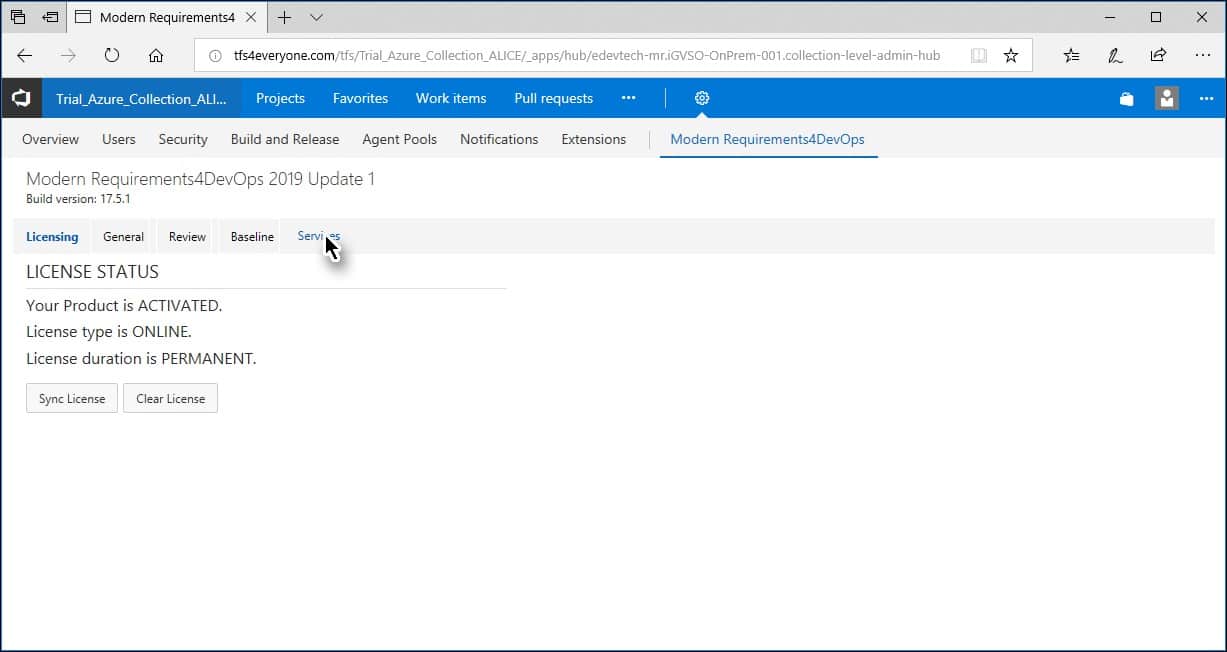
- Click the Services tab.

The options for Services Tab are displayed.

The Settings sub-tab deals with two options:
- Setting time interval to Scan the Azure DevOps organization (or TFS Collection) for new projects
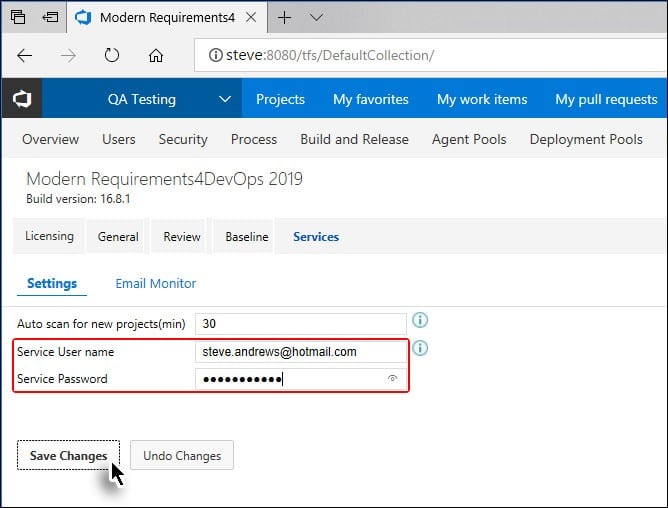
- Registration of the current organization (Admin user credentials are required for this option)
Note: Enter values for both of these settings in one go. Users can’t choose to configure one setting while leave the other pending.
Enter time interval for Auto Scan (should be between 1 and 60).
This value determines the interval in minutes after which the registered Azure DevOps organization would be scanned for new projects.

- Provide authorized login credentials. (with TFS admin rights).
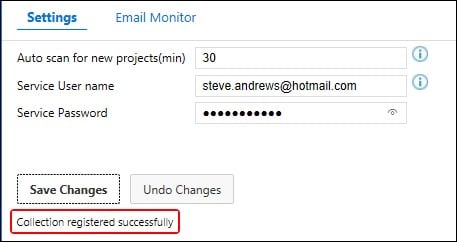
On successful authentication, current organization is registered and a confirmation message is displayed.

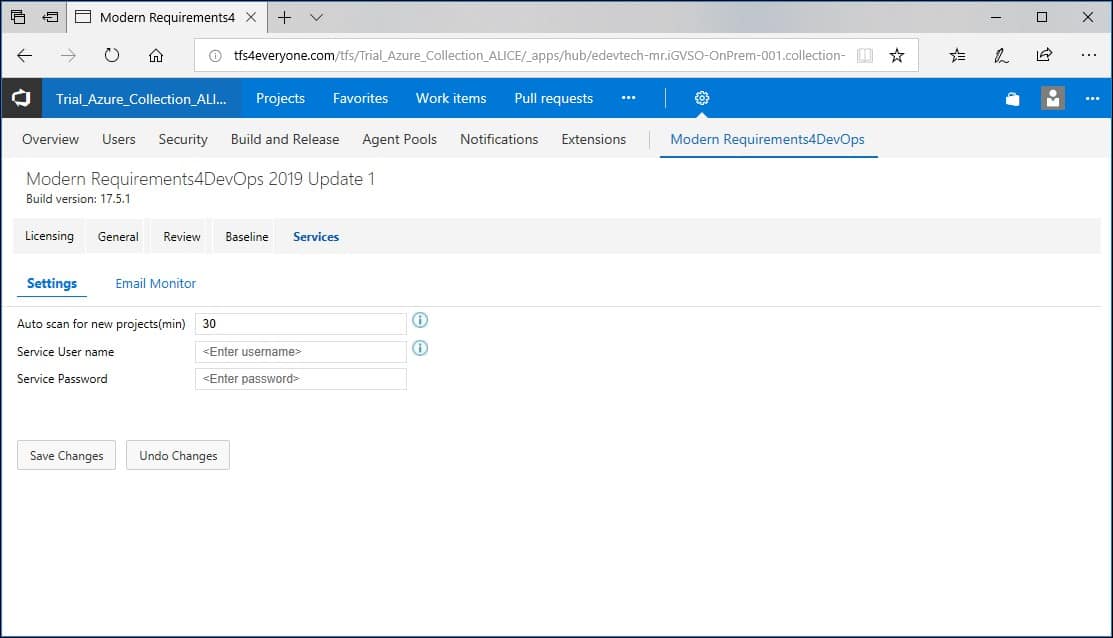
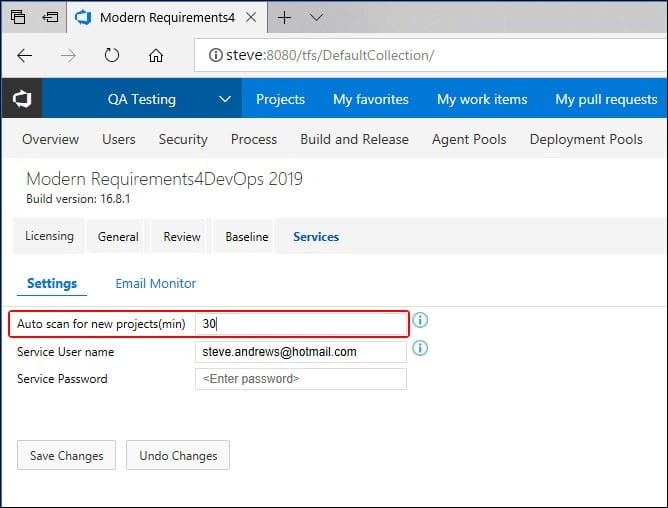
The above section elaborated the process to customize the automatic scanning time for the Azure DevOps Organization. The value shown in the above image means that the organization would be scanned every 30 minutes for the new project.
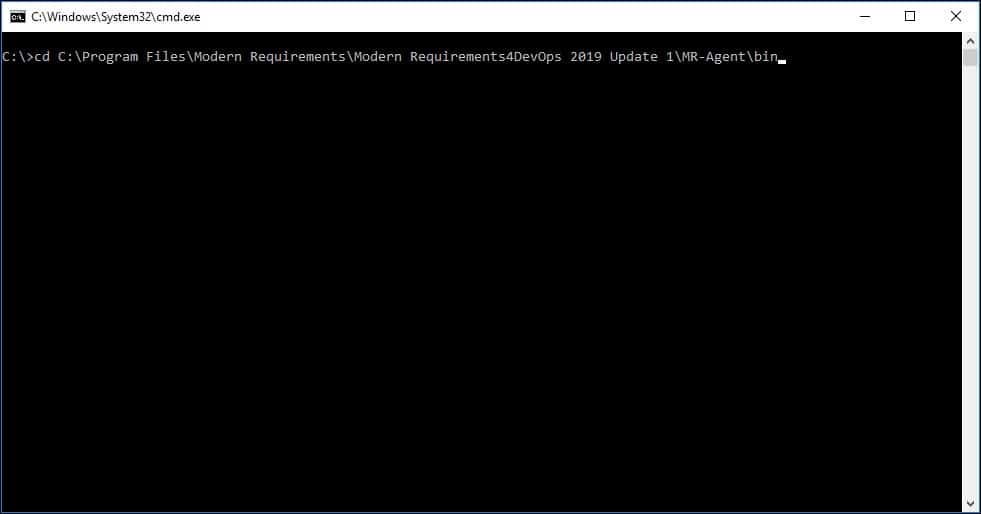
However if the user has just created a new project and wants to work on it right away then he has to manually identify it (the project) in the Azure DevOps Organization. The following steps are required to do so:
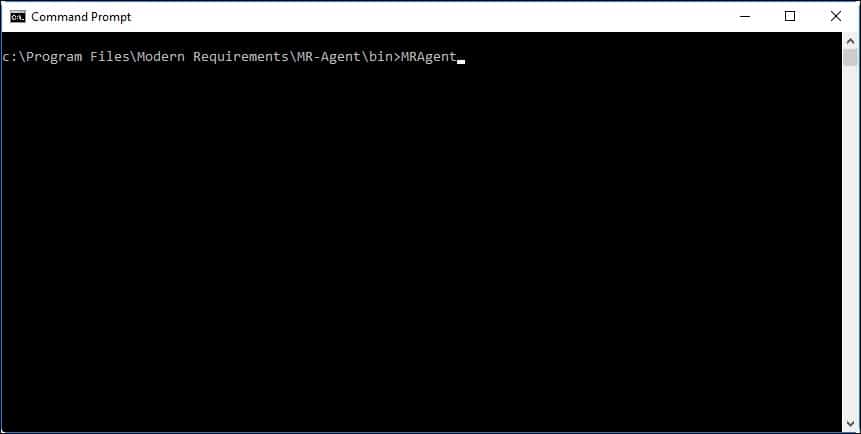
- Enter the following command on CMD: cd :\Program Files\Modern Requirements\MR-Agent\bin

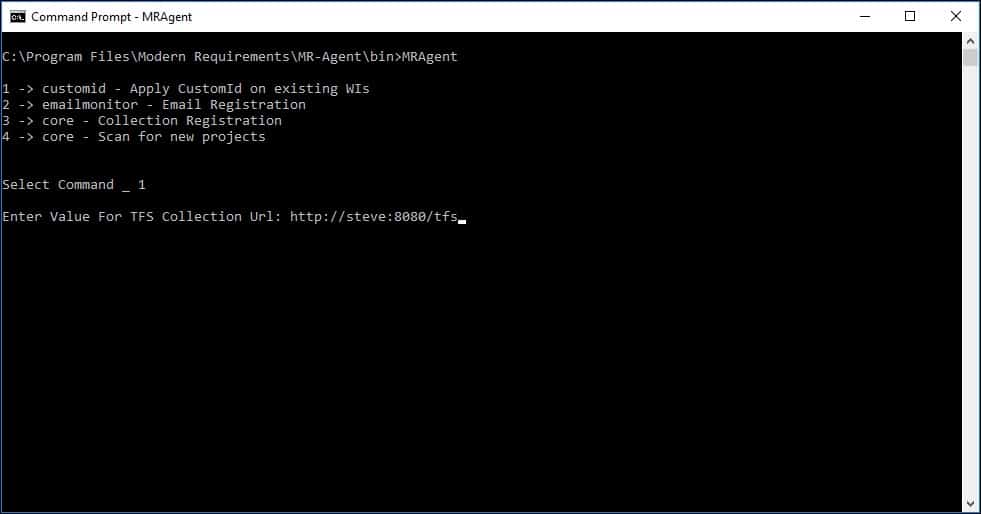
- Once in the bin directory, enter the following command: MRAgent
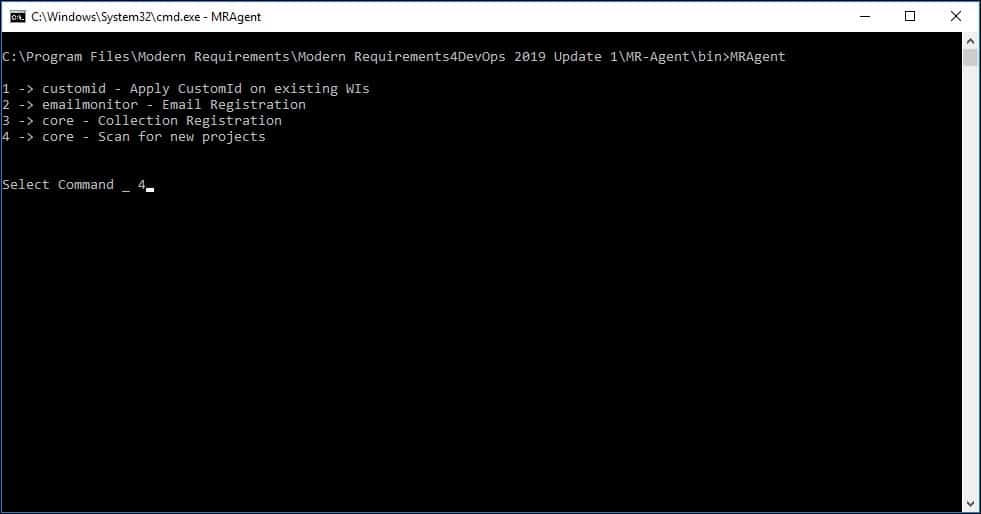
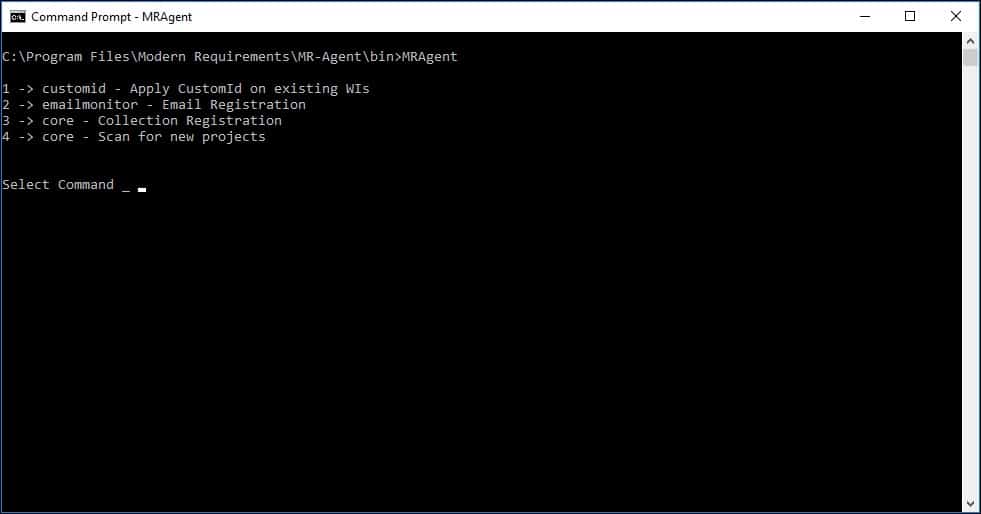
The menu of options is displayed.
- Type 4 and click Enter.
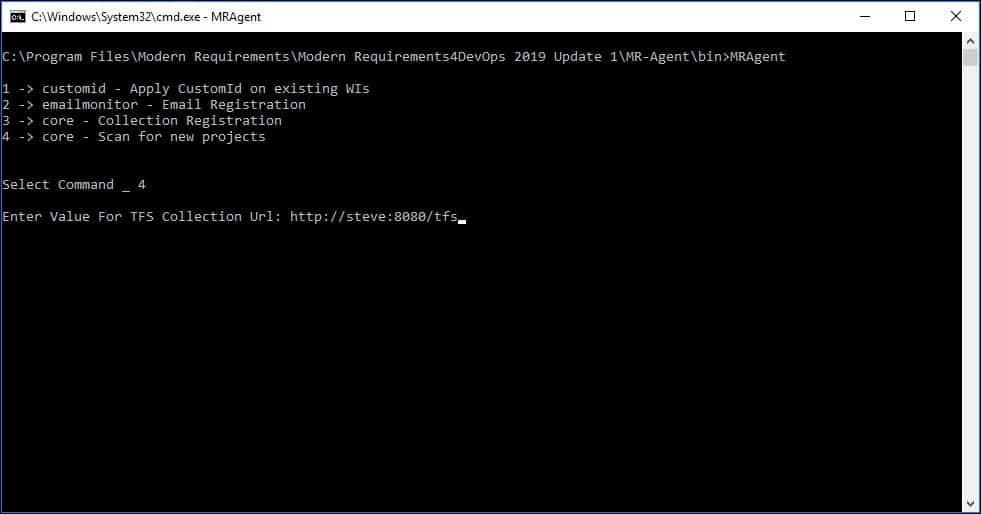
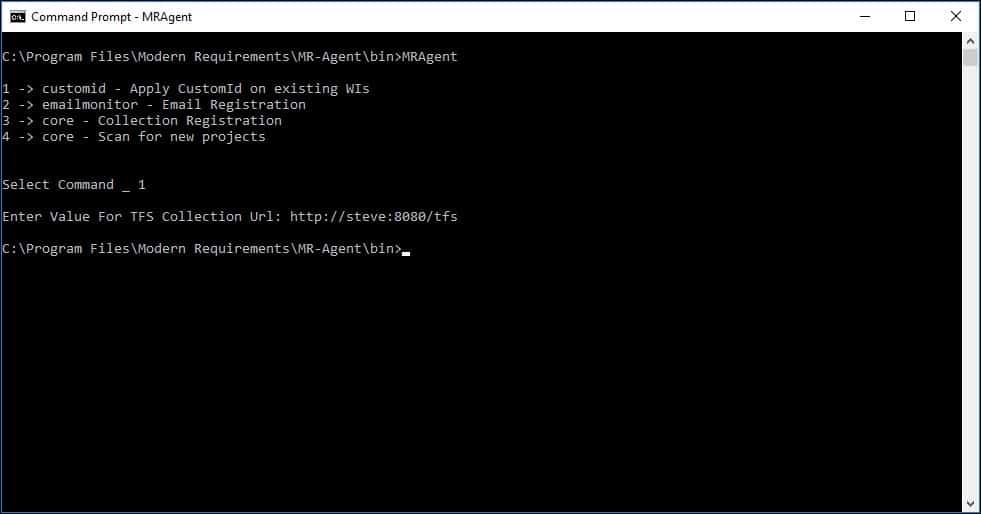
- Enter the Azure DevOps organization value to scan for new projects.
If no error message is displayed, the process has been successfully carried out for scanning new projects created after registering an Azure DevOps organization/or applying its config.


Custom ID is a component of MR Services (MR Agent) that is used to provide Customized IDs to work items in addition to their default work item IDs. The Custom IDs do not replace the original IDs, instead they complement them. The customized IDs can be used to keep track of the work item origins (i.e. which team created a particular work item).
In order to make the Custom ID work properly, users must manually create the following two items:
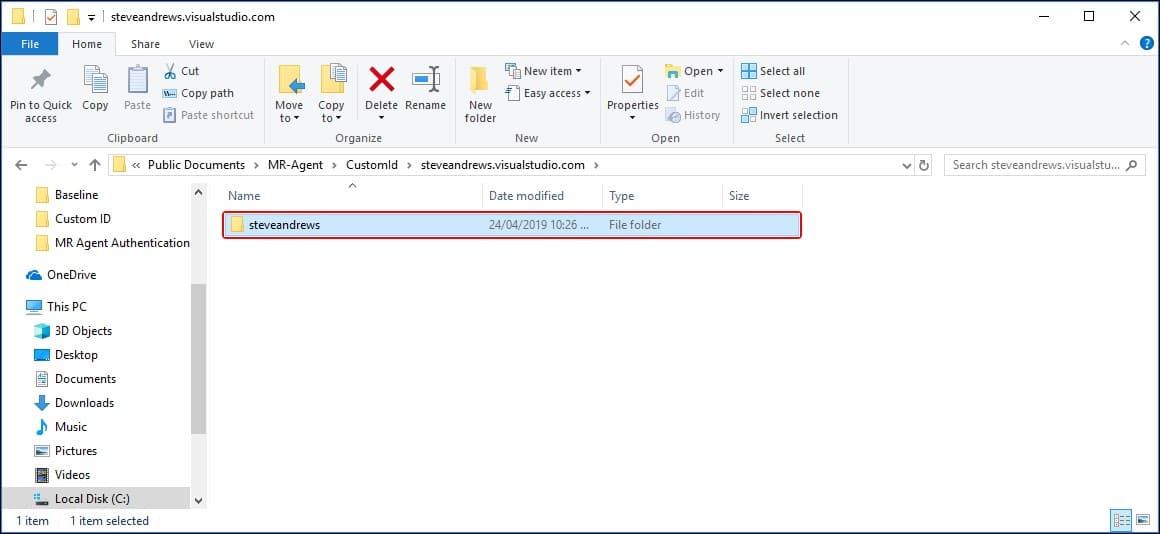
- A folder that is named after the Azure DevOps (TFS) server name (on which the Custom ID is required to apply).
- Another folder that is named after Azure DevOps organization or TFS Collection (on which the Custom ID is required) under the Azure DevOps (TFS) folder name.
The relevant organization folder should also include the config.xml file containing all configuration. The file and folder hierarchy should appear as displayed below using the text pattern and relevant image: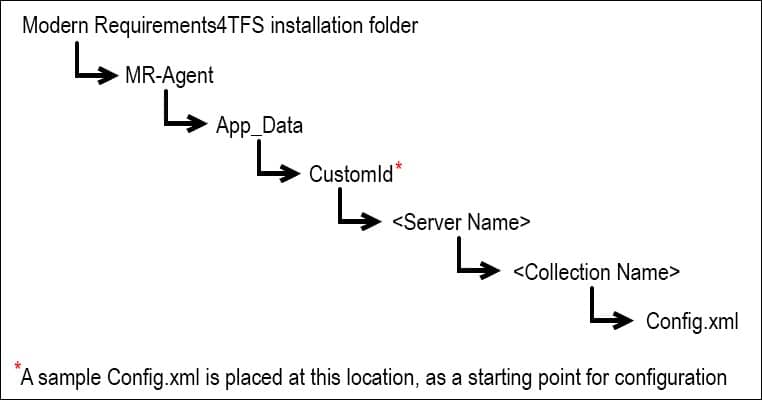
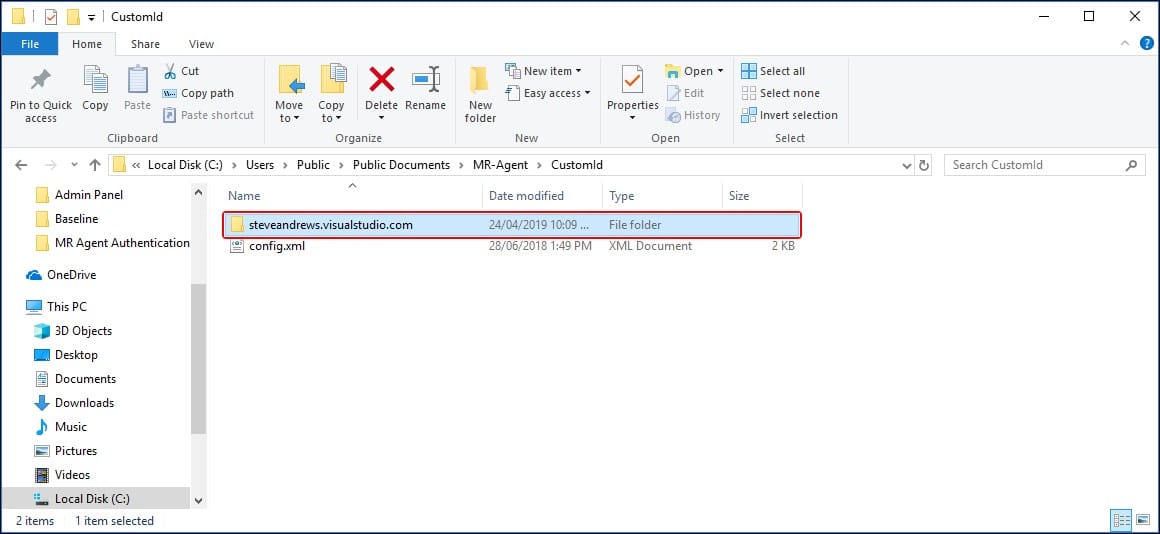
As described in the image above, a sample Config.xml file is placed in the CustomId folder.
- Create a folder named after the Azure DevOps Server name (on which component is required to apply) at this location.

- Enter the newly created folder and again create another folder here with the name of Azure DevOps organization name (on which component is required to apply).
- Copy the xml file (discussed earlier) into the newly created folder i.e. Folder with Azure DevOps organization name.
This file contains the blueprint for the desired configuration.

Configuring the Custom ID XML File
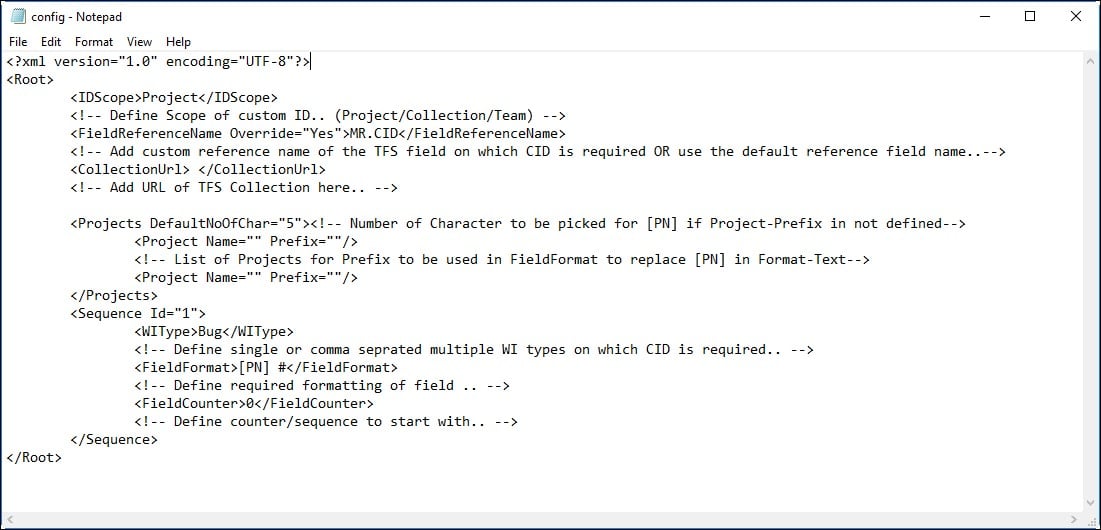
- Open the xml file in Notepad or any text editor.

- Define the value of the IDScope tag as per requirement, for example:
– Collection -> apply counter scope to Collection level.
– Project -> apply counter scope to Project level.
– Team ->apply counter scope to the Team level. - “FieldReferenceName” tag with “Override” value “Yes” means that the user defined field (between the tags) will be considered for the Custom ID. “Override” value “No” means that the default field “MR.CID” will be considered and applied for the Custom ID. This means that users must define this field in their TFS template with the same reference name, i.e. MR.CID.
- “CollectionUrl” tag requires the URL for the TFS collection on which the Custom ID is required to apply. (Note: Please make sure that the URL should not end on ‘\’ )
- “Projects DefaultNoOfChar” tag denotes the number of characters to pick up from the project name, if the project name is not defined in the tag<Project Name= “ ”>. By default its value is 5. Update the value if desired.
- Provide the TFS Project name (e.g. Project Name=”GITNew”) and its customized name (e.g. Prefix=”GTN”) to be used as a part of custom IDs.
- “Sequence Id=”1″” tag ID value shows the number of different Custom ID groups created in the configuration file and is used to identify and differentiate from the ID. It will always be a numeric only field and should be kept unique. The Sequence tag consists of a combination of WorkItem type, formatting required on the ID field and counter to start from.
- The “WIType” value requires the type of Work Item on which the Custom ID is required to apply. Also, if required, multiple Work Items could be defined for the same configuration to apply as a group.
- The “FieldFormat” tag is used to define ID formatting required on the Custom ID.
Example: [PN] Req #####[PN] is used as a placeholder for the above defined prefix of the project Name.
For numeric format reference please check the following link:
https://docs.microsoft.com/en-us/dotnet/standard/base-types/custom-numeric-format-strings - The “FieldCounter” tag is required to define the number or series from where the Custom ID counter is required to start from. Once the counter value is applied (configuration file is applied), it cannot be modified in any case.
- Following the successful completion of the configuration file, save and close the file.
Applying Custom ID on Existing Work Items
- Enter the following command on CMD: cd :\Program Files\Modern Requirements\MR-Agent\bin
- Once in the bin directory, enter the following command: MRAgent

The menu of options is displayed.
- Type 1 and click Enter.
- Enter the Azure DevOps organization (or TFS Collection) URL value.
If no error message is displayed the Custom ID has been applied on existing work items of collection successfully.

Dirty Flag is a component of MR Services (MR Agent) that is used to mark particular work items as dirty (due to changed requirements) so that relevant stakeholders may review these work items once instead of proceeding with the outdated requirements.
In order to make the Dirty Flag work properly, users must manually create the following two items:
- A folder that is named after the Azure DevOps (TFS) server name (on which the Dirty Flag is required to apply).
- Another folder that is named after Azure DevOps organization or TFS Collection (on which the Dirty Flag is required) under the Azure DevOps (TFS) folder name.
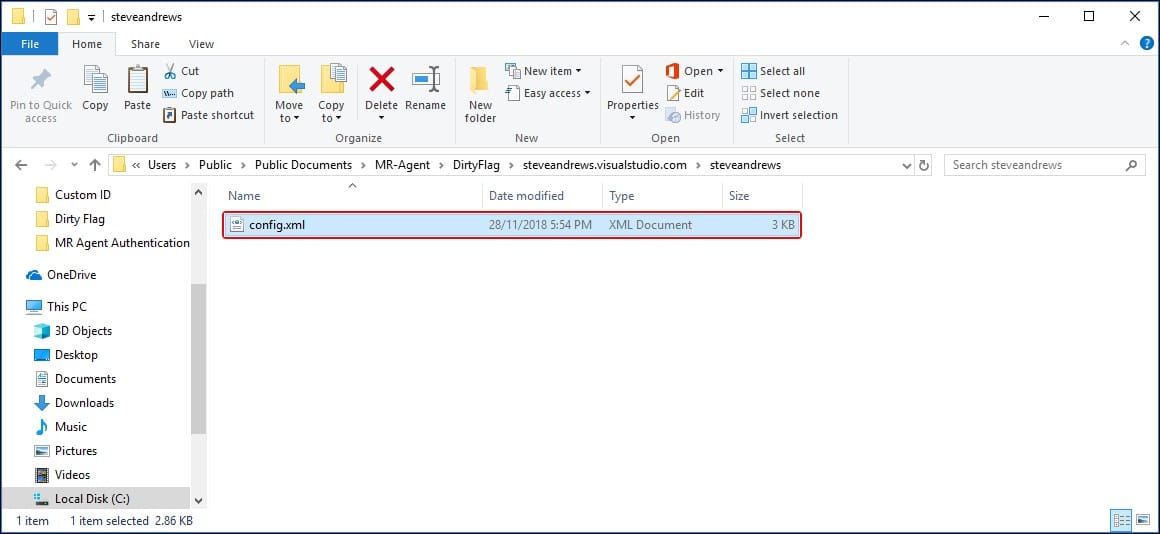
The relevant collection folder should also include the config.xml file containing all configuration. The file and folder hierarchy should appear as displayed below using the text pattern and relevant image: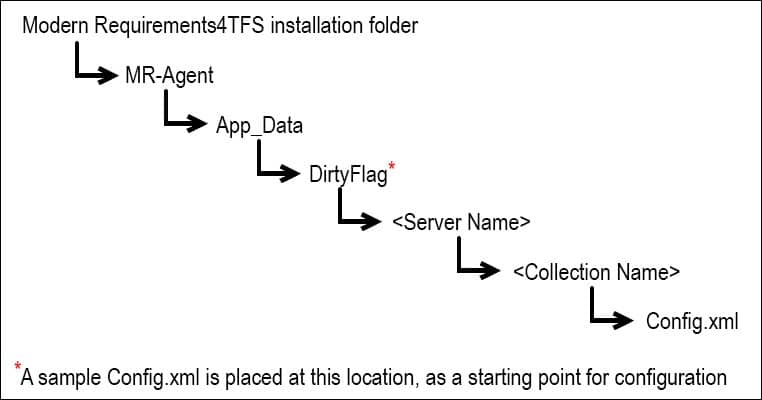
As described in the image above, a sample Config.xml file is placed in the Dirty Flag folder.
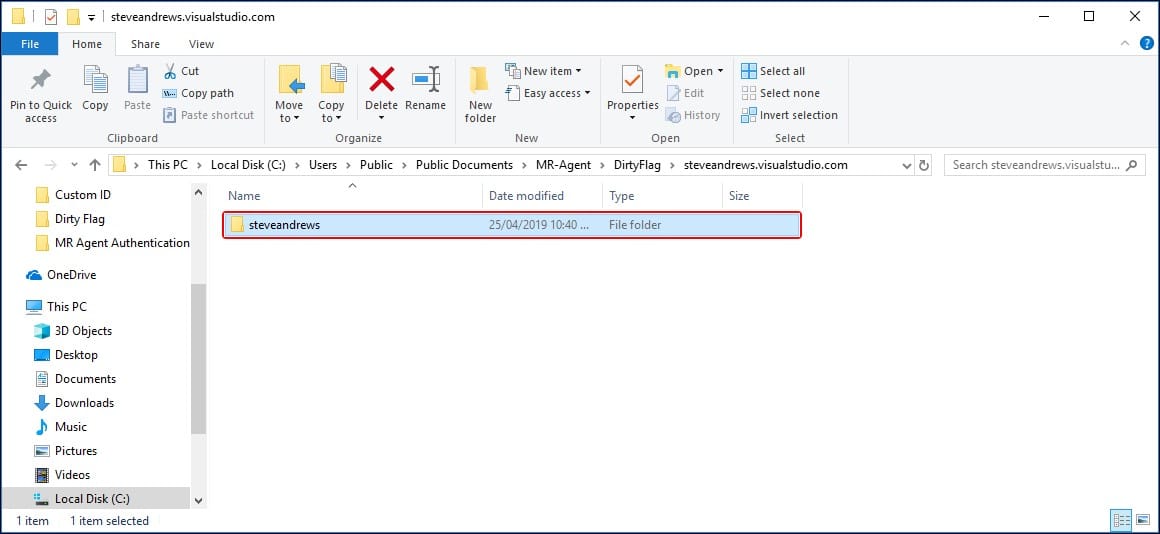
- Create a folder named after the Azure DevOps (TFS) Server name (on which component is required to apply) at this location.
- Enter the newly created folder and again create another folder here with the name of Azure DevOps organization (or TFS collection) name (on which component is required to apply).
- Copy the xml file (discussed earlier) into the newly created folder i.e. Folder with Azure DevOps organization (or TFS collection) name.
This file contains the blueprint for the desired configuration.

Configuring the Dirty Flag XML file
- Open the xml file in Notepad or any text editor.

- Define the Collection URL value using the CollectionURL
Each Action tag has a Source part and a Target part. The Source part tells MR Services (MR Agent) what to look for to trigger the Dirty Flag; the Target part tells MR Services (MR Agent) which type of work items will be tagged as dirty in case of a trigger.
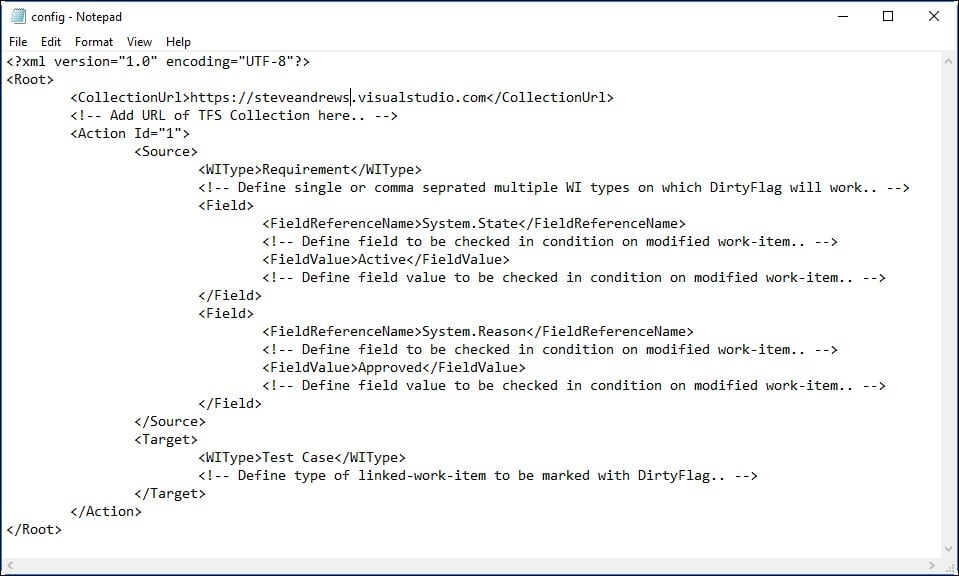
- In the Source section the “WIType” tag denotes the type of work items with which the Dirty Flag will work. Multiple work items types could be used with comma “,” as a separator.
- The “FieldReferenceName” tag denotes which field(s) of the work item (the list is provided in the WIType tag) will be checked.
- The “FieldValue” tag denotes the exact value of the FieldReferenceName that will trigger the Dirty Flag.
If multiple fields are checked, the Dirty Flag will be triggered only when all the FieldValues are matched, i.e. using AND logic.
- The “WIType” of the target section denotes the type of work items that will be marked as dirty if the condition in the source section is satisfied.
- Save and close the configuration file following its successful completion.
Email Monitor is a component of MR Services (MR Agent) that is used to automatically create work items from emails. A particular email address is configured for this purpose and on successful completion of the configuration process, all emails sent to this email address result in creating/updating work items. The process involves the following steps*:
- Configuring the Email Monitor Config file (placed at a particular location)
- Entering and verifying email settings
Each of these steps is elaborated further below.
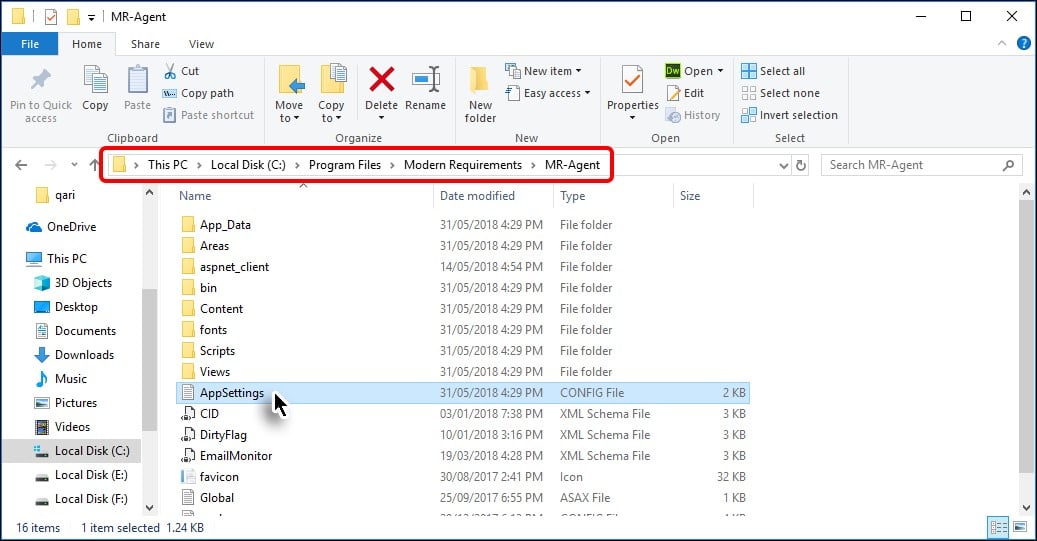
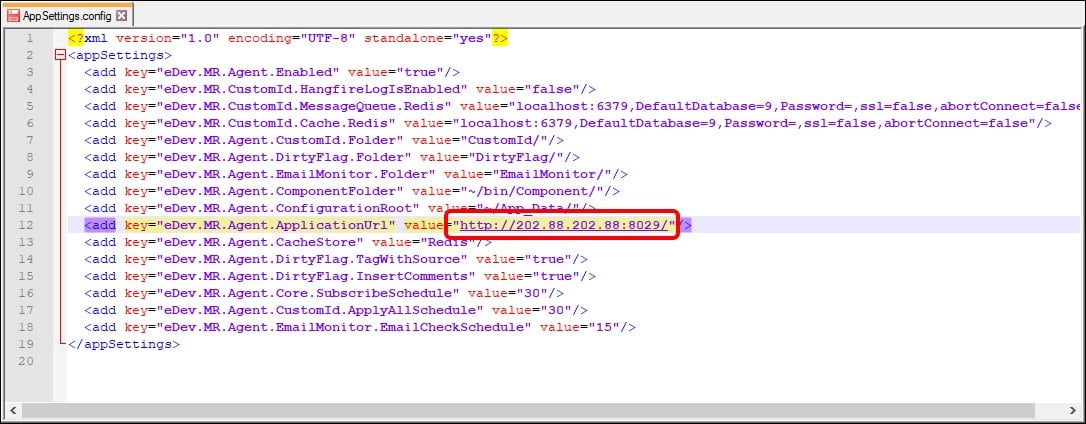
*For local Azure DevOps (TFS) servers, MR Services (MR Agent) automatically adds the relevant location in the application settings file (AppSettings.config). However if Azure DevOps Services are involved then the user’s machine should have a live IP address that the Azure DevOps Services can use to access/communicate. This IP address should be added in the AppSettings config file. The process to do it is elaborated in the following steps:
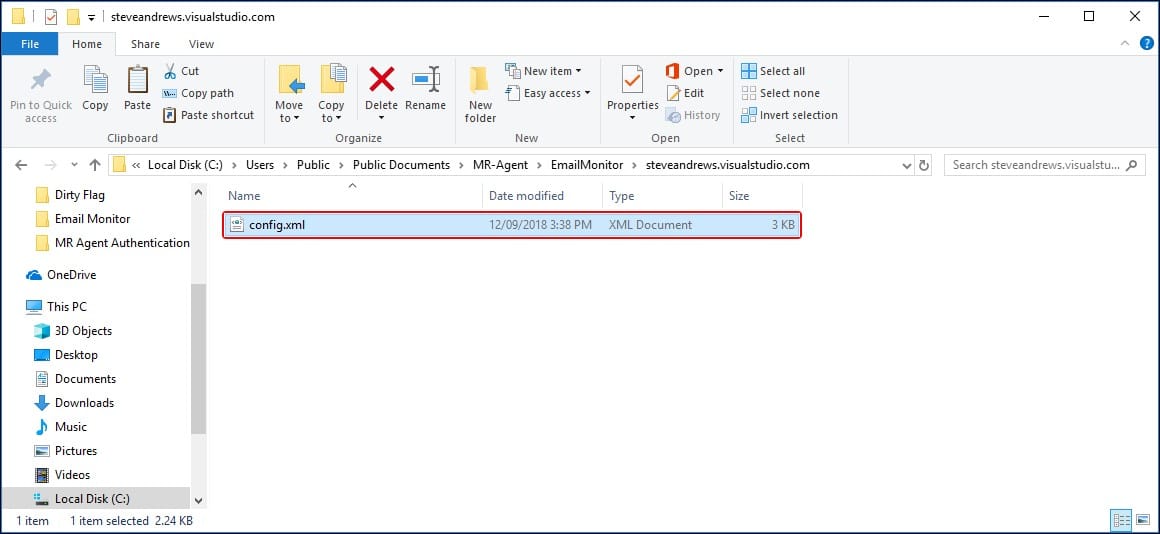
- Go to the installation folder of MR Services (MR Agent) (highlighted in the image) and open the AppSettings config file in a text editor.

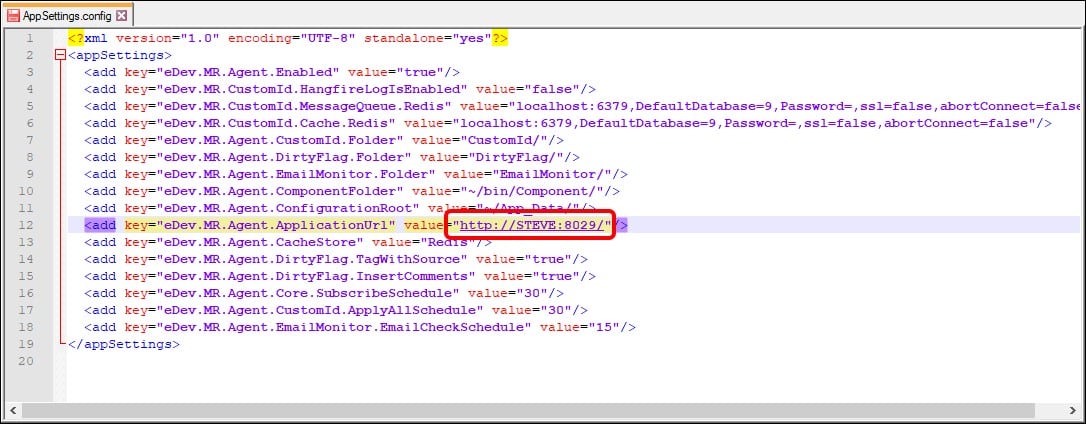
The ApplicationURL is automatically set toward the local machine.

Change the value (for Azure DevOps Services only) to the live IP address of your machine including the relevant port.
*Contact your Network Administrator to get the live IP address and port information
- Save and close the config file.
Timing Configurations in APPSETTING file
At the bottom of the AppSettings config file, there are three timing configurations available for users.
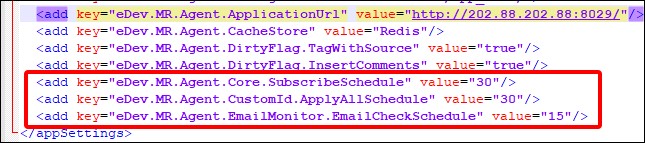
SubscribeSchedule
- Works for all components of MR Services
- Used to check new projects/collections
- Default value “30”* represents the number of minutes, after which MR Services (MR Agent) scans for new projects. Users can configure the value (in minutes) as per their requirements.
*This value can also be configured using Admin Panel.
ApplyAllSchedule
- Works only for Custom ID
- Used to apply Custom ID on newly created work items
- Default value “30” represents the number of minutes, after which MR Services (MR Agent) scans for new work items and apply Custom IDs on them. Users can configure the value (in minutes) as per their requirements.
EmailCheckSchedule
- Works only for Email Monitor
- Used to check if a new email has arrived from which work items could be created/updated
- Default value “15” represents the number of minutes, after which MR Services (MR Agent) scans for email. Users can configure the value (in minutes) as per their requirements.
Email Monitor Configuration
In order to make the Email Monitor work properly, users must manually create the following items:
- A folder that is named after the Azure DevOps (TFS) server name (on which the Email Monitor is required to apply).
The relevant server folder should also include the config.xml file containing all configuration. The file and folder hierarchy should appear as shown below using the text pattern and relevant image:
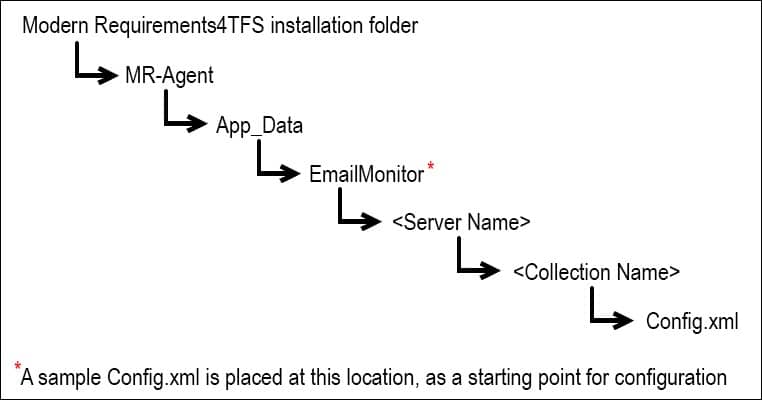
* Note: for the current versions of Email Monitor, the hierarchy stops at the server folder, and placing the file in that server folder. However for the future versions, the hierarchy would go up to the organization folder (like other components of MR Services (MR Agent)). Please consult with your administrator or contact Modern Requirements if any uncertainty persists in this matter.
As described in the image above, a sample Config.xml file is placed in the EmailMonitor folder.

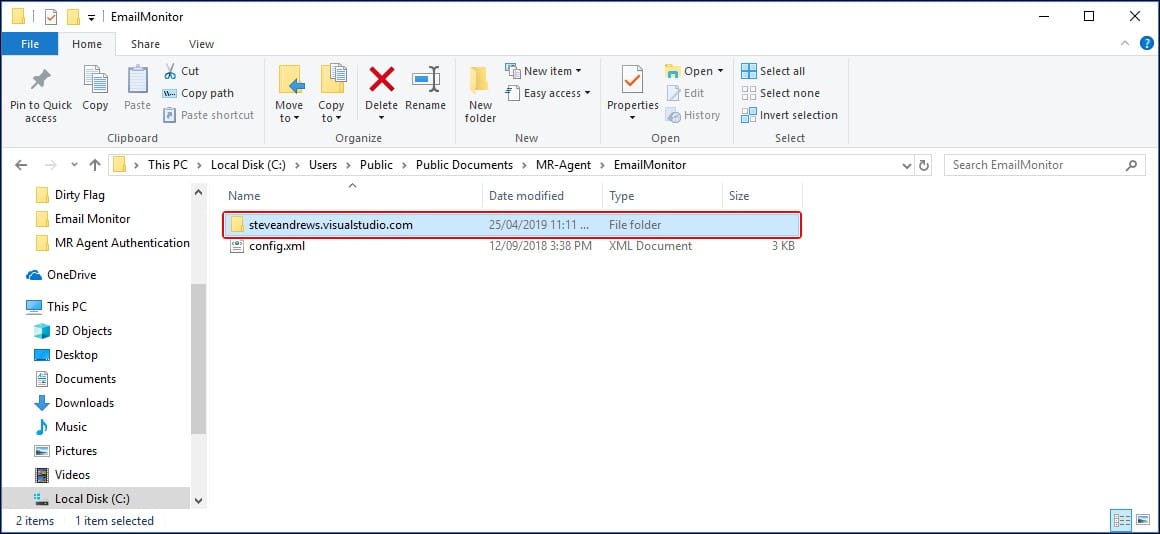
- Create a folder named after the Azure DevOps (TFS) Server name (on which component is required to apply) at this location.
- Enter the newly created folder and copy the xml file (discussed earlier) into that folder i.e. Folder with Azure DevOps (TFS) Server name.
- This file contains the blueprint for the desired configuration.
Configuring the Email Monitor XML file
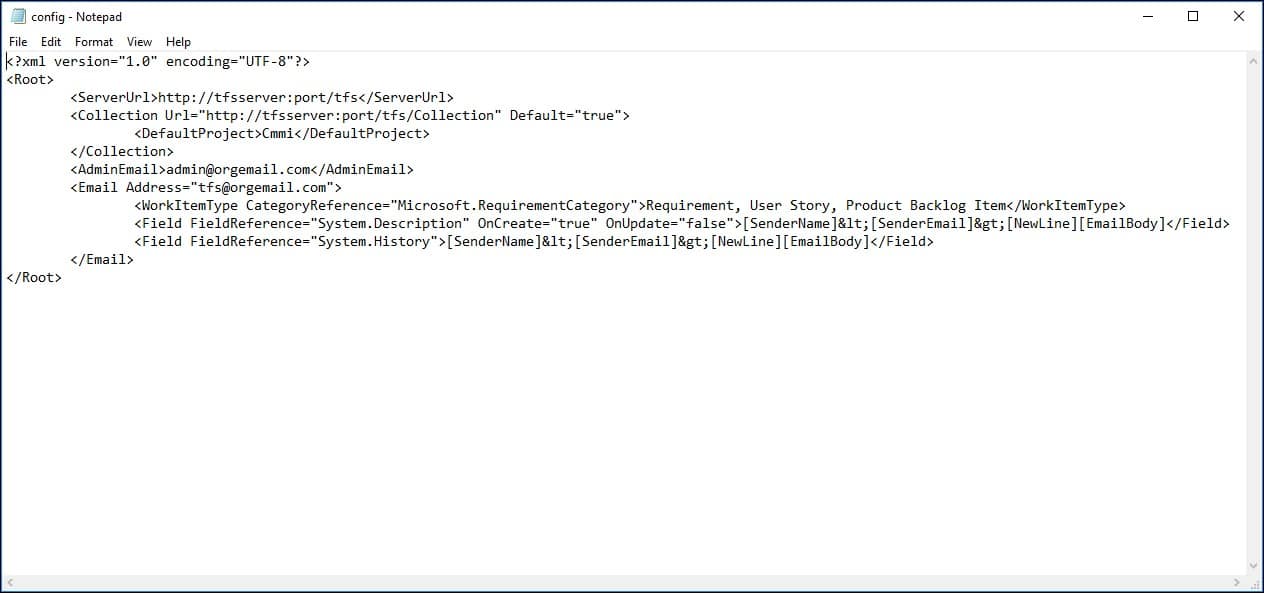
- Open the xml file in Notepad or any text editor.

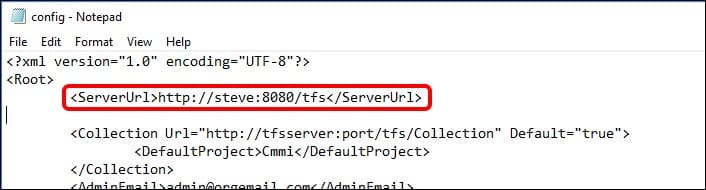
- Define the value of the ServerURL tag as per requirement, for example:

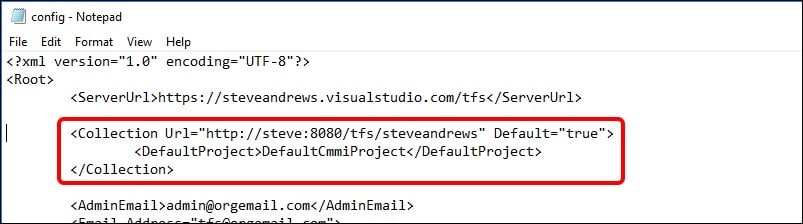
- Similarly define the value for Collection Url (including the DefaultProject)

IMPORTANT
– The values for both the ServerURL and Collection Url should correspond to the folder structure described before.
– Make sure that the URL does not end with a forward slash “/”
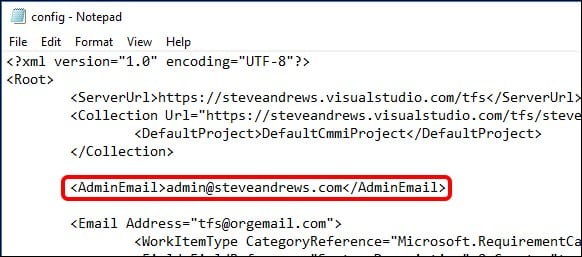
– User can define multiple Collection URLs in the config file. - Provide the value for AdminEmail. This email address is used as a mitigation, in case the desired functionality can’t be achieved using the address defined in Email tag (explained in the next step).

Note: Only a single Admin email can exist in the config file.
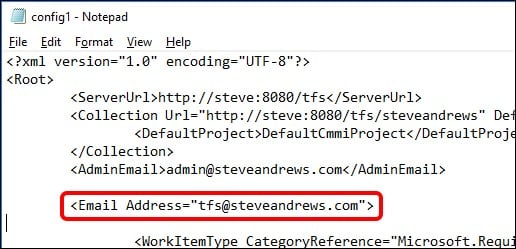
- “Email” tag is the main tag in this file that defines where the email would be sent. The emails sent to this address would be used to create desired types of work items. Configure the Email tag as required
- Email: Provide the target email address where the email should be delivered for work items creation/update. In case some criteria does not match with the desired values, the warning email would be sent at the Admin Email defined above.

Note: Multiple email addresses can be defined in the config file.
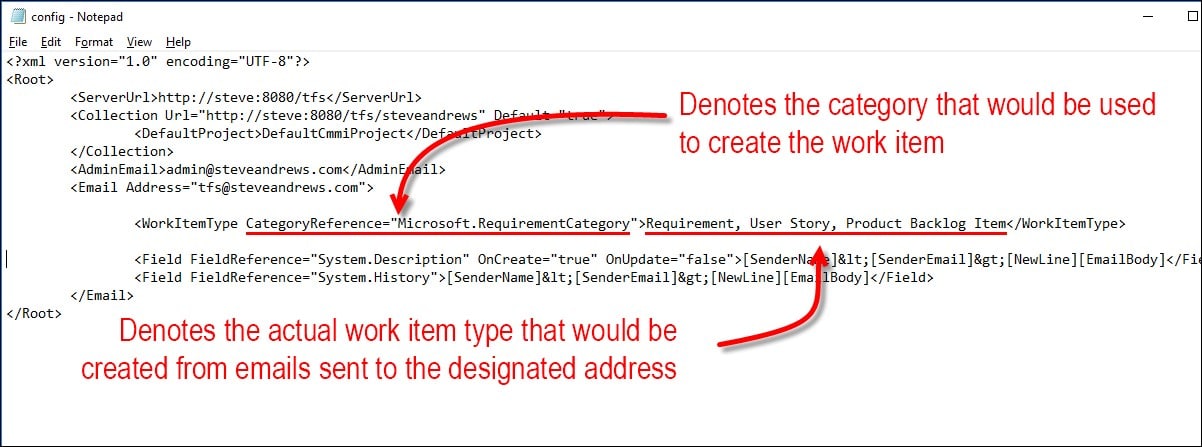
- Work Item Type: Set the desired type of work item to be created. In the following example CategoryReference represents the internal category type of work items. Multiple values in this tag means that the relevant type of work item would be created depending upon the template of team project. e.g. If the team project is using CMMI template then the email would create a Requirement work item. Similarly, for Agile based project a User Story would be created and for a Scrum based project a Project Backlog Item would be created.

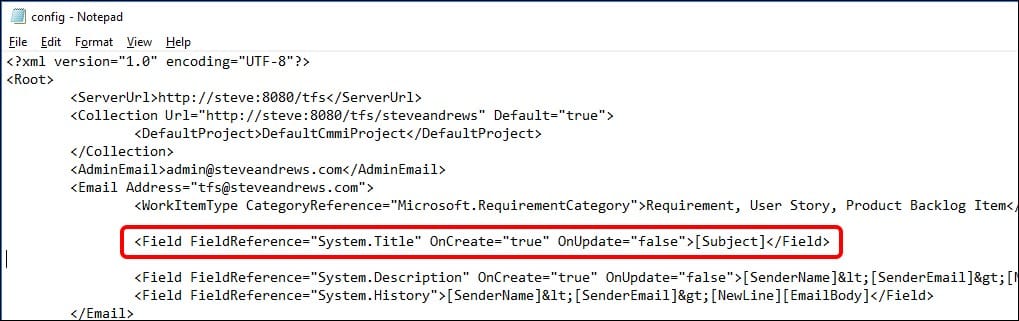
- FieldReference=”System.Title”: Tells what would be the title of the work Item to be created. The following example shows that the subject of the email would become the title of the work item.
- OnCreate= ”true” means that the title would be set from the email’s subject only for new Work Items.
- OnUpdate=”false” means that for existing Work Items, the Title field would not be updated.

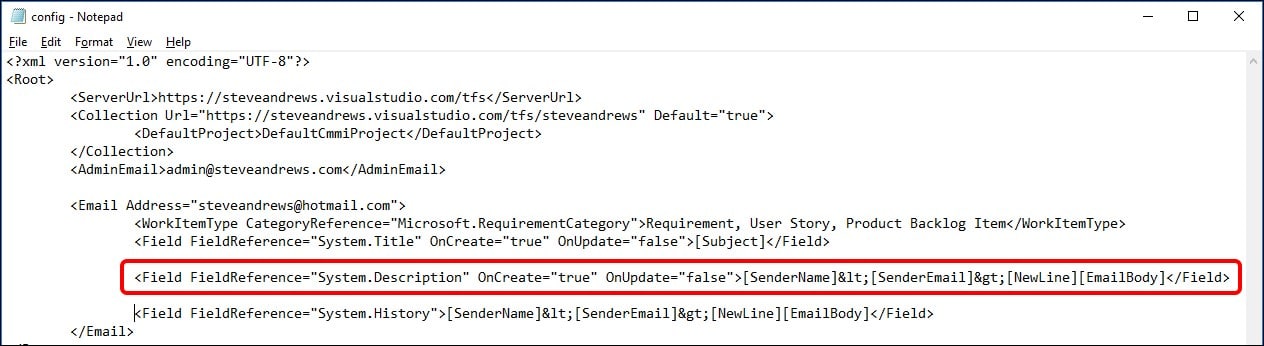
- FieldReference=”System.Description”: Tell where to put the information from the incoming emails (i.e. in which property/field of the work item). The following example uses the Description field for this purpose.
- OnCreate= ”true” means that for new Work Items, the content of the email (described next) would be used to populate the Description field of the work item.
- OnUpdate=”false” means that for existing Work Items, the Description field would not be overwritten. Instead the update would go to the comments/history section of the work item.
The later part of this field tells the composition of the description field. The following information would compose the Description field:
- Sender Name shown inside <> e.g.
- Sender Email also shown inside <> e.g. <alice.ducas@steveandrews.com>
- Email body added in a new line

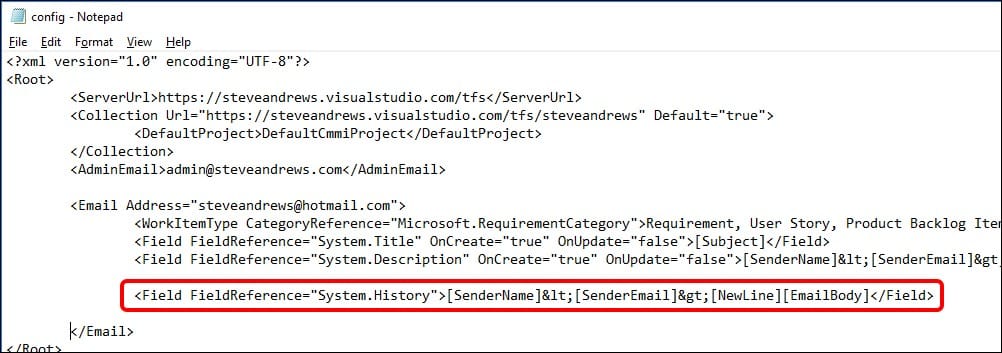
- The final FieldReference=”System.History” is used for discussion emails that come after a work item has been created. Instead of overwriting the Description field, the subsequent email information is stored in the Comments field (internally called History). The composition of the History field is more or less the same as of Description field discussed above. Users are advised to keep the original settings for this tag.

- Following the successful completion of the configuration file, save and close the file.
- Email: Provide the target email address where the email should be delivered for work items creation/update. In case some criteria does not match with the desired values, the warning email would be sent at the Admin Email defined above.
Deploying the Email Monitor
Email Monitor can be deployed by configuring relevant settings under the Admin Panel. These settings can be accessed using the Services Tab.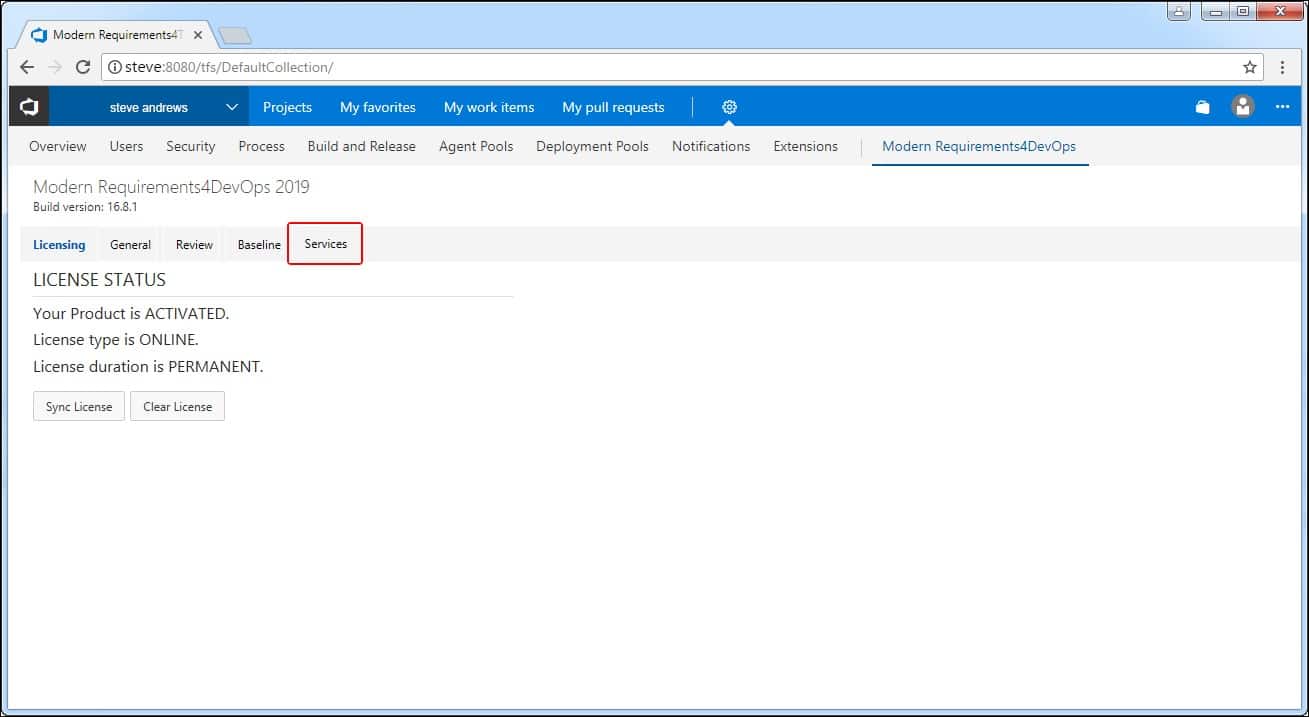
The Services section of the Admin panel currently has two Tabs: Settings & Email Monitor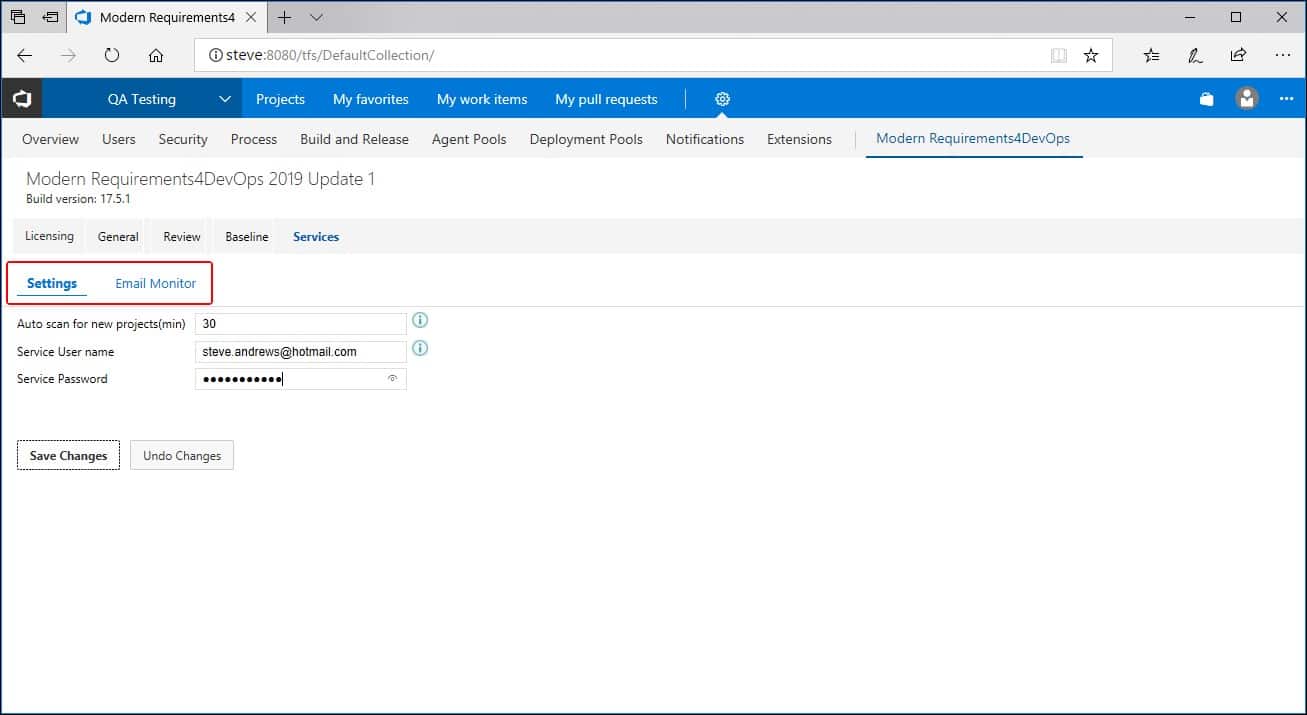
Settings Tab deals with 1) User Authentication/Organization Registration 2) Scanning for new projects.
Email Monitor deals with all the email related options discussed earlier in the command line section.
Configuring Email Monitor options
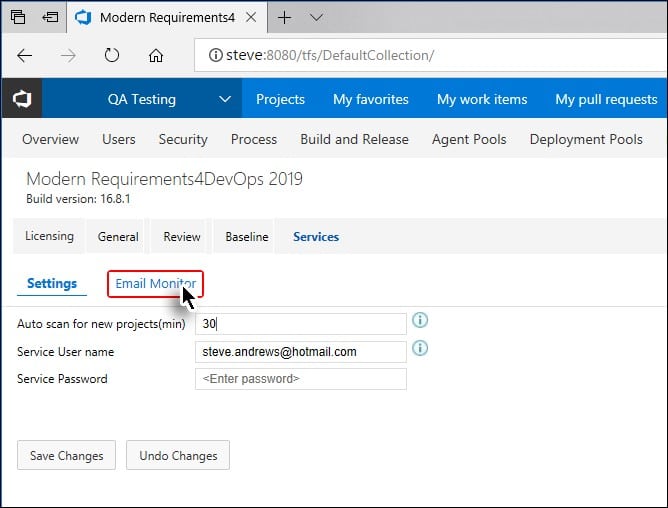
- Email Monitor tab under the Services section is used to configure email settings.
- The options can be accessed by clicking the Email Monitor tab as shown in the following image.
- If the user hasn’t registered their organization (by providing required details in the Settings sub-tab), then upon clicking the Email Monitor sub-tab, the user is sent back to the Settings sub-tab, unless the desired information is entered.
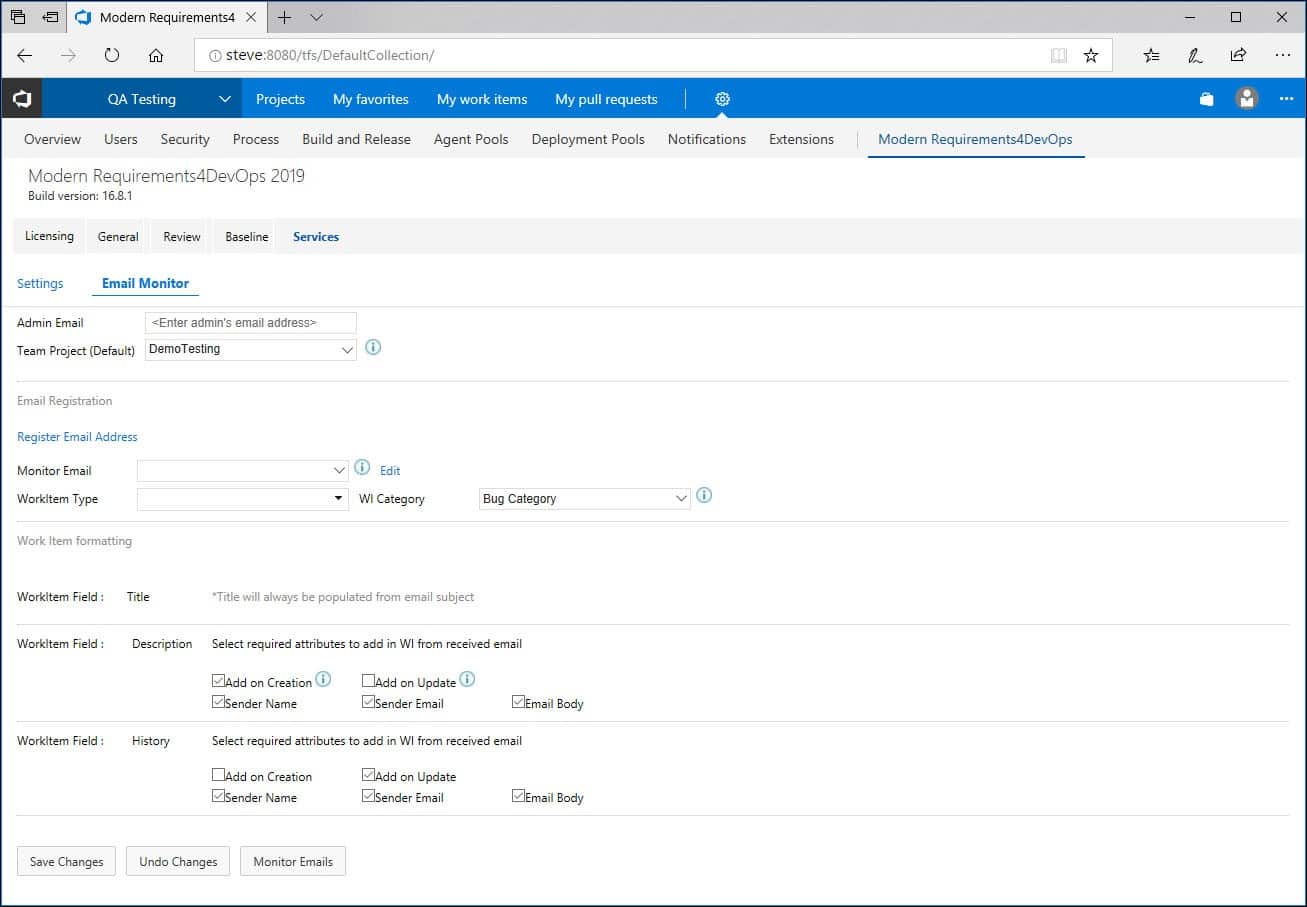
- The Email Monitor settings are divided into sections, where each section is used to configure a particular setting.

- All necessary settings are configured once. Users can not configure certain settings and leave other pending.
- The first section is used to configure the default project and the admin email address.

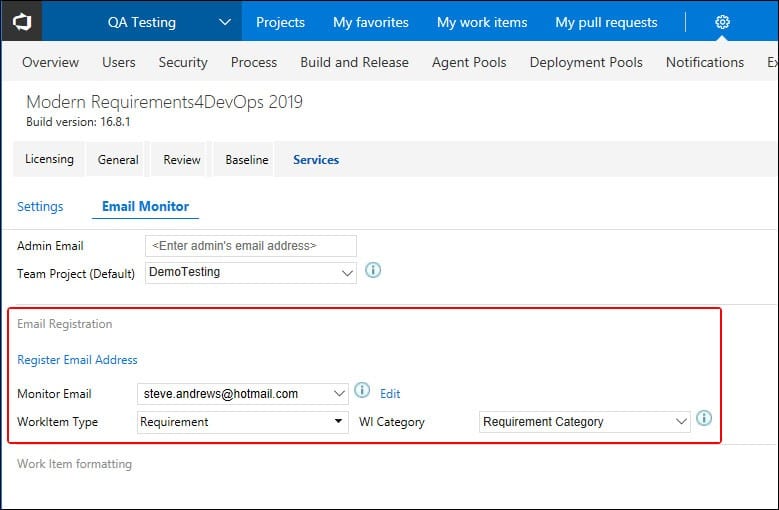
- The second section is used to configure the email address that would be used for Email Monitoring.

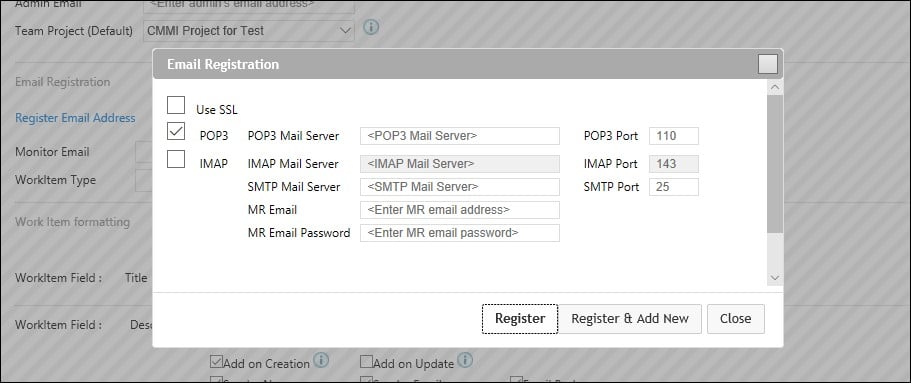
Clicking on Register Email Address would open a popup window where the network settings for the email (e.g. SSL, POP3, IMAP etc) can be configured.

- The third section is used for settings (that will be used to) to extract Work Item content from the emails sent to the Registered Email Address.

Clicking on Save Changes button after configuring all the settings would deploy the Email Monitor.