This article covers how to use the Impact Assessment module and its extension on Modern Requirements4DevOps. The Impact Assessment module for MR4DO allows users to perform impact analysis on a given work item which ultimately helps to assess the impact on the related and subsequent work items down the hierarchy.
To learn how to install the Impact Assessment module, please visit the installation guide.
Users can invoke Impact Assessment from Queries module.
Users can select one or multiple work items in Queries and then click on “Add Impact” from the options. As shown in the image below. In Queries module, the “Add Impact” option is available in Queries toolbar and in the Context Menu.
As the “Add Impact” option is clicked, the user will be navigated to the “Impact Assessment” module and the “Add Impact” window will appear asking the user to enter the name for the Impact and specify the folder for its placement.
Add Impact From Backlogs
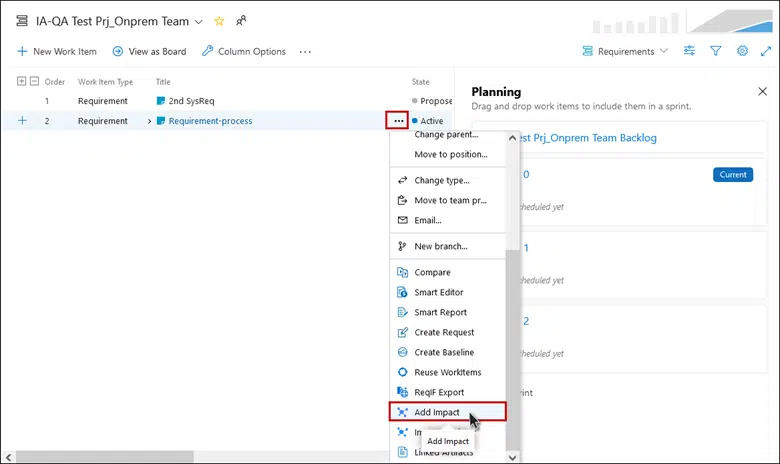
Like the Queries module, “Impact Assessment” can also be invoked from the Backlogs.
Users can select one or multiple work items in Backlogs and then click on “Add Impact” as shown in the image below.
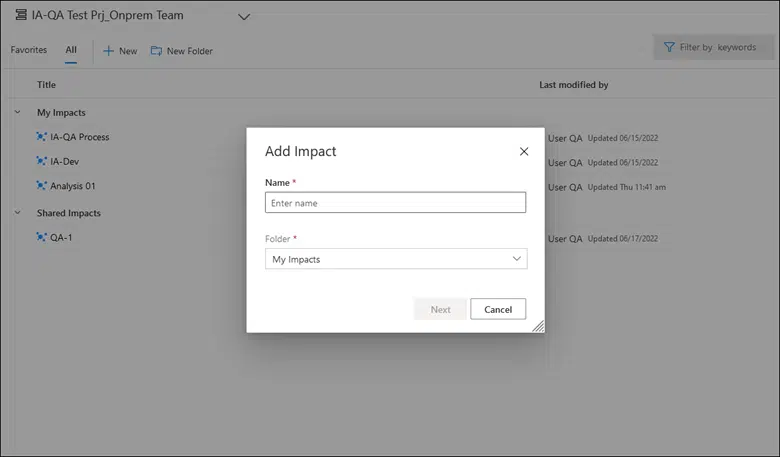
As the “Add Impact” option in clicked, the user will be navigated to the “Impact Assessment” module and the “Add Impact” window, as shown below, would be shown to add name for the Impact and for selecting its relevant folder.
Impact Assessment UI
On the Impact Assessment Analysis page, as shown in the image below, two columns are shown by default. The column on the left-hand side entails the source work item(s) on which the Impact Assessment is intended to be performed. The second column in the Analysis window displays the list of all those work items that are directly associated with the source work item through any Link Type.
If any work item of the second column has work item(s) linked to it then, upon clicking the respective work item, the linked work item(s) will reflect in the third column of Impact Assessment.
The number of columns will increase with the chain of associated work items as shown in the image below.
Add Link
With the Add Link option users can add an existing or new work item(s) during Impact Assessment. The Add Link option is only available when the source work item is selected.
Add an Existing item
1. Once you have selected the desired source work item, click on the Add Link option and select “Existing Item“
As you click on the “Existing Item” option, the following “Add Link” window will appear. The user can now link an existing work item(s) from within the ADO server to the source work item of Impact Assessment.
3. Select the Existing Work item(s) Link Type.
4. Now enter the Work Item ID or search by title or work item type. While the user is entering the text, the system will start displaying suggestions/results that matches to the work item type or title of the work item.
User can also add commentswhile adding an existing work item. Added comments will only be visible in Links tab of ADO work item editor.
Now Click on the OK button.
Existing work item has been added.
Add New Item
Select the desired source work item, click on the Add Linkoption and select “New Item“
As the user clicks on “New Item“, the following “Add New Linked Work Item” window appears with the relevant options.
Select the desired link type for the new work item.
Select the desired work item type.
Enter title for the new work item.
Now click on the “OK” button.
New work item has been addedas link against the source work item of the Impact File.
Mark Item as Impacted, Not Impacted, To be Discussed
While doing the Impact Assessment users can mark any work item as Impacted, Not Impacted, or To be Discussed as shown in the image below. The Clear or Clear All option can be used to clear the Impacts from selective or all work items respectively.
Note: Marking work items with any of the below statuses would lead to the “Add Comments” option.
Add Comments
With the “Add Comments” option, a user has a slew of options while performing Impact Assessment. The user can enter the Impact, add comments, and add any existing or new task resulting out of the Impact with in the Add Comments window.
When a user clicks on the “Add Comments” icon or marks any work item, the “Add Comments” window provides the user a one-liner description area which may be utilized as deemed suitable.
If an Impact necessitates the addition of any further task(s) to perform, the user can click on the Add Task option in the Add Comments window and utilize any or both of the options, Existing Task and New Task, as required.
To add an existing task against the work item, click on the Add Task option in the top left corner of the window and then select “Existing task“. Once you have clicked on it, enter the link type and select the task(s) to link.
Click on the “OK” buttononce you have selected the Link Type and Task(s) to Link.
The existing work item has now been added as a linked work item.
To add a New Task against the work item, click on the Add Task option in the top left corner of the window and then select “New Task“. As the user clicks on the “New Task” option, the comments window expands with the option of adding new tasks real-time.
Enter a title for the new task and provide a value for the “Original Estimate“.
As the user presses the Enter button or clicks anywhere in the Add Comments window, the New Task will be added as a linked work item.
The user can create multiple New Tasks in the same manner and each task will be added as a Linked Work Item, as shown in the image below.
The Show all tasks toggle button (as shown in the image below) is used to show all the tasks linked to the work item. This also includes tasks that weren’t added or created from the Add Comments window.
The highlighted section in the below image denotes Total Number of Closed Tasks out of Total Number of Proposed Tasks.
Note: The toggle button must be set to ON to view the total number of closed and proposed tasks against the work item.When the toggle button is set to OFF, the user will only be able to see the counts for tasks that were added or created from the Add Comments window.
By clicking on the check box, a user can mark the task(s) as closed. When a task is check marked as “closed” by the user, it helps identify how many tasks have been completed during the impact among the total number of tasks created.
The user can click on the X sign followed by a confirmation dialogue box to delete the link between the two WI.
Column Options
With the Column Options, a user can add or remove columns as per the requirement. The user can also configure multiple sorting with the Sorting option.
Settings
With the Settings option from the tool bar, the user can set the visibility of the Work Items to three different show-only scenarios. The user can choose to show only the Impacted items OR Not Impacted Items OR To Be Discussed Items.
Filter
By clicking on the Filter icon, as shown in the top right of the below image, a user can invoke the filter options over each of the columns. With the help of the filter option, the user can restrict the visibility of items according to different sets of criteria.
For more filter options against each column, the user needs to click on the > icon as shown in the below image.
Document View
Once the Impact Assessment has been performed on all the work items, the user can view the Impact Assessment Report in the Document View Tab.
From the Document View tab, the user has the option to download the Impact Assessment Report in Wordand PDF format and can also share it through the E-mail.
The first column of the report shows the hierarchical chainof all the marked work items.
The analysisperformed through the Mark item as option (i.e. Impacted, Not Impacted, and To be Discussed) will be reflected in the Analysis column.
The one-linerdescription entered by the user from the Add Comments window will reflect against the respective work item in the Impact column.
Related Task(s)are those which were created by the user in the Add Comments window after analyzing the Impact.
Note: The Document View will show all the columns and fields regardless of any filter that might have been set by the user.
Performing Impact Assessment
While performing Impact Assessment and analyzing the impact of source work item on associated work items, a user can determine whether to mark the associated work items as Impacted, Not Impacted, and To be Discussed.
Mark The Work Items
Select the work item you want to mark and click on Mark Item as. Now select your desired Impact.For instance, we will mark a work item here as Impacted.
Add Comments
When the user clicks on any of the three Impacts the following comment window will appear allowing the user to add any relevant details regarding the impact.
Enter the relevant information about the Impact on the Work Item in the comment window.
Add Task(s)
In the comment window, a user also has the option to add task(s) in light of the Impact and forthcoming changes. The user can either select an existing task or create a new one.
Added task(s) from the comment window can been seen in the third column of the Analysis page.
Impact Assessment – Document View
Once all the associated work items have been analyzed and marked, the user can view the Impact Assessment Document View for the assessment report. The report can be accessed by clicking on the Document View tab.
Download & Share Impact Assessment
In the Document View tab, the user can view the Impact Assessment Report, download it in Word and PDF formats, and also send it via Email.