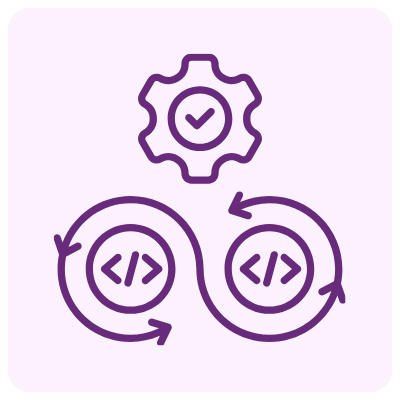
As an administrator, you can control how users access and interact with their Modern Requirements4DevOps projects by applying admin settings.
Continue readingAs an administrator, you can control how users access and interact with their Modern Requirements4DevOps projects by applying admin settings.
Continue reading
As an administrator, you can control how users access and interact with their Modern Requirements4DevOps projects by applying admin settings.
Continue reading
As an administrator, you can control how users access and interact with their Modern Requirements4DevOps projects by applying admin settings.
Continue reading
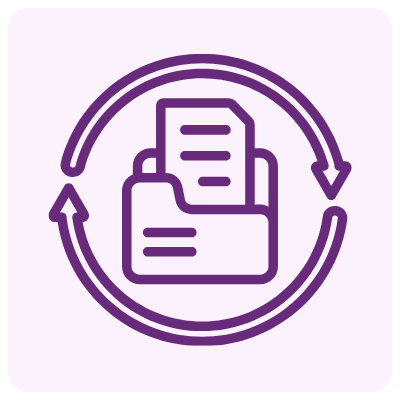
Achieve quicker compliance, shorter development cycle times, and faster value delivery
Continue reading

What is Modern Requirements4DevOps? Read on to discover how Modern Requirements4DevOps works—what problems it can help you solve and who uses it, along with a tour of its features, pricing, and integrations.
I’ll also explain how Modern Requirements4DevOps compares to similar tools.
Read the full article on Digital Project Manager.


Rights Management is a new feature in MR2020 Release to control user access. The project administrator can grant or deny a group of users from accessing an MR module and its functionalities. Currently, Rights Management is available for three MR modules: Smart Docs, Baseline, and Reporting.
Flexible and customizable permissions allow project teams to maintain the appropriate balance of collaboration and control.
Whenever a permission change takes place, it will immediately impact every user team/group that is assigned the permissions. This ensures that permission settings can easily be updated and maintained as projects progress and teams change roles.
Rights Management can be accessed from the Modern Requirements4DevOps extension under Project Settings.
The available features which you can set permissions for varies from module to module.
The available Group Features are as follows:
There are typically three types of permission access to choose from for each group feature:
“Allow”
“Deny”
“Not Set”
Teams/Groups can automatically inherit permission settings from parent Teams/Groups. Permissions Settings explicitly changed in the child teams/groups may override permissions inherited from parent Teams/Groups. Keep the following rules in mind:
When same user exists in more than one teams/groups, the following rules apply:


MatCal is a feature in Modern Requirement4DevOps used to perform mathematical and logical expressions on work items.
To manage the relationships between work item properties in a smarter way! It eliminates the manual efforts of doing the calculation outside the project environment and avoids risks of introducing incorrect calculation results to your projects.
Let’s look at a simple example here to illustrate a relationship between work item properties.
Business Value and Priority are properties of work item Feature. Normally, high Business Value leads to high Priority.
With the right configuration, MatCal could help you manage the relationship by automatically assigning Priority value based on the Business Value input.
Scenario 1: Automotive Safety Integrity Level (ASIL) in ISO 26262

Scenario 2: Risk rating is automatically assigned according to Severity score and Occurrence score

Scenario 3: Priority rating is automatically assigned according to Severity score and Likelihood score

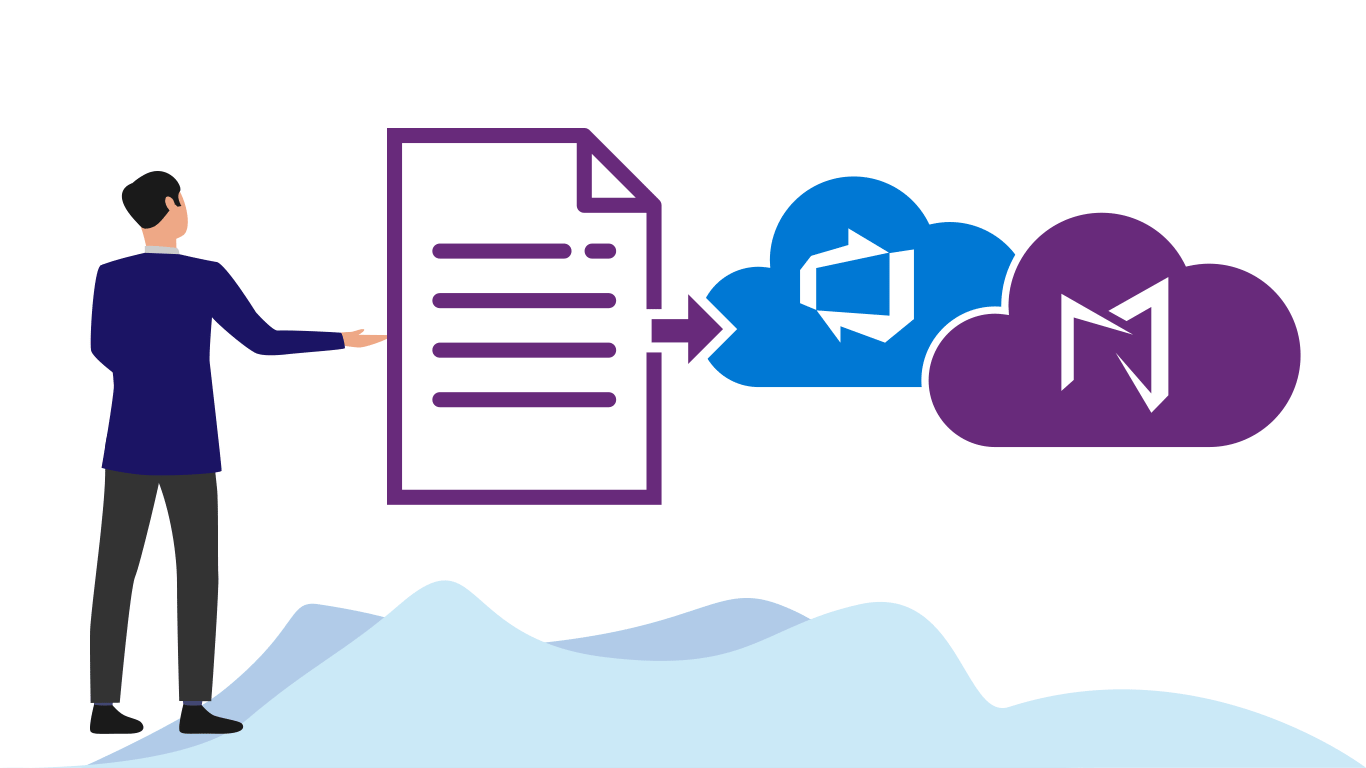

When moving to Azure DevOps, or when working offline away from your existing Azure DevOps project, you need a way to bring your newly created requirements into Azure DevOps.
Many teams face the issue of getting the requirements they have created in Excel, Word, and elsewhere into Azure DevOps. Luckily there are a few simple ways to do this without having to worry about adding a lengthy copy/paste session to your process!
In this article, we’ll cover a few different ways to import requirements.
One of these options is free, and some are features provided by adding Modern Requirements4DevOps to your Azure DevOps project.
The topics in this article are as follows:
Whether you have all or some of your existing requirements in Excel, or you are looking to export requirements from an in-house tool to a .csv file, there is a free way to import your requirements to your Azure DevOps project.
This is a free solution – provided you already have Azure DevOps and Excel.
The first step is to make sure you have the Microsoft Excel add-in called “Team tab.”
You can download this add-in directly from here:
(On the aforementioned page, Azure DevOps Office® Integration 2019 is listed under the Other Tools, Frameworks, and Redistributables section. )
If you clicked the link above, you will have the ability to turn on your Excel team tab.
When enabled, this extension allows you to connect an Excel sheet directly to a given project in your Azure DevOps Organization.
When you enable it you will have two primary functions available to you:
1) You will be able to publish requirements to your project from Excel
2) You will be able to pull requirements from your project to Excel
This means you can work on your requirements from either interface and connect the changes to your project. i.e. if you pull requirements into Excel and make changes, you can publish those changes backup to your requirements in your project.
After you have run the installer you downloaded you are ready to enable the extension.
Enabling the Team tab in Excel:
In this video, we cover how your team can use the Import capabilities provided by the Excel Team tab Add-in.
The second way to import requirements into your project is through Microsoft Word.
This feature is a “Preview Feature” available with any Enterprise Plus Modern Requirements4DevOps license. This means any user in your organization with an Enterprise Plus license will be be able to access and use the Word Import Feature.
If you aren’t currently using Modern Requirements4DevOps, you can try this Word Import Feature by trying Modern Requirements4DevOps today!
So how does Word Import work?
Warning: As a Preview Feature, you should expect that this might not be prettiest solution, and will typically require some coding knowledge. But not much – and if you can borrow a developer familiar with xml (or any other scripting language) for 20 minutes, you should be just fine.
Word Import works by having a well-formatted Word document which uses different Headings to represent the different Work Items / Requirements and their properties in your document.
For example, let’s take an example of a BRD you might already have in Word format.
You likely have your Introduction, Overview, Scope, and other context elements using the style of Heading 1.
You might then have your Epics, Features and User Stories in this document as well. Your document might look like this:
Heading 1 – Introduction
-> Paragraph – All of the text for the Introduction goes here…
Heading 1 – Overview
-> Paragraph – All of the text for the Overview goes here…
Heading 1 – Scope
-> Paragraph – All of the text for the Scope goes here…
Heading 1 – Requirements
-> Heading 2 – Name of Epic
–> Heading 3 – Name of Feature
—> Heading 4 – Name of User Story
—-> Paragraph – Description of the User Story above
Now, your document might be a little different but that’s okay. The principles you are about to learn are the same.
Word import requires a document (shown above) and a ruleset (explained below).
Typically an admin will create a ruleset that your team will use for importing documents, and it will only have to be done once. So if you have a document already created and your admin has created a ruleset you’re good to go.
If your admin needs to create a ruleset, read on.
Creating a ruleset is incredibly simple and is done by editing an XML file.
The XML file you create will determine how the Word Import tool parses your document for:
1) Which pieces of the document are work items?
2) Which pieces of the document are properties of a given work item?
If you are working through this in real-time, it might help to download this ruleset file as a starting point and watch the following video:
In this video, we cover how to use the sample ruleset file to import a simple requirements document. Please remember creating a ruleset is typically a one-time process.
Diagrams, Mockups, and Use Case models can be incredible tools for authoring and eliciting requirements.
This is why with Modern Requirements4DevOps, your team can easily build all of these visualizations directly from within your project. This allows you to benefit from a single-source of truth model where everything is built into your project.
But maybe you already have Diagrams and Mockups that you would like to add to your Azure DevOps project and connect to requirements. Is it possible to import these assets?
The answer is yes.
Both our Mockup tool and our Diagram tool will allow you to easily bring existing Mockups or Diagrams into your Azure DevOps project.
To do this, simply save your asset as a .png or .jpeg file from your chosen Mockup/Diagram tool.
You can then upload your created asset to either the Modern Requirements4DevOp Simulation tool (mockups) or Diagram tool (diagrams).
You might be thinking, but if we upload it as .png or .jpeg then how can we edit our Diagrams and Mockups? Well, you can’t. But there’s a reason you should do this even still.
If you want to connect a single Diagram to 25 requirements without using Modern Requirements, you will have to open all 25 requirements and connect them to each individual requirement.
When you update your Diagram in the future, you will have to reopen all 25 requirements and change the attachment.
With Modern Requirements4DevOps however, you are able to create a Diagram work item that you can link all of your necessary requirements directly to using the right panel. This means you will be able to have your Diagram in one place, and when that Diagram needs updating, you can easily add in your updated image, and connect your attachment to that single work item.
In this article we covered three distinct ways that you can import both requirements and their assets to your Azure DevOps project.
You can import requirements through Excel or Word, or import your existing Diagrams and Mockups.
If you are interested in using Modern Requirements4DevOps to support your requirements management process, consider giving our product a try here!


Welcome to Modern Requirements4DevOps 2019 Update 2! Many improvements and enhancements have been added in this release. The following is an annotated version of the release notes to help guide users through the update to Modern Requirements4DevOps.
A completely new tool has been added to Modern Requirements to assist you in your project traceability and management needs. The MR Artifact Tool!
The MR Artifact Tool is accessible from the context menu of any work item. This tool lists all Modern Requirements artifacts that the work item is associated with! Now users can now quickly access which Modern Requirements artifacts are utilizing the work item selected.
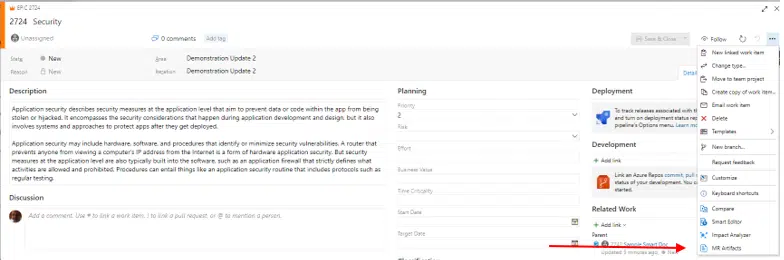
This tool currently can trace work items that are contained in Smart Docs, Reviews, and Baselines.

The Compare Tool, used for direct comparisons between work item revisions has, for lack of a better work, been revised!
RevisionIDs are now further demarcated by new properties. The new properties are Last Approved and Last reviewed. These properties will apply themselves to revisions of work items that have undergone review during their life cycle.

These properties will be displayed next to the RevisionID in the dropdown menu of the Compare Tool.

When using the Compare Tool, the tool will automatically populate a default revision into the dropdown menu. When a dropdown menu is opened, the Last Approved and Last Reviewed work items will be shown respectively at the top of the list. They will be followed by the remaining revisions shown in descending order (newest to oldest).
When the Compare Tool is invoked, the left dropdown menu will always display the relevant revision of the work item. When opened from the Backlog, this field will be populated with the latest revision. When launched from a Review, this field will default to the revision of the work item that was included in the review. If accessed from a Baseline, this field will display the revision of the work item as it was at the time the baseline was created.
The right dropdown is the compare revision field. If the work item has taken part in a review, this field will default to the Last Approved revision.

If an approved revision does not exist, this field will default to the Last Reviewed revision.

If the left dropdown defaults to the latest approved revision of a work item, the right dropdown will remain empty.
The Compare Tool can be accessed from a newly created work item. However, without any revisions the right dropdown will again be empty.

When invoking the Compare Tool from within the Compare Baseline tab, the tool functions differently. The comparison is no longer automatic as the user is manually comparing the work item between two baselines. The dropdowns within the tool will instead default to the revision of the work item included in each compared baseline.

While using the Compare Tool, the user can interact with either dropdown and make any comparison between revisions.
Smart Docs has increased in functionality with the addition of three new features…
Child work items created in Smart Docs can now automatically inherit properties of their parent!
Smart Docs’ Meta Template Designer now allows users to configure work items with inheritable fields. When creating a sub/child work item on-the-fly from a parent node, values from configured fields can be inherited from the parent. This rule is not applied when inserting existing work items.

Smart Editor has also introduced a new feature with read-only fields.

Individual fields can be defined as read-only within the process template. Smart Editor will also treat these fields as read-only.
Modern Requirements Stakeholder interaction with Smart Docs has further improved with the introduction of the option to open work item. Previously stakeholders could not open work items – now they can!

When enabled, Stakeholders invited to the project will be able to open items in Azure DevOps’ standard editor.

Stakeholders can access this feature from both the Document and Compare tabs of Smart Docs.
Additional enhancements have been made to the current features of the Smart Docs module.
The Meta Template Designer now gives users the ability to update saved Document Templates. Previously, this functionality only applied to meta templates; now document templates can also be updated!

This provides users with the ability to make on-the-fly changes to any of their document templates.
Functionality includes:
Changes made to Document Templates can be applied to all Smart Docs using the template. After changes are made, a user just needs to use the “Update all Templates” feature in the Smart Docs toolbar.

A major change has been made to the aesthetic form of Smart Docs.
Both text and image wrapping have been improved in Smart Docs as all included data will now properly be wrapped to the successive line.
This is a purely aesthetic change. However, this change should greatly improve the readability and the way an individual will visually consume the output document.
Smart Docs’ title, HTML fields, large images, and tables will all benefit from this improvement.
Some very functional additions have also been made to the Review Management module.
As a review initiator, you will now be able to Submit Comments without needing to be a reviewer – a review initiator is a reviewer by default.
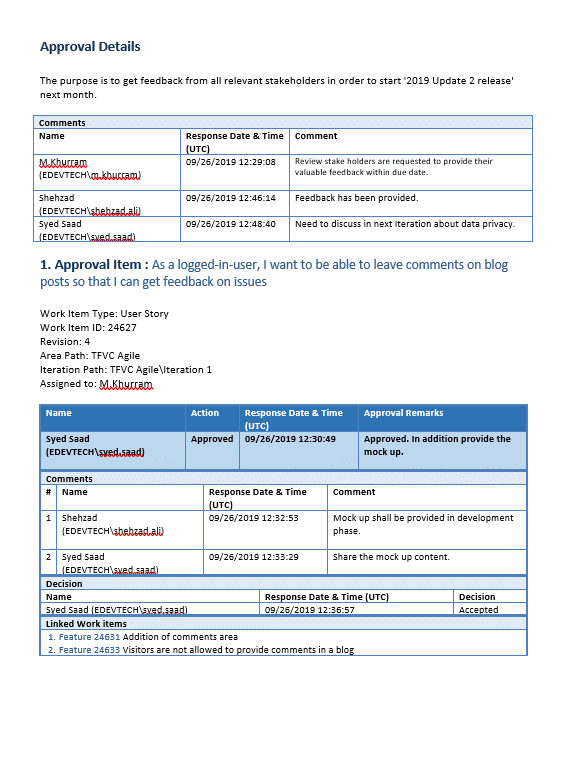
Two new types of Audit Reports have been added to the Review Management module.

Approval Audit Report:
Report includes complete details of approval actions applied to the work items in the review


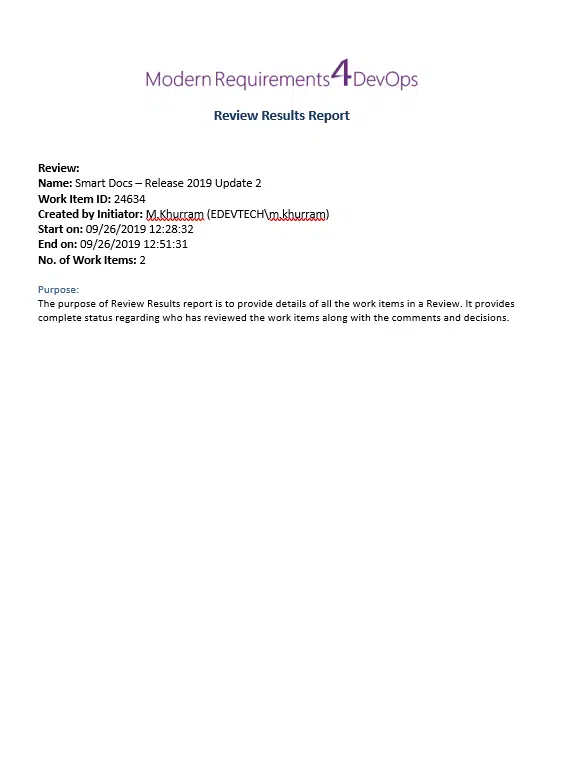
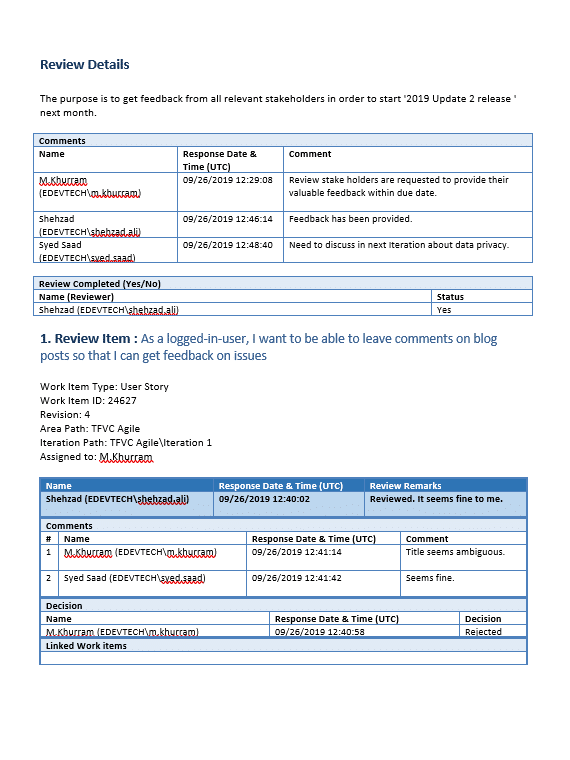
Review Results Report:
Report Includes the complete details of review actions applied to the work items in the review

It should be noted that the existing Review Audit Report will be retitled as Legacy Audit Report.
Users still have access to Legacy Audit Report option.
The Review Management module has received several enhancements to its core functionality.
The way Modern Requirements handles Review metadata has been completely overhauled. When creating a review, the corresponding metadata will now be saved in your repo (source control).
Review metadata was previously stored within the HTML field of a Feedback Request work item.

Update 2 has also brought changes to the operational process of Review Management.
The previous review creation process was slow and link heavy; three links were created for each work item included in a review.
In Update 2, when a review is created, links will no longer be created between the Feedback Requests and work items included in the review.
Additionally, a Feedback Response work item will no longer be created by the system when a user provides a review response (approval/submit review).
The new process is more efficient and link-free to mitigate Azure DevOps’ restriction of 1000 links/work item limit.
Additionally, automation has been improved when completing common actions within reviews.
When using the Link work item feature to link a work item to an approval or rejection, the link will be made directly to the work item the user is currently reviewing.

Comments provided in the Details tab will be automatically added to the Feedback Request work item along with the profile information of the comment poster.


Upon the completion of a review, a comment will be added to the Feedback Request work item along with the profile information of the participant.

When reviews have been closed, no further action can be taken for approval and commenting. This will prevent review stakeholders from being able to add additional comments or link work items to the closed review.
Changes have also been made to update the UI of the Review Request popup form.
The Baseline module has improved its capabilities with the addition of new features to improve trace and manage your work items.
When comparing Baselines, users can now configure which individual link types trigger a change indicator. Previously, users only had the option to disable the trigger or have it applied for all link types. This configuration can be found within the Admin Panel.

Difference Reports have been enhanced to only show fields that have been configured as trigger for change indicators. Previously, the Compare Tool UI and the Difference Reports were not in sync.
With the inclusion of tracking link type changes between baselines, Difference Reports will include the ability to report on link type changes.
The Copy/Reuse Baseline Tool has also received some boost in functionality.
The system will automatically copy the area/iteration path of the source project and set it to the copied work items if the identical values exist in the target project.

As seen In this example, as the work item is copied, the work item’s iteration path is copied from the source project and set in the target.

As with previous iterations of the Smart Report Tool, users can upload and apply Word templates to their reports. Update 2 introduces the ability to Inherit Word Styling when Smart Reports are exported to Microsoft Word and a Word template is applied.
From the template, Smart Reports will inherit styling for headings, font size, underlined or bold text, font color, indentation, and alignment.
This option can be found in the “Style Sheet” dropdown menu.

Improvements have also been made regarding how Modern Requirements data is handled.
Modern Requirements data will now automatically sync to Azure DevOps Server (TFS) source control for single-Sign on build deployments.
To use this capability, add a Collection-level user’s credentials to the General tab of the Modern Requirement4DevOps Admin Panel.

If credentials have not been provided, the user will be prompted with a notification message.
Modern Requirements data will sync with both GIT and Team Foundation Version Control.
Modern Requirements recognizes that our client’s projects will scale, and their requirements management software should scale with them.
Modern Requirements4DevOps throughput performance has been greatly optimized. Update 2 introduces the ability to support large sets of data in work item heavy modules. Large data support has been added to Review Management, Baseline, and Smart Report.
Reviews and Smart Reports can now be created with a maximum of 10,000 work items.
Users can now create Baselines that include up to 100,000 work items.
Additional improvements in throughput to features of Baseline include:
Copy work items
Difference Reports
Rollback work items
Completing operations using large sets of data can sometimes be time consuming. Modern Requirements recognizes that your time is valuable and has already implemented features to improve efficiency.
Time consuming operations no longer slow you down. These operations are now completed in the background and provide users the option of being notified by email when completed.
This feature has been integrated into the Review Management module and is available when conducting the Approve/Reject All feature on large sets of work items. The system will automatically identify when the operation will take more than one minute and notify the user.
Smart Report is also supported by this feature. If generating the Smart Report does not instantly occur, a background process will be initiated. Regarding Smart Report, notification email’s will contain links that enable the user to save their output report to Word or PDF.
Functionality and user experience are core elements in Modern Requirements design philosophy.
Several bugs were address and fixed with the release of Update 2. See a full list of bug fixes or read release notes here.

Eliciting, authoring, and managing non-functional requirements (NFR’s) can be a daunting and time-consuming task. Most people who read the previous sentence will likely agree.
NFR creation can be a difficult task and creating non-functional requirements that are both quantifiable and measurable is an issue we’ve seen many teams struggle with.
Building great non-functional requirements is however, worth the effort.
Non-functional requirements provide teams with a means to gauge the success of a project, process, or system. They allow your team to capture measurable ways with which you can discuss, analyze, and evaluate the different attributes of your project.
Because of the value NFR’s provide to a project, we often see teams engaging in long and complicated processes to create NFR’s that are barely meaningful or relevant at project end.
Today, we’re going to change that.
In this article we cover both the value of creating NFR’s, as well as show you how you can employ some simple tools and techniques to reduce the time required for quality NFR creation.
TABLE OF CONTENTS
Non-functional requirements provide your team with all of the success measures of a product, project, system, process, or application. When a good non-functional requirement is created, a team will be able to not only identify if a project is successful but will also be able to easily identify how far from success a project might be.
Great non-functional requirements can be instrumental to a project’s success in many different ways aside from being a success measure. NFR’s can help teams understand the overall goals of a project, help align the project’s outcome with business goals, and much more.
Suffice it to say that quality NFR’s can contribute greatly to project success, and the way we evaluate that success. But that doesn’t mean they are easy to manage, elicit, or author.
Let’s take a look at the primary technique teams use today to build better non-functional requirements faster.
When building non-functional requirements, teams implement templates in order to create these work items more quickly with greater consistency.
By definition, a template is anything that serves as a model which others can copy and reuse.
Typically, templates are created as a pre-set format for a document, file, or simply the format every NFR can be created using. Once implemented, the format provided by a template does not need to be recreated every time it is needed, and users can simply pull up a template and get started quickly.
This leads us to the most obvious benefits of using non-functional requirements templates.
Templates save time and increase consistency!
When teams begin building a repeatable process, they often turn to templates in order to remove the need to constantly recreate document or file formats. Instead, reusing the same pieces of a document, file, or structure as a template allows your team to reduce rework and capitalize on the benefits of greater consistency.
While time being saved and consistency being increased are great direct benefits that templates provide, there are many not so obvious indirect benefits that templates provide as well.
The largest indirect benefit from using templates is the ability to create a simple to follow, structured approach to building files, documents, and requirements.
By providing a templated structure, users who interact with a given file or document have an easier time identifying where to input each specific piece information, and what format that piece of information should adhere to.
This type of direction not only improves the accuracy of the content of being worked on, but also reduces the time required for NFR creation, document reviews, and requirement approvals. This is in part since supplying a template also increases standardization and use familiarity with the asset being created.
Templates create a two-fold level of simplicity in regard to NFR work items. Building the work item is simplified as data just needs to be input within the correct fields of the template. Additionally, the template presents information in a more consumable fashion once the work item is built.
As the process becomes simpler, it also becomes more approachable. This means templates also make NFR’s and their documentation easier to create for new, or less familiar, Business Analysts.
This discussion of templates, however, might have already started to give off a sense ambiguity.
Are we talking about employing templates for documents?
Are we talking about employing templates for NFR creation?
Are we talking about employing templates that outline the properties of an NFR?
Put simply, yes.
A non-functional requirements template could be used in any of these areas to bolster your non-functional requirements authoring, elicitation, and management.
An NFR template might be used to organize and manage NFRs, help a team with document creation, or even in the actual construction of NFR’s.
If you’re looking for a simple method to construct high quality NFR’s, check out our Two Simple Steps to Creating Non-functional Requirements article found here!
Whichever way your team uses templates to build NFR’s, you can rest assured that building non-functional requirements yields an incredible return and can be done faster and easier than ever before.
Requirements elicitation, or the gathering of requirements, has never been a simple process. It is however, something that many people encounter every day in the work place.
For example, if someone asks you to build or complete something you might ask some questions. What should this thing do (functional requirement), and how should this thing be in terms of security, usability, or accessibility (non-functional requirement).
A well-equipped business analysts (BA) will similarly ask questions that are designed to tease out the necessary functional and non-functional requirements of any project, process, or system. BA’s primarily use questions as their medium of engagement with Stakeholders. Through this type of close collaboration with Stakeholders, BAs create a forum that helps Stakeholders express what it is they want from their product.
During a conversation with a BA, a Stakeholder will express what features they want and what their product should do (functional requirements) as well as how they want the user experience to feel (non-functional requirements).
BA’s often employ several time-tested elicitation techniques when engaging with Stakeholders. During the elicitation process some of these techniques might include:
Each of these techniques have two things in common.
Let’s think about how questionnaires can benefit from becoming, or using, templates.
We know that to elicit the proper requirements, the proper questions must be asked.
This is where the knowledge of a veteran BA becomes a greater asset, as they have been through the elicitation process numerous times. They have the benefit of experience and may know better which questions to ask in relation to specific industries, products, or technologies.
This experience and knowledge can be easily captured with a non-functional requirement questionnaire template. Experienced BAs can compile well-thought-out question lists or question templates that will focus on specific functions (FRs) or system attributes (NFRs), and passively guide the team’s elicitation process even if they are not directly involved.
These questionnaire templates can then provide structure and consistency to the elicitation process, ensure the correct questions are being asked, and also reduce the likelihood of important questions being missed.
There are plenty of examples where templates can help teams benefit from the knowledge they already have within their team.
Let’s look at more examples of how templates are being used today in different elicitation and authoring tasks.
Many teams continue to implement non-functional requirement templates in the form of a table to author and house requirements.
The use of tables typically stems from the needs of users to organize and maintain their requirements in one place. Before the use of explicit Requirements Management tools, table were used to help define naming and numbering conventions, to help track and trace requirements, as well as help by providing fields for any number of properties.
Tables have historically worked well as templates as they are simple to organize and make it easy to manage the content within the table. Tables have traditionally held the added benefit of providing an approach to export the information from a table to other areas such as document creation.
What is that export approach? Copy and paste.
For teams that use tables as templates, the requirements typically get copy and pasted from a table and are then inserted into a document. Typically, the requirement is copy and pasted field by individual field into a template designed specifically for the document (another example of templating!).
But while tables used to be a robust solution for managing requirements that contain a variety of fields, they have some significant downfalls in today’s world of explicit RM tools.
Tables are often disconnected compilations of important information and can often be siloed off from other tools and processes. Often this results in tables becoming an extra step in your RM process, and extra asset that someone has to take ownership of to manage, update, and maintain.
But this doesn’t have to be the case.
With Microsoft’s Excel Team tab extension, teams can easily connect the tables they have used in the past with their Azure DevOps project. They can easily map every requirement field, property, and identifier to the Azure DevOps work item that gets created in their project.
But how does Azure DevOps help with NFR’s?
First, Azure DevOps is flexible.
Microsoft’s ALM platform allows you to easily add any types of work items your team needs to a project.
Non-functional requirements are just one of the work item types you can add to a project.
What is a “work item type”?
Work items are an ADO-based authoring template for the type of requirement they represent.
Some examples are functional requirements, transitional requirements, user stories, or even non-functional requirements. Whatever taxonomy your project requires, Azure DevOps will support it and each of the work items you create will have their own set of properties, states, and relationships which can be chosen and customized.
With a non-functional requirement, you can configure any fields or property that your team requires to help with the management of your project. As mentioned previously, mapping the requirements you already have in a table is simple with the Microsoft Teams tab Excel extension [provide link].
But what can you do with NFR’s once they are in Azure DevOps (ADO), and how does migrating the creation of NFR’s to ADO help your team?
Let’s look at the tools.
The creation of documents depends on an organization’s policies, processes, expectations, and requirements of the stakeholders, and can even be built to house your non-functional requirements.
Documents provide an easy way to create accountability for meeting the agreed upon requirements for a project. They afford a level of security for the stakeholders as documents can act as a checklist for agreed upon requirements, which can easily be cross-referenced to determine if stakeholders are getting what they paid for or if work was not completed.
Another major benefit of proper documentation is that requirements often evolve throughout a project’s lifecycle. A requirement might become more clearly defined later in its life, or it might simply evolve in a manner that yields a different expectation of your product.
Queue the addition of non-functional requirement documents to your process.
As requirements evolve, so too will the expectations for your project. This means the success indicators of your project, a.k.a. non-functional requirements, will have to be reviewed and changed.
Using our Smart Docs module of the Modern Requirements4DevOps suite, a user can easily construct a fully versionable requirements document directly from their Azure DevOps project. This means users can easily make, and track changes to requirements from a user-friendly document interface.
New requirements can also be easily created in your project from within a document’s interface, or you can choose to insert existing requirements directly into your document. This means you can easily drag/drop your non-functional requirements directly into an easily exportable document without leaving Azure DevOps and without a need for copy/paste.
Let’s extend the idea of importing your existing NFR’s that live in tables into Azure DevOps, and then cover how you can turn these NFR’s into documents using Modern Requirements.
First you import into Azure DevOps your non-functional requirements from your table using the Microsoft Team tab extension for Excel. Then you simply query all non-functional requirements and drag/drop them into your document.
It’s that simple.
But let’s say you now want to add structure to a document so that non-functional requirements can only be added in specific areas of the document.
We support that too!
There is a template designer built directly within the Smart Docs module, that helps you dictate what work item types are allowed where in your documents. This means anyone building a document, NFR-based or otherwise, can easily adhere to the structure your template provides and create consistent documentation.
Reusable document templates are an asset to any team. In fact, you likely already use these today.
A reusable document template provides your team with an already populated document that lays out what a document should look like. This type of template helps authors easily figure out where specific information should go, and what contextual elements should make up the document created.
Think about that Word document you already have on your Desktop. It likely already has a placeholder for things like Introductions, Scope, Goals, as well as where you should put specific requirements. This is a reusable document template.
The main reason document templates are used is to increase efficiency and cut down on rework within the document manufacturing process.
Luckily for teams who currently use multiple applications for their RM and documenting processes, there is a solution that can be used for both. Modern Requirements with Azure DevOps.
The reusable document templates you create with Modern Requirements + Azure DevOps, can be configured to hold any field or property you need to show within your document. You can save any document as a reusable document template, which can automatically populate fields such as Introduction, Goals, NFR Requirements, and more.
You can build documents in just a few clicks that can help your team get started quickly when building any sort of documentation! This means your team can benefit not only from your documents and requirements living in the same space, but also increase efficiency, create structure, increase accuracy, and create consistency within your document creation process.
Non-functional requirements are much more abstract than their functional counterparts.
This makes them harder to draw out as you’re not simply pointing at the system and telling it what to do, instead you are asking questions about how the system should be and using NFR’s to represent that.
As discussed earlier in this article building strong NFRs are based on asking the right questions.
So, what if you are new to requirements management or have little experience? Where do you start? MR4DevOps addresses this situation with our comprehensive FAQ module.
The FAQ module is a series of focused question templates directed at specific system attributes which are categorized by the three primary aspects of the product; operational, revisional, and transitional.
Additionally, the FAQ module contains question templates for the elicitation of NFR for compliance and risk based medical device development. As users answer the questions from the template, they automatically create a non-functional requirement directly into the Backlog.
The questionnaire templates included in the FAQ module are beneficial to BAs with all levels of experience. Veteran BAs can modify existing lists by adding their own questions or create their own question list from scratch. By doing so, BA’s are able to capture their experience and knowledge of the elicitation process and pass it along to other members of the team.
MR4DevOps provides a great solution to one of ADO’s major oversights; the lack of an integrated reporting tool.
When using tools like FAQ, or Smart Docs, to author and manage your non-functional requirements, Smart Report will be the tool that you use to output your requirements. Smart Report allows you to output requirements as PDF, HTML, or Microsoft Word where you can apply your own predesigned header/footer and even Table of Contents or title page as well.
Looking to make a report for your project’s NFRs?
The Smart Report tool is equipped with an advanced report template designer. The template designer allows you to build and save custom report templates based on work item type. This enables you to build a unique NFR template that shows whichever properties and fields of an NFR that you wish to include in the report; this information is pulled directly from the work item!
This template can be applied to any group of selected or queried NFRs and used whenever you are required by your reporting process. The benefit of the reporting tool is it empowers you with the ability to create instant, structured, and consistent requirements reports.
Modern Requirements4DevOps offers several solutions to assist with the elicitation, authoring, and management of non-functional requirements.
Would you like to have a closer look into designing templates with Modern Requirements or interested in finding out what other tools can improve your process? Book a product demonstration today!
Experience for yourself how our Modern Requirements toolbox can empower Microsoft’s industry leading Azure DevOps into a single application requirements management solution.
Head over to www.modernrequirements.com to learn more about our company and products.

50% Reduction in UAT efforts

80% time saving on creating Trace Analysis

Significant reduction in approval delays

50% requirements productivity improvement

10-fold reduction in development rework
40% reduction in compliance reporting efforts
End-to-end requirements management in Azure DevOps.

AI-powered assistance for DevOps workflows.

Autonomous AI agents for DevOps execution.

Real-time data sync across tools and systems.